background image

L

This unit is compatible with Caller ID. You must subscribe to the appropriate service of your 
service provider/telephone company.

L

Designed to be used in Czech, Hungary, Slovakia and other Eastern Europe according to the 
location setting feature. The default setting is other Eastern Europe. To change the location 
setting, see page 50 (f
eature #114).

Operating Instructions

Multi-Function Laser Fax

Model No.


KX-FLM663HX
KX-FLM673HX

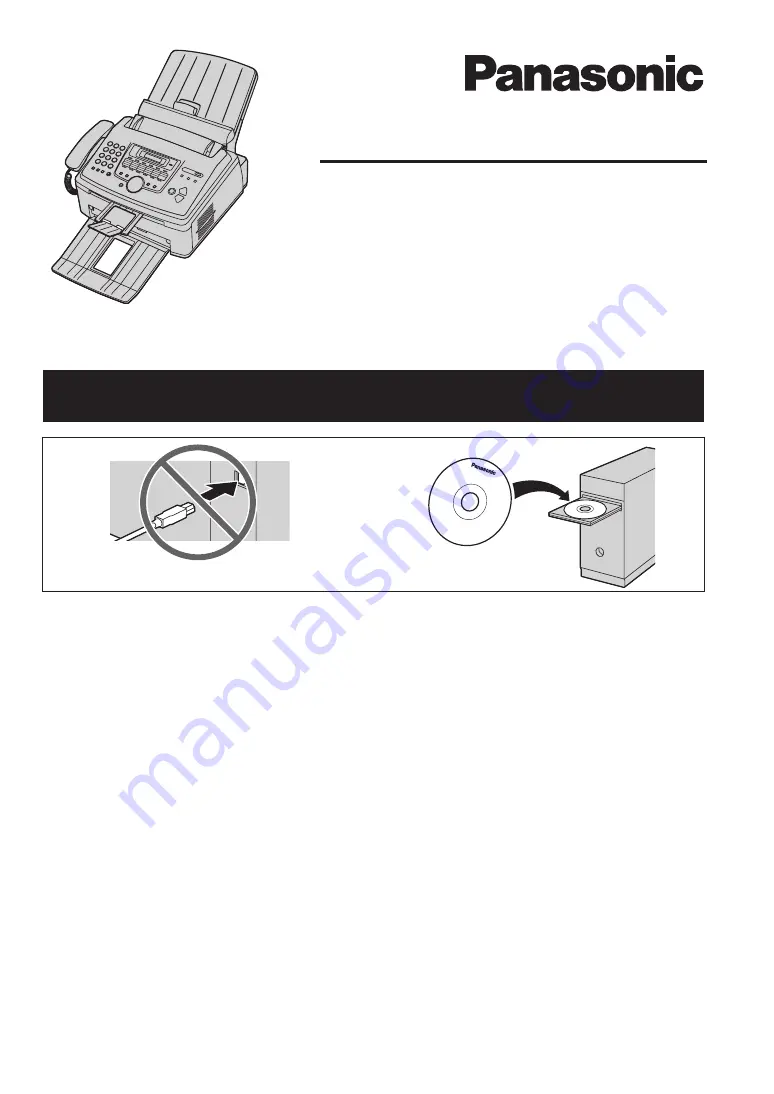
Do NOT connect the unit and a computer with USB cable until prompted by the Multi-Function 
Station (CD-ROM).

1

2

Summary of Contents for KX-FLM663HX

Page 1: ...ry Slovakia and other Eastern Europe according to the location setting feature The default setting is other Eastern Europe To change the location setting see page 50 feature 114 Operating Instructions Multi Function Laser Fax Model No KX FLM663HX KX FLM673HX Do NOT connect the unit and a computer with USB cable until prompted by the Multi Function Station CD ROM 1 2 ...

Page 2: ...owerPoint are either registered trademarks or trademarks of Microsoft Corporation in the United States and or other countries L Pentium is a trademark of Intel Corporation in the U S and other countries L Screen shots reprinted with permission from Microsoft Corporation L Adobe and Reader are either registered trademarks or trademarks of Adobe Systems Incorporated in the United States and or other...

Page 3: ...OFF immediately after printing Leave the power turned ON for a minimum of 30 minutes after printing Location L To avoid malfunction do not position the unit near appliances such as TVs or speakers which generate an intense magnetic field Static electricity L To prevent static electricity damage to the interface connectors or other electrical components inside the unit touch a grounded metal surfac...

Page 4: ...nalties of fines and or imprisonment may be imposed on those found guilty The following are examples of items that may be illegal to copy in your country Currency Bank notes and checks Bank and government bonds and securities Passports and identification cards Copyright material or trademarks without the consent of the owner Postage stamps and other negotiable instruments This list is not inclusiv...

Page 5: ...aking a phone call using one touch dial feature or navigator directory 36 7 Fax Sending Faxes 7 1 Sending a fax manually 38 7 2 Sending a fax using one touch dial feature and navigator directory 39 7 3 Broadcast transmission 40 7 4 Sending a computer document as a fax message from your computer 41 Receiving Faxes 7 5 Selecting the way to use your fax machine 41 7 6 Receiving a fax automatically Au...

Page 6: ...2 1 Recording paper jam 74 12 2 Document jams sending 77 13 Cleaning Cleaning 13 1 Cleaning the inside of the unit 78 14 General Information Printed Reports 14 1 Reference lists and reports 80 Specifications 14 2 Specifications 80 Copyrights 14 3 Information of copyrights and licences KX FLM673 only 83 15 Index 15 1 Index 90 ...

Page 7: ...e the original carton and packing materials for future shipping and transportation of the unit 1 Starter toner cartridge 1 2 Drum unit 3 Operating instructions English only 4 Quick reference guide Czech Hungarian and Slovak only 5 Important information guide English only 6 Quick installation guide 7 Power cord 8 Telephone line cord 9 Handset j Handset cord k Paper stacker l Paper tray m Paper tray...

Page 8: ...ies page 40 D Manual broad L To send a document to multiple parties by storing using the dial keypad page 40 E Caller ID L To use Caller ID features page 47 F Fax L To switch to the fax mode page 18 38 G Copy L To switch to the copy mode page 18 33 H Auto Answer L To turn the auto answer setting ON OFF page 41 I Scan L To switch to the scan mode page 18 30 J Redial Pause L To redial the last numbe...

Page 9: ...a contrast page 33 38 T Enhanced Copy L To make a collated copy page 34 L To enlarge or reduce a document page 34 L To make N in 1 copy page 35 U Lower L To select stations 12 22 for the one touch dial feature page 36 39 V Set L To store a setting during programming W Start L To copy a document page 33 L To scan a document page 30 L To send or receive a fax page 38 43 X Stop L To stop an operation...

Page 10: ...the green drum surface Do not place the drum unit near dust or dirt or in a high humidity area Do not expose the drum unit to direct sunlight L We cannot be responsible for any damage to the unit or degradation of print quality which may occur from the use of a non Panasonic toner cartridge and drum unit L Do not leave the toner cartridge out of the protection bag for a long time It will decrease ...

Page 11: ...n 5 Turn the two levers 4 on the toner cartridge firmly 6 Make sure that the triangles 5 match to install the toner cartridge correctly 7 Lift open the front cover 6 holding OPEN 7 L If the lower glass 8 is dirty clean it with a soft and dry cloth 8 Install the drum and toner unit 9 by holding the tabs L Do not touch the transfer roller j 2 3 4 5 6 7 8 j 9 ...

Page 12: ...age 4 and the inside of the unit page 78 when replacing the toner cartridge and or drum unit Note L To ensure that the unit operates properly we recommend the use of Panasonic toner cartridge Model No KX FA83E KX FA83X and drum unit Model No KX FA84E KX FA84X See page 8 for accessory information Toner save feature If you want to reduce toner consumption set the toner save setting to ON feature 482...

Page 13: ...er with the pegs 2 on the bottom of the unit then insert the two tabs of the paper stacker into the slots on the unit 3 Note L Do not place the unit in an area where the paper stacker may be easily bumped into L Document and recording paper will be ejected from the front of the unit Do not place anything in front of the unit L The paper stacker can hold up to approximately 100 sheets of printed pa...

Page 14: ...ation 14 1 8 Document stacker Pull the document stacker 1 forward gently until it clicks into place then press the centre part of the document stacker 2 to open the extender 3 1 9 Handset cord Connect the handset cord 1 2 1 3 1 ...

Page 15: ... you want to use letter or legal size paper change the setting feature 380 on page 51 1 Before inserting a stack of paper fan the paper to prevent paper jams 2 Pull the tension plate forward 1 3 Remove the paper tray cover 2 4 Pinch the right side of the recording paper guides 3 then slide it open to its full width 5 Insert the paper print side down 4 L The paper should not be over the tabs 5 L If...

Page 16: ...1 Introduction and Installation 16 6 Adjust the width to the size of the recording paper by sliding the right side of the guides 6 7 Attach the paper tray cover 7 8 Push the tension plate back 8 6 7 8 ...

Page 17: ...phone line cord L Connect to a single telephone line jack 3 EXT jack L You can connect an answering machine or an extension telephone Remove the protection sheet if attached 4 Answering machine not supplied 5 LAN interface connector 1 L Remove the protection sheet if attached 6 Network router Network hub not supplied 1 L Also connect networked computers 7 To the internet 1 8 LAN cable not supplied...

Page 18: ...2 3 Selecting the operation mode Fax Copy Scan You can select the desired mode by pressing one of the following buttons Fax Select this mode when using the unit as a fax machine page 38 Copy Select this mode when using the unit as a copier page 33 Scan Select this mode when using the unit as a scanner page 30 Note L The default operation mode is the fax mode L You can change the default operation ...

Page 19: ...orn paper Paper with a coated surface Paper with a faint image Paper with printing on the opposite side that can be seen through the other side such as newsprint L To set a document with a width of less than 210 mm we recommend using a copy machine to copy the original document onto A4 or letter size paper then setting the copied document L Do not set documents that do not satisfy the requirements...

Page 20: ...the volume Important L Before adjusting the volume set the operation mode to fax mode If the Fax light is OFF turn it ON by pressing Fax Ringer volume While the unit is idle press V or L The ringer volume can only be adjusted if there are no documents in the document entrance Confirm that there are no documents in the entrance To turn the ringer OFF Press V repeatedly to display RINGER OFF OK i Se...

Page 21: ...ng to your unit s date and time setting L After setting the date and time if the unit is in the copy mode change it to the fax mode by pressing Fax You can check your unit s date and time setting on the display To correct a mistake Press or to move the cursor to the incorrect number and make the correction 2 8 Your logo You can program your logo name company name etc so that it appears on the top ...

Page 22: ...ator manages the network with a DHCP Dynamic Host Configuration Protocol server it will automatically assign an IP Internet Protocol address subnet mask and default gateway to the unit 1 After connecting the LAN cable to the unit and the computer connect the power cord L The IP address subnet mask and default gateway will be set automatically 2 Install Multi Function Station on the computer that y...

Page 23: ...ments and converting an image into text with Readiris OCR software Scanning from other applications for Microsoft Windows that support TWAIN scanning Storing editing or erasing items in directories using your computer Programming the features using your computer Sending receiving fax documents using your computer To use Multi Function Station on your computer the following are required Operating S...

Page 24: ...tructions L Readiris OCR software page 31 and Device Monitor page 62 will also be installed 5 The Connect Type dialogue box appears For USB connection 1 Connect directly with a USB cable i Next L The Connect Device dialogue box will appear 2 Connect the unit and a computer with USB cable 1 then click Next The pictured model is KX FLM673 L If the unit is connected to your computer the model name wi...

Page 25: ...y i Modify Utilities Then follow the on screen instructions To uninstall the software For Windows 2000 Windows XP and Windows Vista users you must be logged in as an administrator in order to uninstall Multi Function Station Start i All Programs or Programs i Panasonic i the unit s name i Uninstall Then follow the on screen instructions 2 12 Starting Multi Function Station Start i All Programs or ...

Page 26: ... name that will be displayed on the unit Scan Save to To select the folder where the scanned image will be saved Viewer File E Mail OCR Custom To change scanning settings for Multi Function scan application Note L Assign a unique name for the PC name to avoid overlapping or the scanned image may be sent to an undesired computer To select the default E mail software The default E mail software is u...

Page 27: ...ll start printing Note L To stop printing from the unit see page 63 L To load paper see page 15 28 L For details about the paper specifications see page 81 L If a printing error occurs the Device Monitor page 62 will start automatically and display the error information Setting the printer properties You can change the printer setting in step 3 We recommend that you test paper especially special s...

Page 28: ...abels have been removed Labels that do not completely cover the backing sheet as follows To print on envelopes Use envelopes designed for laser printing We recommend the following High quality envelopes of 90 g m2 paper Envelopes that have thin sharply creased leading edges Envelopes that have diagonal seams and Envelopes with a moisture content of 4 to 6 by weight L You can load 10 envelope of 90...

Page 29: ...pes with clasps snaps or tie strings L Envelopes with transparent windows L Envelopes that use encapsulated types of adhesive that do not require moistening but rely on pressure to seal them Side seam construction Peel off strip Multiple flaps Twisted Curled Bent edged Waved Dog eared Self adhesive Clasp Transparent window ...

Page 30: ...r when you select PDF as a file format the software that is associated to open PDF file will start Note L To stop scanning see page 63 L You can save the images in TIFF JPEG BMP or PDF formats 4 1 2 Scan to save as a file 1 Set the original page 19 2 Scan 3 Press V or repeatedly to select FILE i Set 4 For USB connection Press V or repeatedly to select USB HOST i Set For LAN connection KX FLM673 on...

Page 31: ...ation Using dial keypad Press Set then enter the e mail address using the dial keypad page 61 6 Set 7 If necessary change the scanning settings Press press V or repeatedly to select the desired setting i Set i Start Note L If you select black white for the scan type you can save the images in TIFF or PDF formats If you select greyscale for the scan type you can save the images in JPEG or PDF forma...

Page 32: ...cument again and click Scan L The scanned image will be displayed in the Multi Function Viewer window after scanning L To save the scanned image select Save As from the File menu L To cancel scanning while the document is being scanned click Cancel Note L You can display images in applications that support TIFF JPEG PCX DCX and BMP formats L You can save images in TIFF JPEG PCX DCX BMP or PDF form...

Page 33: ... feature 463 on page 51 and the timer before returning to the default operation mode feature 464 on page 51 L If the Auto Answer light is ON the unit can receive faxes automatically even when in the copy mode To select the resolution 1 Press Resolution repeatedly TEXT PHOTO For both text and photographs TEXT For text only PHOTO For photographs shaded drawings etc 2 Set Note L You can change the de...

Page 34: ...ure 468 on page 56 L The unit will only enlarge the centre of the upper part of the document To make an enlarged copy of the bottom of the document turn the document around and then make a copy Example 150 enlarged copy Example 70 reduced copy 5 2 2 Collate copy The unit can collate multiple copies in the same order as the original document pages 1 Set the original page 19 2 Enhanced Copy 3 Press ...

Page 35: ...anced Copy 3 Press or repeatedly to select N in 1 i Set 4 Press V or repeatedly to select the number of original documents from 2 in 1 4 in 1 or 8 in 1 i Set 5 Press V or repeatedly to select the layout from PORTRAIT or LANDSCAPE i Set 6 If necessary enter the number of copies up to 99 i Start 7 After you finish copying press Stop to reset this feature Note L You can save the previous N in 1 setti...

Page 36: ...er the telephone number up to 32 digits i Set L To program other items repeat steps 2 to 3 4 Menu Note L A hyphen or a space entered in a telephone number counts as 2 digits 6 1 3 Editing a stored item 1 Directory 2 Press V or repeatedly to display the desired item i Menu i 3 Edit the name if necessary i Set 4 Edit the telephone number if necessary i Set 6 1 4 Erasing a stored item 1 Directory 2 P...

Page 37: ...ctory 2 Press V or to initiate the navigator directory 3 Press 5 repeatedly to display any name with the initial L see page 61 for character entry L To search for symbols press 4 Press V or repeatedly to display LISA L To stop the search press Stop L To dial the displayed party press Monitor or lift the handset ...

Page 38: ...t Note L You can hold the previous contrast setting feature 462 on page 51 To redial the last number Redial i Start L If the line is busy the unit will automatically redial the number 2 or more times Note L To stop sending see page 63 To send more than 20 pages at a time Insert the first 20 pages of the document Add the other pages up to 20 at a time on top of the previously inserted pages while t...

Page 39: ... and telephone numbers into one touch dial feature and navigator directory page 36 L Make sure that the Fax light is ON 1 Set the original page 19 2 If necessary change to the desired resolution page 38 and the desired contrast page 38 3 Enter the fax number Using stations 1 11 Press the desired station key Using stations 12 22 Press Lower then press the desired station key Using navigator directo...

Page 40: ...peat this step up to 20 items L If you have programmed the wrong item press Stop to erase the item 5 Set L To program another broadcast key repeat steps 2 to 5 6 Stop 7 3 2 Adding a new item into the broadcast memory 1 Directory 2 Press V or repeatedly to display the desired broadcast memory BROADCAST1 BROADCAST2 or MANUAL BROAD i Menu i 3 Press V or repeatedly to display the desired item you want...

Page 41: ...be cancelled L For details see the help file by selecting p from Multi Function Station L Click Select to change the active unit Receiving Faxes 7 5 Selecting the way to use your fax machine Depending on your situation select the way you prefer to use your fax machine Use only as a fax FAX ONLY mode Use mostly as a telephone TEL mode Use as a telephone and or fax TEL FAX mode Use with answering ma...

Page 42: ...tomatically without ringing 7 5 4 Use with answering machine Your situation You want to use the unit with an answering machine Setup Connect an external telephone answering machine and set the ring count of the answering machine to less than 4 L Set the ring count in FAX ONLY mode of the unit to more than 4 if you use with auto answer ON How to receive calls When receiving phone calls the answerin...

Page 43: ...of the extension telephone 2 When document reception is required a fax calling tone slow beep is heard or no sound is heard press 9 default fax activation code firmly 3 Replace the handset Note L To stop receiving see page 63 L To receive fax documents using the extension telephone make sure remote fax activation is turned ON feature 434 on page 55 beforehand The default setting is ON 7 7 2 Activa...

Page 44: ...cted 7 8 Using the unit with an answering machine 7 8 1 Setting up the unit and an answering machine 1 Connect the answering machine 1 L Answering machine is not supplied L Remove the protection sheet 2 if attached page 17 2 Set the number of rings on the answering machine to 4 rings or less L This will allow the answering machine to answer the call first 3 Record a greeting message on the answeri...

Page 45: ...o display POLLING i Set 2 Dial the fax number i Start 7 10 Junk fax prohibitor preventing fax reception from undesired callers If you subscribe to Caller ID service page 47 this feature prevents fax reception from calls that do not show caller information Additionally the unit will not accept faxes originating from numbers that match the ones on a programmable junk fax prohibitor list Important L ...

Page 46: ...ing ON page 42 2 Start Multi Function Station i PC FAX 3 When a fax call is received your computer will receive a document through the unit Note L You can view print or transfer the received document using your computer Viewing a received document 1 Select PC FAX from Multi Function Station 2 Select Received Log in Communication Log 3 Click the item you want to view 4 Click File in the menu bar th...

Page 47: ...ot be received properly Consult your PBX supplier L If the unit cannot receive caller information the following will be displayed OUT OF AREA The caller dialled from an area which does not provide Caller ID service PRIVATE CALLER The caller requested not to send caller information LONG DISTANCE The caller made a long distance call To confirm caller information by printing the Caller ID list To pri...

Page 48: ...ller information 8 5 1 Storing in the one touch dial feature and navigator directory 1 Caller ID 2 Press V or repeatedly to display the desired item 3 Menu 4 Select the station key or navigator directory For stations 1 3 1 Press the desired station key 2 Press V or repeatedly to select DIAL MODE i Set i Set For stations 4 11 Press the station key i Set For stations 12 22 Press Lower then press the...

Page 49: ...on Station i Utilities i Embedded Web L You can also access the unit by entering its IP address on the web browser 2 Select the desired category from the menu bar Device Configuration features of the unit Network Configuration features of the network 3 Type root as the user name then enter the password feature 155 on page 51 i OK 4 Select the desired feature tab at the top of the right frame 5 Cha...

Page 50: ... select the desired language i Set i Menu Setting the location where you use 1 1 4 This setting must match your location L The language setting is also available feature 110 on page 50 1 OTHER E E default To use in other Eastern Europe 2 CZECH To use in Czech 3 SLOVAKIA To use in Slovakia 4 HUNGARY To use in Hungary Setting the dialling mode 1 2 0 1 PULSE 2 TONE default See page 18 for details Set...

Page 51: ... unit will not print the Caller ID list but will keep records of the information for the last 30 callers 1 ON The unit will print the Caller ID list automatically after every 30 new calls page 47 Setting the recording paper size 3 8 0 1 LETTER Letter size paper 2 A4 default A4 size paper 3 LEGAL Legal size paper Holding the previous contrast setting 4 6 2 0 DISABLED default Deactivates this featur...

Page 52: ...res 52 Setting toner save feature 4 8 2 0 OFF default Deactivates this feature 1 ON The toner cartridge will last longer Note L This feature may lower the print quality by reducing toner consumption Feature Code Selection ...

Page 53: ...l keep a record of the last 30 fax transmissions and receptions 1 ON default The unit will print a journal report automatically after every 30 new fax transmissions and receptions page 39 Changing the receiving mode in the manual answer setting 4 0 4 1 TEL default Telephone mode page 43 2 TEL FAX Telephone Fax mode page 43 Sending documents overseas 4 1 1 If you cannot send a fax overseas even if ...

Page 54: ... will then send the data at the specified time You cannot use this feature for another fax transmission until the former sending is completed Note L To cancel after programming press Stop while the unit is idle and then press Set Setting the Error Correction Mode ECM 4 1 3 This feature is available when the sending receiving fax machines are ECM compatible 0 OFF Deactivates this feature 1 ON defau...

Page 55: ... make sure the unit is supplied with enough paper to print the stored document Setting friendly reception 4 3 8 To receive a fax automatically when you answer a call and hear a fax calling tone slow beep 0 OFF You have to press Start for fax reception 1 ON default You do not have to press Start for fax reception Receiving a fax into the computer 4 4 2 If you wish to receive a fax into the computer...

Page 56: ...c Holding the previous N in 1 setting 4 6 7 0 DISABLED default Deactivates this feature 1 ENABLED The unit will hold the previous setting Holding the previous zoom setting 4 6 8 0 DISABLED default Deactivates this feature 1 ENABLED The unit will hold the previous setting Holding the previous collate setting 4 6 9 0 DISABLED default Deactivates this feature 1 ENABLED The unit will hold the previous...

Page 57: ...erver KX FLM673 LAN connection only This feature can be programmed only through the web browser interface page 60 Registering the scan to e mail destinations via e mail server KX FLM673 LAN connection only L This feature can be programmed only through the web browser interface When you send scanned files via the e mail server you can register e mail destinations up to 30 destinations for the unit ...

Page 58: ... server of the network on the LAN using the dial keypad i Set i Menu Setting the secondary DNS server for the LAN connection 5 0 5 This feature is available when feature 500 is deactivated 1 Menu i 5 0 5 i Set 2 Enter the secondary DNS server of the network on the LAN using the dial keypad i Set i Menu Setting the machine name 5 0 7 1 Menu i 5 0 7 i Set 2 Enter the name of the unit to recognize on...

Page 59: ...9 Programmable Features 59 Setting HTTPD for the LAN connection 5 3 4 0 DISABLED Denies access to the web browser 1 ENABLED default Allows access to the web browser Feature Code Selection ...

Page 60: ...age 59 Feature Tab Selection Setting the location where you use this unit LAN FEATURE Enter the location information of the unit SMTP setting for scan to e mail via e mail server E MAIL FEATURE Enter the SMTP server information to send scanned image from the unit via e mail server Consult your service provider or network administrator for details Setting the error notify feature ERROR NOTIFY ENABL...

Page 61: ...t characters using V or Instead of pressing the dial keys you can select characters using V or 1 Press V repeatedly to display the desired character Characters will be displayed in the following order 1 Uppercase letters 2 Number 3 Symbol 4 Lowercase letters L If you press the order will be reversed 2 Press to insert the displayed character 3 Return to step 1 to enter the next character Keypad Cha...

Page 62: ...ction Station 10 2 2 Using Device Monitor You can confirm the setting information and current status of the unit from your computer 1 Start Multi Function Station 2 Utilities i Device Monitor L The Device Monitor window will appear 3 Confirm the status of the unit Status Current status of the unit Note L Additional information toner and recording paper status unit information etc will be displayed...

Page 63: ...p 2 2 To cancel printing Press Stop repeatedly to display STOP PRINTING To cancel scanning Press Stop repeatedly to display STOP SCANNING To cancel copying Press Stop repeatedly to display STOP COPYING To cancel sending or receiving faxes Press Stop repeatedly to display STOP FAX To cancel broadcast transmission Press Stop repeatedly to display BROAD CANCELLED To cancel fax redialling Press Stop r...

Page 64: ... FAX PROH REJECT L The junk fax prohibitor feature of this unit rejected fax reception MEMORY FULL L The memory is full of received documents due to a lack of recording paper or a recording paper jam Install paper page 15 or remove the jammed paper page 74 L If feature 442 is set to ALWAYS page 55 check the connection between the computer and the unit NO DOCUMENT FAILED PICKUP L The document was n...

Page 65: ...KEEP COPYING L Copying has stopped due to a lack of recording paper or a recording paper jam See the other displayed message instructions to continue copying LOW TEMP L The inside of the unit is extremely cold and cannot be operated Use the unit in a warmer area While the unit cannot be operated the received documents are temporarily stored into the memory and will be printed out automatically whe...

Page 66: ... L The memory is full of received documents due to a lack of recording paper or a recording paper jam Install paper page 15 or remove the jammed paper page 74 L If feature 442 is set to ALWAYS page 55 check the connection between the computer and the unit TONER EMPTY b CHANGE SUPPLIES L The toner s service life is finished Replace the toner cartridge immediately TONER LOW b CHANGE SUPPLIES L The t...

Page 67: ...all it L Check that your computer has enough memory and hard disk space If your computer warns that there is insufficient memory close other applications If there is not enough space on the hard disk delete unnecessary files L Uninstall Multi Function Station once and re install it I cannot install or uninstall Multi Function Station L Some of the files needed to install or uninstall Multi Functio...

Page 68: ...age 78 Please do not insert a document before correction fluid has dried completely Coloured text is printed in black instead of greyscale when printing from Microsoft PowerPoint or other applications L Select Colour or remove the check next to Greyscale in the print dialogue so that coloured text will be printed in greyscale Problem Cause Solution I cannot scan L When scanning at a high resolutio...

Page 69: ...ge the contrast page 33 and make a lighter copy of the document using TEXT resolution page 33 Problem Cause Solution I cannot send documents L The telephone line cord is connected to the EXT jack on the unit Connect to the LINE jack page 17 L The other party s fax machine is busy or has run out of recording paper Try again L The other party s machine is not a fax machine Check with the other party...

Page 70: ...er or a recording paper jam Install paper page 15 or remove the jammed paper page 74 L If feature 442 is set to ALWAYS page 55 check the connection between the computer and the unit L The unit is not in FAX ONLY mode Press Auto Answer repeatedly to turn ON the Auto Answer light I cannot select the desired receiving mode L If you want to set FAX ONLY mode press Auto Answer repeatedly to turn ON the...

Page 71: ...nasonic i the unit s name i IP Address Checker L The IP address for the unit will be detected Note L If the IP address cannot be detected enter it manually feature 501 on page 58 The IP address of the computer and the unit must be in the same local IP address class as shown below Set the IP address in the range of the number specified in the class corresponding to your local network scale Class Su...

Page 72: ...its Make sure the network is configured correctly Consult your network administrator The Windows Security Alert dialogue box appears and asks if I want to block PCCMFLPD and I cannot operate the following functions after installing the Microsoft Windows XP Service Pack 2 PC printing Scanning Remote Control PC FAX Device Monitor L Click Keep Blocking and run the Windows Firewall Setting Tool to all...

Page 73: ...ear 2 Windows Firewall L The Windows Firewall dialogue box will appear 3 Change settings L The User Account Control dialogue box will appear 4 Continue 5 Click the Exceptions tab 6 Confirm that Panasonic Trap Monitor Service PCMFSMLM and PCCMFLPD are displayed and checked on the Program or port list 11 3 10 Notice for KX MB200 KX MB700 KX FLB880 series users If you have already installed KX MB200 ...

Page 74: ...ove the jammed paper 4 carefully by pulling it toward you L Do not touch the transfer roller 5 3 Close the front cover 6 by pushing down on both sides until locked 12 1 2 When the recording paper has jammed near the recording paper exit 1 Lift open the front cover 1 holding OPEN 2 2 Remove the paper tray cover 4 Caution The fuser unit 3 gets hot Do not touch it 1 2 3 4 5 Caution The fuser unit 3 g...

Page 75: ...Remove the jammed paper 9 from the fuser unit by pulling it upwards carefully then install the drum and toner unit 6 Push back the green levers j to the original position 7 Close the front cover k by pushing down on both sides until locked 8 Pull the tension plate forward l then re insert the recording paper m L Before re inserting make sure to fan and straighten the recording paper 5 6 7 8 9 j k ...

Page 76: ...he display will show the following CHECK PICK UP 1 Pull the tension plate forward 1 then remove the paper tray cover 2 Remove the recording paper 3 2 Re insert the recording paper Attach the paper tray cover then push back the tension plate see steps 7 to 8 on page 16 L Before re inserting make sure to fan and straighten the recording paper n o 1 3 2 ...

Page 77: ... front cover 1 holding OPEN 2 2 Hold the centre part of the front cover 4 and pull open the inner cover 5 L Do not touch the transfer roller 6 3 Remove the jammed document carefully 7 4 Push back the inner cover 5 Close the front cover 8 by pushing down on both sides until locked Caution The fuser unit 3 gets hot Do not touch it 1 2 3 6 4 5 7 8 ...

Page 78: ...side of the unit 1 Disconnect the power cord and the telephone line cord 2 Lift open the front cover 1 holding OPEN 2 3 Clean the document separation roller 4 with a cloth moistened with isopropyl rubbing alcohol and let all parts dry thoroughly 4 Hold the centre part of the front cover 5 and pull open the inner cover 6 L Do not touch the transfer roller 7 5 Clean the document feeder roller 8 with...

Page 79: ...ng the two tabs 8 Clean the lower glass k with a soft and dry cloth 9 Re install the drum and toner unit l by holding the tabs 10 Close the front cover m by pushing down on both sides until locked 11 Reconnect the power cord and the telephone line cord j k l m ...

Page 80: ...1 Approx 4 s page ECM MMR Memory transmission 2 Scanning density Scanning resolution Up to 203 392 dpi Optical Up to 9 600 9 600 dpi Interpolated Copy resolution Up to 600 600 dpi Fax resolution Horizontal 8 pels mm Vertical 3 85 lines mm in standard resolution 7 7 lines mm in fine photo resolution 15 4 lines mm in super fine resolution Photo resolution 64 level Scanner type Monochrome Contact Ima...

Page 81: ...Inkjet paper L Some paper is designed to be printed on only one side Try printing on the other side of the paper if you are not happy with the print quality or if misfeeding occurs L For proper paper feeding and best print quality we recommend using long grained paper L Do not use paper of different types or thicknesses at the same time This may cause paper jams L Avoid double sided printing L Do ...

Page 82: ...se 2b Distinctive Ring using withvoice mail service 5 5 Case 3 EXT TAM External Telephone Answering Machine Table of Contents2 1 Table of Contents 1 1 Included accessories 1 2 Accessory information Finding the Controls 1 3 Description of buttons 1 4 Overview Installation1 5 Toner cartridge and drum unit 1 6 Document tray 1 7 Output tray1 8 Recording paper2 Preparation 2 1 Connections 2 2 Turning t...

Page 83: ...BLE FOR ANY DIRECT INDIRECT INCIDENTAL SPECIAL EXEMPLARY OR CONSEQUENTIAL DAMAGES INCLUDING BUT NOT LIMITED TO PROCUREMENT OF SUBSTITUTE GOODS OR SERVICES LOSS OF USE DATA OR PROFITS OR BUSINESS INTERRUPTION HOWEVER CAUSED AND ON ANY THEORY OF LIABILITY WHETHER IN CONTRACT STRICT LIABILITY OR TORT INCLUDING NEGLIGENCE OR OTHERWISE ARISING IN ANY WAY OUT OF THE USE OF THIS SOFTWARE EVEN IF ADVISED ...

Page 84: ... of California All rights reserved Copyright c 1988 Stephen Deering Copyright c 1988 University of Utah Copyright c 1988 1989 1993 The Regents of the University of California All rights reserved Copyright c 1988 1991 1993 The Regents of the University of California All rights reserved Copyright c 1988 1992 1993 The Regents of the University of California All rights reserved Copyright c 1988 1993 T...

Page 85: ...dation Inc All rights reserved Copyright c 1998 1999 2000 2001 The NetBSD Foundation Inc All rights reserved Copyright c 1998 2000 The NetBSD Foundation Inc All rights reserved Copyright c 1998 2000 2001 The NetBSD Foundation Inc All rights reserved Copyright c 1999 The NetBSD Foundation Inc All rights reserved Copyright C 1999 WIDE Project All rights reserved Copyright c 1999 2000 Jason L Wright ...

Page 86: ...RE Part 2 Networks Associates Technology Inc copyright notice BSD Copyright c 2001 2003 Networks Associates Technology Inc All rights reserved Redistribution and use in source and binary forms with or without modification are permitted provided that the following conditions are met Redistributions of source code must retain the above copyright notice this list of conditions and the following discl...

Page 87: ...NEGLIGENCE OR OTHERWISE ARISING IN ANY WAY OUT OF THE USE OF THIS SOFTWARE EVEN IF ADVISED OF THE POSSIBILITY OF SUCH DAMAGE Part 4 Sun Microsystems Inc copyright notice BSD Copyright c 2003 Sun Microsystems Inc 4150 Network Circle Santa Clara California 95054 U S A All rights reserved Use is subject to licence terms below This distribution may include materials developed by third parties Sun Sun ...

Page 88: ...NY SPECIAL INDIRECT OR CONSEQUENTIAL DAMAGES OR ANY DAMAGES WHATSOEVER RESULTING FROM LOSS OF USE DATA OR PROFITS WHETHER IN AN ACTION OF CONTRACT NEGLIGENCE OR OTHER TORTIOUS ACTION ARISING OUT OF OR IN CONNECTION WITH THE USE OR PERFORMANCE OF THIS SOFTWARE Copyright 1995 1998 1999 2000 by Jef Poskanzer jef acme com All rights reserved Redistribution and use in source and binary forms with or wi...

Page 89: ...ed in part on the work of the Independent JPEG Group Copyright 1995 by Jef Poskanzer jef acme com Copyright 1998 by Jef Poskanzer jef acme com Copyright 1999 by Jef Poskanzer jef acme com Copyright 1995 2000 by Jef Poskanzer jef acme com Copyright 1999 2000 by Jef Poskanzer jef acme com Copyright 1995 1998 2000 by Jef Poskanzer jef acme com ...

Page 90: ...ring 58 533 Auto IP 58 534 HTTPD 59 774 Data timeout 56 A Address list 80 Answering machine 44 Auto IP Feature 533 58 Auto reduction Feature 432 54 B Basic features 50 Broadcast programming list 80 Broadcast transmission 40 C Caller ID Calling back 47 Storing 48 Caller ID list Feature 216 47 Character entry 61 Cleaning 78 Collate hold Feature 469 56 Connecting tone Feature 416 54 Connections 17 LA...

Page 91: ...an 32 Scan application 32 Viewer 32 Push scan 30 E mail 30 File 30 OCR 31 Viewer 30 Q Quick scan 38 R Recall time Feature 121 50 Receiving faxes Automatically 42 Manually 43 Recording paper 15 Recording paper size 81 Redialling 38 39 Reports Address 80 Broadcast programming 80 Broadcast sending 40 Caller ID 51 80 Journal 39 80 Power down 72 Printer test 80 Sending 38 53 Setup 80 Telephone number 8...

Page 92: ...PNQX1315ZA CM0408CK0 ...

Reviews: