Panasonic HC-X1000, Operating Instructions Manual
The Panasonic HC-X1000 is an exceptional professional camcorder that captures stunning 4K Ultra HD footage. To make the most of its features, ensure you obtain the comprehensive Owner's Manual. Download the manual for free from our website, providing step-by-step instructions and detailed explanations to enhance your filming experience.
Share
Download


Reviews:
No comments
Related manuals for HC-X1000

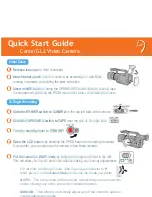
GL1
Brand: Canon Pages: 3
GL-2
Brand: Canon Pages: 2

CAMW7
Brand: Velleman Pages: 17

CK800QHD
Brand: DAMOACAM Pages: 12

HMC-S3003
Brand: Ismart Pages: 32

DC5270
Brand: Argus Pages: 1

VJBK-1T
Brand: Sony Pages: 2

VG-C70AM
Brand: Sony Pages: 2

VCT-SP1BP
Brand: Sony Pages: 2

XCHR57
Brand: Sony Pages: 4

VCT-D580RM
Brand: Sony Pages: 2

VCT-D480RM
Brand: Sony Pages: 3

VCT-50AV Marketing s
Brand: Sony Pages: 1

VCT-D580RM
Brand: Sony Pages: 4

VCT-1BP
Brand: Sony Pages: 2

VCT-MTK
Brand: Sony Pages: 5

VCT-870RM
Brand: Sony Pages: 4

SPK-HCH
Brand: Sony Pages: 2


