Panasonic HC-V160, Operating Instructions Manual
The Panasonic HC-V160 is a versatile camcorder that captures beautiful, high-definition videos. Ensure the best user experience with the Basic Operating Instructions Manual, available for free download on manualshive.com. This essential manual assists users in maximizing the potential of their HC-V160, making recording effortless and enjoyable.
Share
Download


Reviews:
No comments
Related manuals for HC-V160

oCam-2WRS-U
Brand: WITHROBOT Pages: 25
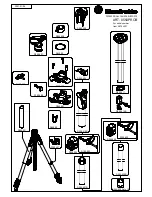
ART. 055XPROB
Brand: Manfrotto Pages: 1

HX-WA20PP
Brand: Panasonic Pages: 71

HX-DC2PP
Brand: Panasonic Pages: 58

SMX-K40BN
Brand: Samsung Pages: 74

VPC-CA6
Brand: Fisher Pages: 193

DV153
Brand: Jazz Pages: 16

DV151
Brand: Jazz Pages: 21

jdc77 HDV141
Brand: Jazz Pages: 29

DV552325011
Brand: Jazz Pages: 59

CC800
Brand: RCA Pages: 68

CC9370
Brand: RCA Pages: 84

HDLPCAM
Brand: Northern Pages: 2

PUPILLO
Brand: Three Pages: 14

HDV-Z20
Brand: Pa. Times Technology Pages: 6

HDSport
Brand: ElectroFlip Pages: 23

VIXIA HF M300
Brand: Canon Pages: 210

AGDVX100 - DV CAMCORDER
Brand: Panasonic Pages: 12


