Jazz DV151, Instruction Manual
The Diamond View DV151 User Manual is a comprehensive guide that ensures a seamless experience with your DV151 camera. Easily download this essential manual for free from our website manualshive.com, assisting you in maximizing the potential of your device and capturing stunning moments with ease.
Share
Download


Reviews:
No comments
Related manuals for DV151
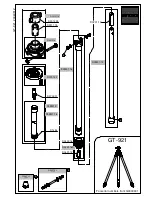
Series 0 Basalt GT-921
Brand: Gitzo Pages: 1

DVR 918M
Brand: Vivitar Pages: 69

VP-D381
Brand: Samsung Pages: 117

CVSE-DV01-2GEN
Brand: Chinavision Pages: 10

CC6351
Brand: RCA Pages: 92

CC6391
Brand: RCA Pages: 96

Small Wonder EZ101
Brand: RCA Pages: 2

Millennium DXL
Brand: PANAVISION Pages: 16

HDV105
Brand: Jazz Pages: 43

DC20 E
Brand: Canon Pages: 2

DC301
Brand: Canon Pages: 87

HC-X909
Brand: Panasonic Pages: 168

VP-D375W
Brand: Samsung Pages: 110

SC-HMX10 - 8GB Flash Memory High Definition...
Brand: Samsung Pages: 124

AJ-PD900WP
Brand: Panasonic Pages: 136

VP-HMX20C
Brand: Samsung Pages: 8

VP-D361W
Brand: Samsung Pages: 254

VDR-M70EG
Brand: Panasonic Pages: 169


