background image

F0808T0 -P 

D

Printed in Japan

ENGLISH

VQT1U92

Bef

ore use

Descr

iption of 

par

ts

Prepar

ation

Shooting

Pla

ybac

k

Editing

Displa

ys

Men

u

Ref

erence

Operating Instructions

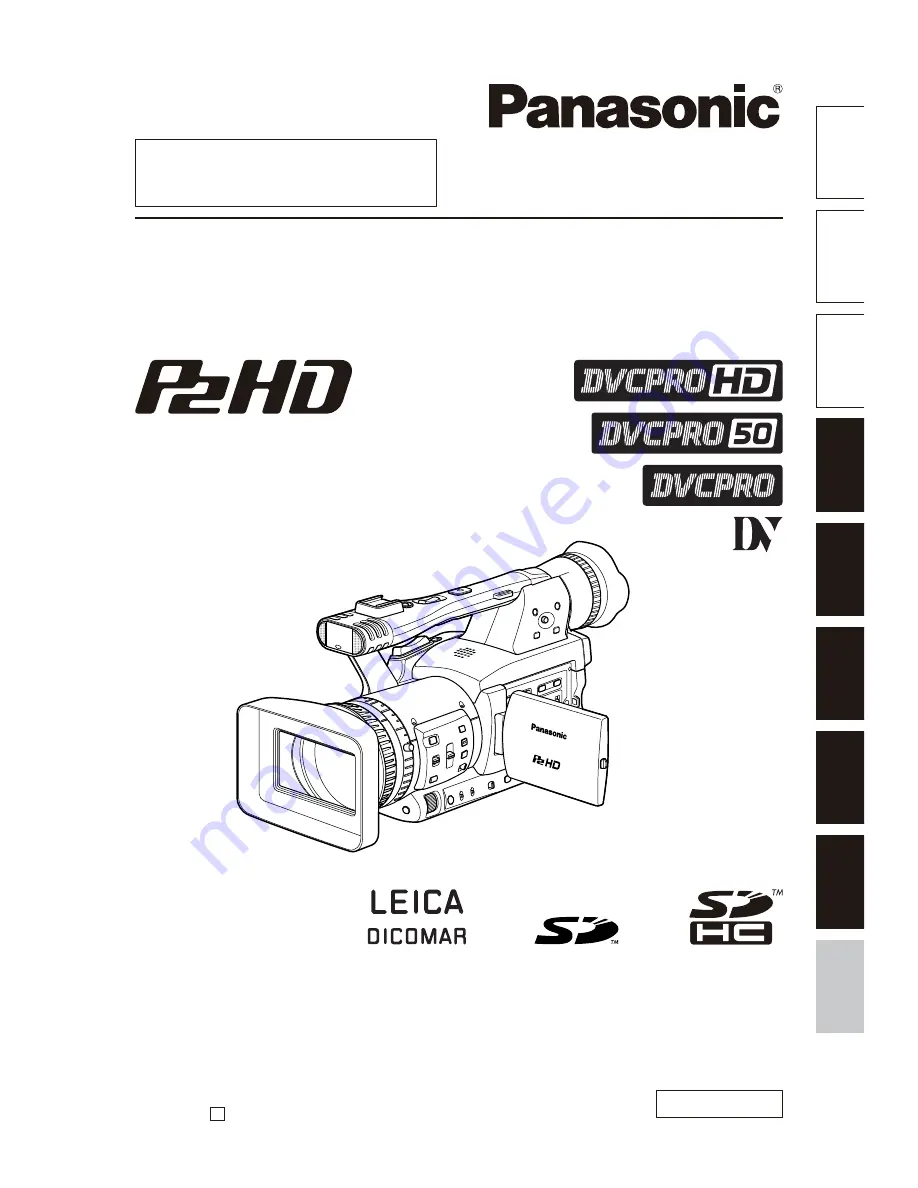
Memory Card Camera-Recorder

Model No. 

AG-HPX170P

Before operating this product, please read the instructions carefully and save this 
manual for future use.

This product is eligible for the P2HD 
5 Year Warranty Repair Program. For 
details, see page 5.

„

Summary of Contents for AGHPX170P - MEMORY CARD CAMERA RECORDER

Page 1: ...back Editing Displays Menu Reference Operating Instructions Memory Card Camera Recorder Model No AG HPX170P Before operating this product please read the instructions carefully and save this manual for future use This product is eligible for the P2HD 5 Year Warranty Repair Program For details see page 5 ...

Page 2: ...E MAINS SOCKET OUTLET SHALL BE INSTALLED NEAR THE EQUIPMENT AND SHALL BE EASILY ACCESSIBLE TO COMPLETELY DISCONNECT THIS EQUIPMENT FROM THE AC MAINS DISCONNECT THE POWER CORD PLUG FROM THE AC RECEPTACLE CAUTION ANGER OF EXPLOSION OR ÚRE IF BATTERY IS mistreated For Battery Pack p 2EPLACE ONLY WITH SAME OR SPECIÚED TYPE p O NOT DISASSEMBLE OR DISPOSE OF IN ÚRE Do not store in temperatures over 60 C...

Page 3: ...QUIPMENT OFF AND ON THE USER IS ENCOURAGED TO TRY TO CORRECT THE INTERFERENCE BY ONE OF THE FOLLOWING MEASURES Reorient or relocate the receiving antenna p NCREASE THE SEPARATION BETWEEN THE EQUIPMENT AND RECEIVER p ONNECT THE EQUIPMENT INTO AN OUTLET ON A CIRCUIT DIFFERENT FROM THAT TO WHICH THE RECEIVER IS connected Consult the dealer or an experienced radio TV technician for help 4HE USER MAY Ú...

Page 4: ...CING TO QUALIÚED SERVICE PERSONNEL 3ERVICING IS REQUIRED WHEN THE APPARATUS HAS BEEN DAMAGED IN ANY WAY SUCH AS POWER SUPPLY CORD OR PLUG IS DAMAGED LIQUID HAS BEEN SPILLED OR OBJECTS HAVE FALLEN INTO THE APPARATUS THE APPARATUS HAS BEEN exposed to rain or moisture does not operate normally or has been dropped Recommendation for Use of Genuine Panasonic Battery Pack Rechargeable Battery Thank you ...

Page 5: ...is Panasonic P2HD device 2EGISTER AS A USER FOR THIS DEVICE TO RECEIVE A SPECIAL SERVICE WARRANTY UP TO ÚVE YEARS OF FREE WARRANTY repairs USTOMERS WHO REGISTER AS USERS ON THE WEBSITE WILL RECEIVE A EXTENDED WARRANTY REPAIR VALID FOR UP TO ÚVE YEARS 1st year 2nd year 3rd year 4th year 5th year 5 P2HD device 2 Basic warranty 3 XTENDED WARRANTY REPAIR 4 0LEASE NOTE THAT THIS EXTENDED WARRANTY IS NO...

Page 6: ... 26 Protecting against a possible erasure 26 Formatting P2 cards 26 Recording times 27 Remove the P2 card 28 5SING 3 3 MEMORY CARDS 29 Installing and removing the SD memory card 29 Formatting SD memory card 29 Cautions in using SD memory cards 29 5SING THE ZOOM FUNCTION 30 IGITAL ZOOM FUNCTION 0 Variable frame rates VFR 31 Native recording 2 Standard recording 2 Using variable frame rates VFR 3HOO...

Page 7: ...Adjusting the volume 75 6IEWING IMAGES ON A MONITOR 75 Checking the date and time 75 Editing ONNECTING EXTERNAL UNITS 76 Headphones 76 External microphone 76 OMPUTER NON LINEAR EDITING ÚLE TRANSFER 77 Hard disk drive data copying 78 IGITAL VIDEO EQUIPMENT UBBING 79 Video deck Dubbing 80 TV Monitor playback dubbing 80 Nonlinear editing with P2 card PC mode 81 Copying from P2 cards to the hard disk ...

Page 8: ...es 3LOW QUICK MOTION RECORDING AXIMUM CHANNEL UNCOMPRESSED digital audio recording DV recording 480i OR DETAILS ON HOW TO HANDLE RECORDED data see page 121 1 P2 mode shooting and playback Pages 25 and 63 Computer 4HE DATA ÚLE IS TRANSFERRED FOR NONLINEAR editing on your computer or other unit 2 PC mode Page 81 XTERNAL HARD DISK 4HE UNIT DIRECTLY CONTROLS THE EXTERNAL HARD DISK DRIVE AND TRANSFERS ...

Page 9: ...LY TO THE SHOOTING OF CERTAIN MATERIAL EVEN IF it is intended for private use Caution regarding laser beams The CCD may be damaged if it is subjected to light from a laser beam 7HEN USING THE CAMERA RECORDER IN LOCATIONS WHERE LASER IRRADIATION EQUIPMENT IS USED BE CAREFUL NOT TO ALLOW THE LASER BEAM TO SHINE DIRECTLY ON THE LENS Notes when connecting a 1394 cable 7INDOWS EFORE CONNECTING TURN OFF...

Page 10: ...amera recorder Lens hood INPUT terminal cover 2 OR PART NUMBERS FOR THE BATTERY SEE n PTIONAL UNITSo SEE BELOW 7HEN USING A CABLE SOLD SEPARATELY OR A 53 CABLE SOLD SEPARATELY ATTACH FERRITE CORES TO THE both ends of the cable Page 77 Optional units XLR microphone AG MC200G Battery M H EQUIVALENT TO ACCESSORY BATTERY About this manual Note concerning illustrations in these instructions Illustratio...

Page 11: ...LE 34 24 34 0 BUTTON Page 25 9 Built in stereo microphone Page 51 10 Tally lamp Front Page 19 11 Remote control sensor Front Page 18 12 White balance sensor Page 9 054 AUDIO INPUT SWITCH Page 51 14 Zoom ring pin hole Page 0 0 CARD ACCESS LAMP X Page 26 6IEWÚNDER Page 20 0 CARD 3 MEMORY CARD SLOT COVER Pages 25 and 29 18 SCENE FILE dial Page 5 19 SLOT SEL button Page 44 20 Mode button Page 25 21 Re...

Page 12: ...R ADJUSTMENT DIAL Page 20 9 FOCUS switch Page 5 10 PUSH AUTO button Page 5 11 AWB button Page 8 12 IRIS dial Page 6 13 ND FILTER switch Page 7 14 IRIS button Page 6 15 GAIN switch Page 7 16 WHITE BAL switch Page 8 5 53 2 53 2 3 SWITCH Page 5 30 BUTTON Page 41 54 5 SWITCH Page 25 20 AUDIO LEVEL knobs CH1 CH2 Page 52 21 LCD monitor Page 21 22 MENU button Page 94 23 THUMBNAIL button Page 66 24 Operat...

Page 13: ...ect a remote control unit to CONTROL ZOOM AND START STOP OF RECORDING EADPHONE JACK MM STEREO MINI JACK Page 76 12 Tripod hole Page 9 13 Security Lock opening Use this opening to attach a security cable OR DETAILS ON HOW TO ATTACH THE CABLE SEE THE PERATING NSTRUCTIONS SUPPLIED WITH THE CABLE The security lock and security cable are DESIGNED TO PREVENT THEFT BUT 0ANASONIC WILL not accept any liabi...

Page 14: ...e function as the COUNTER button on the main unit 4 COUNTER RESET button Page 58 Same function as the COUNTER RESET button on the main unit 5 REC button Page 86 Operation buttons 6 PLAY button q Pages 6 and 86 7 2 7 BUTTON t Page 6 8 PAUSE button h Page 6 Like the operation buttons of the camera MENU operations are performed using SET button 9 STILL ADV button Page 18 10 STOP button g Page 6 butto...

Page 15: ...els EEP METAL OBJECTS SUCH AS NECKLACES and hairpins away from the battery Shortcircuiting may occur across the terminals causing the battery to heat up and you may seriously burn yourself if you touch the battery in this state 4HE BATTERY BECOMES HOT WHILE IT IS BEING used or charged The camera recorder itself also becomes hot during use The recordable time reduces if you repeatedly start and sto...

Page 16: ...let 3 Slide the DC cord s battery connector to the direction of the arrow until it clicks into place DC cord s battery connector Removal 1 Set the POWER switch to OFF and check that the mode lamp is off 2 Slide the DC cord s battery connector to the direction of the arrow while pressing the battery release button Battery release button 3 Disconnect the AC power supply cord from the power outlet CA...

Page 17: ...r strap Attach the shoulder strap and use it as a precaution against dropping the camera 20 mm or more 20 mm or more Detaching and attaching the lens hood Detaching the lens hood 4URN THE LENS HOOD COUNTERCLOCKWISE TO DETACH IT Attaching the lens hood 4URN THE LENS HOOD CLOCKWISE UNTIL IT CLICKS TO secure it in position Be sure to attach the lens hood cap to protect the LENS WHEN NOT IN USE ...

Page 18: ... DOES NOT OPERATE THE WRONG camera recorder by mistake Setting Wireless remote control Press the MCR operation buttons STOP g and STILL ADV at the same time to set the remote control unit for use in operation mode 1 Alternatively press the STOP g and STILL ADV buttons at the same time to set the remote control unit for use in operation mode 2 When the battery in the remote control unit is replaced...

Page 19: ...HEN THE OPERATION MODE BUTTONS ÛASH IN SEQUENCE STARTING WITH THE TOP ONE AND THE POWER then goes off it means that there is no charge left in the battery Recharge the battery SLOT SEL MODE CAM MCR PC POWER ON OFF Mode button Mode lamp Lock release Tally lamp The tally lamp can be made to light up during shooting by selecting ON as the REC LAMP setting in the OTHER FUNCTIONS screen Page 111 When t...

Page 20: ...NDERmS ANGLE SO THAT THE screen is positioned where it is easiest to see 9OU CAN MOVE THE VIEW ÚNDER OUT TO ABOUT degrees perpendicular to the camera 3 DJUST THE DIOPTER ADJUSTMENT LEVER SO that you can see the characters on the VIEWÚNDER SCREEN CLEARLY 6IEWÚNDER DIOPTER DIAL Eye piece Do not point the eye piece at the sun or other strong light source Light concentrated by the lens could damage IN...

Page 21: ... INPUT2 ON OFF LCD ZEBRA EVF DTL OIS WFM COUNTER EVF DTL button Press EVF DTL again to return to the original display EVF DTL OFF appears on the screen for about 2 seconds Using the LCD 1 Set the POWER switch to ON 2 Hold down the OPEN button to open the LCD monitor It can open out to 120 degrees Do not try TO OPEN IT FURTHER AS THIS WILL DAMAGE THE camera OPEN button 3 Position the LCD monitor wh...

Page 22: ...REMAIN OTHER DISPLAY LCD BACKLIGHT SELF SHOOT 4 Push the Operation lever in the e or r direction to select the item PUSH MENU TO RETURN EVF COLOR LEVEL EVF BRIGHTNESS EVF CONTRAST EVF SET 5 Push the Operation lever in the w or q DIRECTION TO MAKE ADJUSTMENT PUSH MENU TO RETURN EVF COLOR LEVEL EVF BRIGHTNESS EVF CONTRAST EVF SET 6 0RESS 5 THREE TIMES TO EXIT THE MENUS You can return the settings fo...

Page 23: ...LY THE IMAGE IN THE VIEWÚNDER or on the LCD monitor not the recorded image 1 Select LCD REV under LCD on the setting menu SW MODE screen This assigns LCD REV to the LCD button 2 Press the LCD button 4HIS BUTTON TOGGLES BETWEEN THE NORMAL AND ÛIPPED IMAGE AT EACH PRESS O SCREENS ARE DISPLAYED WHEN THE IMAGE IS ÛIPPED The unit returns to normal image mode the NEXT TIME IT IS POWERED UP LCD Switching...

Page 24: ...ET YES OFF 00012H 00012H MIRROR TIME ZONE OPERATION EVF SET POWER SAVE MENU INIT OPERATION SELF SHOOT 5 Push the Operation lever in the w or q direction to set YEAR to 2008 CLOCK SET PUSH MENU TO RETURN YEAR 2008 OCT 01 12 00 MONTH PUSH y t DAY HOUR MIN SEL PUSH q g HOOSE A YEAR BETWEEN AND 6 Push the Operation lever in the r direction to move to the MONTH setting CLOCK SET PUSH MENU TO RETURN YEA...

Page 25: ... red 2 3WITCH THE 54 5 SWITCH TO 54 to select auto mode A o APPEARS ON THE VIEWÚNDER AND screens 4HE FOCUS GAIN IRIS AND WHITE BALANCE ARE adjusted automatically 3 0RESS THE 34 24 34 0 BUTTON 2ED ON THE POWER switch to start shooting Press again to return to the camera to the shooting standby mode Use the handle START STOP button to make IT EASIER TO SHOOT FROM LOW ANGLES 1 2 3 POWER ON OFF POWER ...

Page 26: ...ghts orange Slot that is the object of recording Blinks orange ATA IS NOW BEING ACCESSED Blinks orange fast CARD IS NOW BEING RECOGNIZED Both lamps blink orange Ejection of card during access Off Cards have not been inserted or formatted Insertion of incompatible card PC mode USB DEVICE Blinks orange ATA IS NOW BEING ACCESSED Off STATUS OTHER THAN ACCESS UNDERWAY PC mode 1394 DEVICE Blinks orange ...

Page 27: ...X MIN 0 2 approx 128 min approx 64 min APPROX MIN approx 80 min approx 64 min The AJ P2C002SG 2 GB card cannot be used The displayed available space includes the management area and so the space available for recording is smaller than this Concerning the division of clips recorded on P2 cards When using a P2 card of at least 8 GB in this camera if the continuous recording time for a single SESSION...

Page 28: ...this happens turn THE POWER OFF AND BACK ON AGAIN When a card is ejected during formatting Format the card again 7HEN A CARD IS EJECTED WHILE ITS DATA IS BEING accessed 4HE CLIPS MAY BE THROWN OUT OF ORDER Page 57 Check the clips and repair them For details on repairing clips see page 68 Immediately after pre recording a P2 CARD INSERTED INTO AN EMPTY SLOT WILL NOT BE IMMEDIATELY RECOGNIZED During...

Page 29: ...ng THUMBNAIL OPERATION PROPERTY META DATA EXIT DELETE FORMAT REPAIR CLIP RE CONNECTION EXCH THUMBNAIL EXIT SLOT1 SLOT2 SD CARD EXIT 5 3ELECT 9 3 ON THE CONÚRMATION SCREEN The selected SD memory card is formatted You can also format from the SD CARD FORMAT option on the CARD FUNCTIONS screen Page 110 7ITH 3 CARDS OF CAPACITY WILL HAVE been used Cautions in using SD memory cards 3 MEMORY CARDS USED ...

Page 30: ...WHEN IS selected under DRS Page 99 on the setting menu SCENE FILE screen 7HILE USING THE ZOOM FUNCTION THE SLOW SHUTTER IS DISABLED 7HILE USING THE SLOW SHUTTER YOU CANNOT USE THE DIGITAL ZOOM FUNCTION IGITAL ZOOM CANNOT BE CHANGED DURING recording 4HIS CAMERA HAS A X OPTICAL ZOOM FUNCTION OOM WITH THE ZOOM BUTTON OR THE ZOOM RING Zoom button 3ET THE SWITCH TO 3 26 SO THAT YOU CAN USE THE MOTOR DR...

Page 31: ... of 24 fps are recorded in 24 frames The signals are recorded only in the effective frames so recording is possible for 2 5 times as long 1 2 3 4 1 1 1 2 2 3 3 3 4 4 1 1 2 3 4 2 3 4 Camera Recorder 24P 24PN effective frame Before VFR shooting you must set the recording frame rate and recording format ahead of time 9OU CANNOT CHANGE THE FRAME RATES WHILE RECORDING 6 2 SHOOTING IS POSSIBLE ONLY IN P...

Page 32: ... REC FORMAT function Page 104 on the RECORDING SETUP SCREEN SELECT 0 0 0 0 OR 0 0 AS THE RECORDING FORMAT 2 3ELECT THE APPROPRIATE SCENE ÚLE USING THE SCENE FILE dial If necessary before doing this perform the camera settings from the setting menu and REGISTER THE SCENE ÚLE 0AGE 5 3 Using the OPERATION TYPE function Page 98 on the SCENE FILE screen select FILM CAM and set the desired recording fra...

Page 33: ...LOUDS SOMEONE STANDING AMONG CROWD OF PEOPLE and moves made by martial artists If for instance you have shot scenes using the 24P recording format for specifying the playback frames you can DOUBLE THE SPEED OF THE QUICK MOTION EFFECTS BY setting the VFR recording frame rate to 12 fps Recording format REC FORMAT Recording frame rate FRAME RATE 720P 24P 720P 24PN 3ET TO FPS OR LOWER 0 0 0 0 3ET TO F...

Page 34: ... in the progressive mode For output and recording the 24 frame PERSECOND SIGNAL IS CONVERTED TO ÚELD PER second interlace using advanced conversion A B C D E F G H AoAeBoBeBoCeCoCeDoDeEoEeFoFeFoGe GoGeHo He 24PA 60i 7ITH THE n o METHOD FRAMES O E O E O E AND O E SHOWN IN THE ILLUSTRATION WOULD BE EXTENDED OVER DIFFERENT FRAMES WHICH CAN CAUSE A DROP IN PICTURE QUALITY 7ITH THE 0 ADVANCED METHOD HO...

Page 35: ... FOCUS AUTOMATICALLY WHILE YOU PRESS DOWN 053 54 Switching to manual focus assist mode To change from the manual focus mode to the manual focus assist mode set MF ASSIST to ON on the setting menu SW MODE screen You can make coarse adjustments to the focus in manual focus assist mode by turning the focus RING ABOUT HALF THE AMOUNT YOU WOULD TURN IT IN manual focus mode Fine adjustment is made autom...

Page 36: ...NOT WORK VEN WHEN the BOTH mode is set only the GRAPH display is available 4HE 53 33 34 BUTTON DOES NOT WORK WHEN THE DIGITAL ZOOM FUNCTION IS USED To return to the previous screen press the FOCUS ASSIST button again RIS ADJUSTMENTS IRIS dial 53 2 53 2 3 SWITCH IRIS button 1 If the camera is in auto mode use the 54 5 SWITCH TO SWITCH TO MANUAL mode Page 35 2 Press the IRIS button to switch how to ...

Page 37: ... GAIN and HIGH GAIN items on the setting menu SW MODE screen Page 101 In auto mode auto gain is available regardless of THE SWITCH SETTING WHEN A SETTING OTHER THAN OFF is selected under AGC on the setting menu AUTO SW screen Page 104 When the recording frame rate is less than 22 fps AND WHEN A SLOW SHUTTER SPEED HAS BEEN SET THE GAIN IS ÚXED AT D REGARDLESS OF THE SWITCH SETTING 0AGES 1 and 49 IG...

Page 38: ...AR the subject can be used instead Do not include bright spotlights in your shot 4 Set the WHITE BAL switch to A or B whichever one you want to save the ADJUSTMENT IN 5 Press the AWB button DJUSTMENT TAKES A FEW SECONDS 4HE FOLLOWING MESSAGES APPEAR ON THE screen ESSAGE DURING ADJUSTMENT AWB Ach ACTIVE ESSAGE AFTER ADJUSTMENT AWB Ach OK N ERROR MESSAGE APPEARS ON THE SCREEN WHEN WHITE BALANCE ADJU...

Page 39: ...SIVE AND NORMAL 60i modes Press the AWB button to automatically adjust the WHITE BALANCE Press and hold the AWB button to adjust the black balance S THE WHITE BALANCE IS ADJUSTED ÚRST WHEN YOU press the AWB button make the necessary preparations for this 9OU CANNOT ADJUST THE BLACK BALANCE WHILE YOU are shooting ESSAGE DURING ADJUSTMENT ABB ACTIVE ESSAGE AFTER ADJUSTMENT ABB END OLD DOWN THE 7 BUT...

Page 40: ...AS A ZEBRA PATTERN Very bright 2EÛECTING PARTS You can remove most overexposed parts by adjusting the iris and shutter speed in the manual MODE TO REMOVE THE AREAS WITH ZEBRA PATTERNS 4HE DISPLAY CHANGES AS FOLLOWS EACH TIME YOU press the ZEBRA button ZEBRA 1 ZEBRA 2 OFF MARKER BARS CH1 SELECT RESET TC SET REC CH2 SELECT AUDIO INT L INPUT1 INPUT2 SHUTTER SPEES SELECT INT R INPUT2 INPUT1 MIC POWER ...

Page 41: ... MCR mode press the DISP MODE CH button in the thumbnail screen Press the button again to return to the thumbnail screen HANGING THE IMAGE SIZE When recording in 480i mode you can change the SIZE ASPECT RATIO OF THE IMAGES THAT YOU RECORD Select the aspect ratio in the setup menus CAMERA SETUP screen ASPECT CONV Page 100 For menu operation Page 94 SIDE CROP 2ECORDED IN THE REGULAR ASPECT RATIO The...

Page 42: ...ttons You can allocate one of sixteen features to each of the three USER buttons Use these buttons to change shooting settings QUICKLY OR ADD EFFECTS TO THE IMAGES YOU ARE shooting 4HE FOLLOWING FEATURES ARE ALLOCATED TO THE BUTTONS at the time of shipping USER1 WHITEFADE USER2 BACKLIGHT 53 2 4 84 For details see the setup menus SW MODE SCREEN 53 2 TO 0AGE 102 F YOU PRESS A 53 2 BUTTON TO WHICH ON...

Page 43: ...ding Menu settings are retained even if you turn THE POWER OFF 3O IF YOU USE THE CAMERA RECORDER WITH THE SETTINGS FOR BACKUP recording still in effect images on media in ANY UNIT THAT CONNECTED MAY BE OVERWRITTEN After backup recording check the menu item settings before you operate the camera recorder If you use another AG HPX170P as the external unit for backup recording select n o FOR 42 ON TH...

Page 44: ...OT marks during playback 6 APPEARS WHEN YOU CANNOT SET OR RELEASE shot marks When the video data of a single shoot using HOT SWAP RECORDING IS MADE UP OF MULTIPLE CLIPS you cannot set or release shot marks unless all the P2 cards that make up the video data are inserted into the slots You cannot set or release shot marks during loop recording 4EXT MEMO RECORDING This function adds text memos at th...

Page 45: ...he MCR or PC mode or the recording format has been changed after completing a RECORDING 4HEN IT WILL NOT BE POSSIBLE TO DELETE THE CLIP BY TURNING THE POWER OFF AND TURNING IT back on 4HIS BUTTON CANNOT BE USED TO DELETE CLIPS WHEN A 0 CARD ONE OF TWO INSERTED CARDS HAS BEEN removed and reinserted after recording nor can IT BE USED TO DELETE CLIPS ON A WRITE PROTECTED 0 card N HOT SWAP RECORDING T...

Page 46: ...RATION SELECTED IN STEP IS LESS THAN SECONDS 2 WILL ÛASH WHILE RECORDING IS UNDERWAY IN ACCORDANCE WITH THE set time 4HE PRE RECORDING FUNCTION DOES NOT WORK No sound is recorded LL DATA RECORDED WHILE THIS MODE IS ACTIVE WILL BE CONTAINED IN ONE ÚLE O GUARANTEES ARE MADE FOR THE OUTPUT images Pre recording PRE REC This function is used to record pictures and sound STARTING AT A ÚXED TIME APPROX S...

Page 47: ...nly one of the inserted cards is DIR ENTRY NG CARD Page 91 When continuous one shot recording is performed there may be delays in ACKNOWLEDGING THE RECORDING OPERATION After one shot recording has started a recordable P2 card cannot be used even if it is inserted into an empty slot The slots for recording in this mode are indicated by the orange P2 card access lamps The slots for recording P2 card...

Page 48: ...peration is not possible even if only one of the inserted cards is DIR ENTRY NG CARD Page 91 Stopping may take some time 4HE FOLLOWING OPERATIONS ARE NOT ACKNOWLEDGED UNTIL THE 0 CARD ACCESS lamps change from blinking to fully lit up The slots for recording in this mode are indicated by the orange P2 card access lamps Text memos cannot be added ...

Page 49: ...R SPEED SWITCHES BETWEEN NORMAL AND THE SPEED YOU SELECTED WITH THE 30 SELECT button 2 After you have pressed the SHUTTER button press SPEED SELECT to select the shutter speed 4HE SHUTTER SPEED CHANGES AS FOLLOWS EACH time you press SPEED SELECT The order is reversed for the SHUTTER SELECT button Remember that the faster the shutter speed THE LOWER THE SENSITIVITY DJUSTING THE SHUTTER SPEED With t...

Page 50: ...FREQUENCY OF THE TELEVISION OR COMPUTER MONITOR TO MINIMIZE THE HORIZONTAL NOISE THAT APPEARS WHEN SHOOTING such subjects Y SWITCHING TO PROGRESSIVE MODE YOU CAN ALSO shoot PAL system television screens When the OPERATION TYPE option in the SCENE FILE screen page 98 is set to FILM CAM the shutter opening angle can be adjusted FROM TO IN STEPS Example When the recording frame rate is set to 24 fps ...

Page 51: ...ING SETUP screen BARS CH1 SELECT RESET TC SET REC CH2 SELECT AUDIO INT L INPUT1 INPUT2 SHUTTER SPEES SELECT INT R INPUT2 INPUT1 MIC POWER 48V ON OFF INPUT2 ON OFF LCD ZEBRA EVF DTL OIS WFM COUNTER CH2 SELECT switch CH1 SELECT switch 054 SWITCHES 054 POWER 48V Switch Using the built in microphone 1 Switch the CH1 SELECT switch to INT L Audio from the built in microphone Lch is recorded to audio cha...

Page 52: ...ND SWITCH BOTH 3 4 AND CH2 SELECT to INPUT 2 DJUSTING THE RECORDING LEVEL AUDIO LEVEL knob Use the AUDIO LEVEL knob to adjust the recording level of the built in microphone or of audio signals input through the INPUT 1 2 XLR PIN TERMINAL To adjust the volume of the sound for monitoring Page 4 To adjust the recording level of the audio signals TURN THE 5 6 KNOB WHILE REFERRING to the audio level me...

Page 53: ...UP screen Page 104 F6 SCENE CINE D File suitable for shooting movie like SCENES WHERE THE DYNAMIC RANGE IS TO BE EMPHASIZED 4HE RECORDING FORMAT REMAINS UNCHANGED EVEN WHEN THE SCENE ÚLE IS changed It must be set using the REC FORMAT option on the RECORDING SETUP screen Page 104 HANGING SCENE ÚLE SETTINGS 4HE SETTING VALUE OF THE SCENE ÚLE CAN BE CHANGED LSO YOU CAN SAVE THE CHANGED SCENE ÚLE TO E...

Page 54: ...n TO SELECT 3 6 4 SCENE FILE F1 PUSH MENU TO RETURN LOAD SAVE INIT VIDEO CAM DEFAULT 1 48 0 0 0 0 0 OPERATION TYPE V DETAIL LEVEL DETAIL CORING FRAME RATE SYNCRO SCAN DETAIL LEVEL CHROMA LEVEL 9 Press the Operation lever push it in the r direction to select SAVE and press it again SCENE FILE F1 PUSH MENU TO RETURN LOAD SAVE INIT LOAD SAVE INITIAL 0 0 0 0 OPERATION TYPE V DETAIL LEVEL DETAIL CORING...

Page 55: ... w or q DIRECTION TO SELECT A ÚLE NUMBER TO SCENE FILE SD CARD PUSH MENU TO RETURN FILE SELECT 1 NO FILE NO FILE NO FILE NO FILE READ FILE 3 FILE 4 WRITE FILE 1 FILE 2 TITLE RELOAD 4 Push the Operation lever in the e or r direction to select WRITE and press it again SCENE FILE SD CARD PUSH MENU TO RETURN FILE SELECT 1 YES NO FILE NO FILE NO FILE NO FILE READ FILE 3 FILE 4 WRITE FILE 1 FILE 2 TITLE...

Page 56: ...T2 SHUTTER SPEES SELECT INT R INPUT2 INPUT1 MIC POWER 48V ON OFF INPUT2 ON OFF LCD ZEBRA EVF DTL OIS WFM OSD COUNTER RESET TITLE VOL MULTI P IN P REC A DUB PLAY REW FF ZOOM DATE TIME PHOTO SHOT START STOP COUNTER 7HEN ALL CHARACTERS HAVE BEEN ENTERED PUSH the Operation lever in the w direction at the left end or in q direction at the right end of the characters Then press the Operation lever 4O RE...

Page 57: ...layed has been deleted Use a P2 VIEWER OR OTHER PROGRAM TO CHECK ALL THE DATA You can add the video and audio systems name of the videographer shooting location text memos and other information to the video data you have recorded on the P2 card This data is called the clip metadata Display method Page 69 4HERE ARE TWO KINDS OF CLIP METADATA THE DATA THAT is recorded automatically during shooting a...

Page 58: ... User information FR RAME RATE 0 0 0 AND FRAME SEQUENCE IN PROGRESSIVE MODE SHOOTING No display Data is not displayed Resetting the counter 0RESS THE 5 4 2 2 3 4 BUTTON WHILE THE counter is displayed 1394TC preset mode When shooting using a multi camera you can synchronously set the initial values of TC 4HE CAMERA USED FOR SYNCHRONIZATION IS THE 34 2 AND THE CAMERA BEING SYNCHRONIZED IS the SLAVE ...

Page 59: ...CHANGE THE ITEMS SHOWN ABOVE Specifying the time code TC PRESET Set TC PRESET so you can record a value of your choice as the initial setting for the time code to be used at the start of recording 1 Set the POWER switch to ON 2 On the setting menu RECORDING SETUP screen push the Operation lever in the e or r direction to move to TC PRESET and press it again RECORDING SETUP PUSH MENU TO RETURN MIC ...

Page 60: ...ra or Remote control 5 Press the MENU button when you have ÚNISHED SETTING THE TIME CODE MENU 6 Push the Operation lever in the e direction to move to YES and press it again TC PRESET PRESET OK YES PUSH STILL NO 7 0RESS 5 TWICE TO EXIT THE MENUS MENU With this unit the time code value is adjusted in ACCORDANCE WITH THE FORMAT AND FRAME RATE OR this reason bear in mind that making a change in the f...

Page 61: ... and press it again RECORDING SETUP PUSH MENU TO RETURN MIC GAIN2 50dB 2CH DF REC RUN USER YES 25M REC CH SEL UB MODE UB PRESET TC MODE TCG TC PRESET TIME STANP 5 Set the user information Push the Operation lever in the e or r direction to select user information characters You can use numbers from 0 to 9 and letters from A to F UB PRESET PUSH MENU TO RETURN MONTH PUSH q g 0 0 0 0 0 0 0 0 SEL PUSH...

Page 62: ...G THE BUILT IN BATTERY 3ETTING THE TIME DATA CONTINUED 7 Push the Operation lever in the e direction to move to YES and press it again UB PRESET PRESET OK YES PUSH STILL NO 8 0RESS 5 TWICE TO EXIT THE MENUS MENU ...

Reviews: