background image

Содержание AGDVC20P - 3 CCD DV CAMCORDER

Страница 1: ......

Страница 2: ...ADE OF PLUG TO WIDE SLOT FULLY INSERT CAUTION THE AC RECEPTACLE MAINS SOCKET OUTLET SHALL BE INSTALLED NEAR THE EQUIPMENT AND SHALL BE EASILY ACCESSIBLE TO COMPLETELY DISCONNECT THIS EQUIPMENT FROM THE AC MAINS DISCONNECT THE POWER CORD PLUG FROM THE AC RECEPTACLE Camera Recorder The rating plate is on the underside of the Camera Recorder AC Adapter The rating plate is on the underside of the AC A...

Страница 3: ...in a particular installation If this equipment does cause harmful interference to radio or television reception which can be determined by turning the equipment off and on the user is encouraged to try to correct the interference by one of the following measures Reorient or relocate the receiving antenna Increase the separation between the equipment and receiver Connect the equipment into an outle...

Страница 4: ...enings must not be blocked or covered Never place the video unit on a bed sofa rug or other similar surface or near or over a radiator or heat register This video unit should not be placed in a built in installation such as a bookcase or rack unless proper ventilation is provided or the manufacturer s instructions have been adhered to 10 Power Sources This video unit should be operated only from t...

Страница 5: ...spill liquid of any kind onto the video unit 18 Servicing Do not attempt to service this video unit yourself as opening or removing covers may expose you to dangerous voltage or other hazards Refer all servicing to qualified service personnel 19 Damage Requiring Service Unplug this video unit from the wall outlet and refer servicing to qualified service personnel under the following conditions a W...

Страница 6: ...nnot be used simultaneously 34 Before requesting repair Problems and solutions 34 Cautions for Use 36 Explanation of terms 39 Specifications Specifications 40 ª Carefully read the Operating Instructions and use the Camera Recorder correctly Injury or material damage resulting from any kind of use that is not in accordance with the operating procedures explained in these Operating Instructions are ...

Страница 7: ...lter Kit optional first of all loosen the lens hood attachment knob 1 If the MC protector or ND filter is used the lens hood can be mounted on the filter When you attach the lens hood back unite the marks and fasten the lens hood attachment knob 1 If you push the W T lever toward W during recording with the filter or conversion lens attached to the camera recorder 4 corners of the image may become...

Страница 8: ...2 33 Cassette eject lever OPEN EJECT 12 34 DC Input socket DC IN 10 35 DV terminal DV 29 Connect this to the digital video equipment 36 S Video output socket S VIDEO OUT 27 28 37 Video output socket VIDEO OUT 27 28 38 Audio output sockets AUDIO OUT 27 28 39 Power lamp 13 40 Recording start stop button 19 41 Off On switch OFF ON 13 42 Tripod receptacle This is a hole for attaching the camera to opt...

Страница 9: ...trap length adjuster and pull it Pull it out more than 2 cm 1 from the shoulder strap length adjuster so that it cannot slip off Using the LCD monitor You can record the image while viewing it on the LCD monitor opened 1 Press the PUSH OPEN button and at the same time bring the LCD Monitor out about 90o in the direction of the arrow The viewfinder will go off 2 Adjust the angle of the LCD monitor ...

Страница 10: ...rom the AC adapter 1 Connect the AC mains lead to the AC adapter and the AC mains socket 2 Put the battery on the battery mount by aligning the mark and then securely plug it in ª Charging lamp Lights up Charging Goes off Charging completed Flashing The battery is over discharged discharged excessively In a while the lamp will light up and normal charging will start When the battery temperature is...

Страница 11: ...when the recording and stopping operations are repeated 1h 30 min indicates 1 hour 30 minutes The times shown in the table are rough estimates The times indicate the recordable times when the viewfinder is used The times in parentheses indicate the recordable times when the LCD monitor is used The recordable time will become shorter in the following cases When you use both the viewfinder and the L...

Страница 12: ...not come out Close the cassette cover completely and then open it again completely Check if the battery has run down ª When the cassette holder cannot be housed Set the OFF ON switch to OFF then to ON again Check if the battery has run down ª Inserting removing the cassette When the cassette holder is in action do not touch anything except the PUSH mark When inserting a previously recorded cassett...

Страница 13: ...tape Using the screen display Press the ENTER button at the center of cursor buttons and icons will be displayed on the screen Each press switches the display as follows depending on the mode In the Tape playback mode the icons will be automatically displayed on the screen 1 Tape recording mode AUTO MANUAL FOCUS switch is set to AUTO 2 Tape recording mode AUTO MANUAL FOCUS switch is set to MANUAL ...

Страница 14: ...u 5 Press the 1 or ENTER button to set the selection 6 Press the 3 or 4 button in order to select the item to be set 7 Press the ENTER button to determine the setting ª To exit the menu screen Press the MENU button ª To get back to the previous screen Press the 2 button ª About the menu setting The menu screen does not appear during recording And you cannot record when the menu screen appears ª Op...

Страница 15: ...rged Adjusting LCD monitor viewfinder ª Adjusting the brightness and color level 1 Set SETUP LCD SET or EVF SET YES 2 Press the 3 or 4 button in order to select the item to be adjusted LCD SET Brightness of the LCD monitor Color level of the LCD monitor EVF SET Brightness of the viewfinder 3 Press the 2 or 1 button to move the bar indication representing the brightness 4 Press the MENU or ENTER bu...

Страница 16: ... battery Install the coin type battery supplied in the remote control before using it 1 While pressing the stopper 1 pull out the battery holder 2 Set the coin type battery CR2025 with its i mark facing upward and get the battery holder back in place ª Remote control usable range The distance between the remote control and the camera Within approx 5 m 15 feet Angle Approx 10o up and 15o down left ...

Страница 17: ...5 The battery is normally expected to last about 1 year but it depends on operation frequency Keep the coin type battery out of the reach of children If the remote control mode of the camera and that of the remote control do not match with each other REMOTE will appear When the remote control is operated for the first time after the camera is turned on CHECK REMOTE MODE 33 will appear and operatio...

Страница 18: ...ipod optional whenever possible Low angle recording Adjust the angle of the LCD monitor according to the position in which the camera recorder is held If the camera recorder is not held firmly in stable position the picture in the LCD monitor cannot be watched properly For easier low angle recording the sub recording start stop button and the sub zoom lever on the front of the camera recorder can ...

Страница 19: ...t a recording check 19 to verify that the image is recorded properly In order to find the unrecorded section carry out the blank search 19 ª On screen display in the tape recording mode 1 Recording time elapse 2 Remaining tape indication ª Concerning the remaining tape time indication on the screen The remaining tape time is indicated in minutes When it reaches less than 3 minutes the indication s...

Страница 20: ...oom function When pushing the W T lever as far as it will go you can zoom from 1k to 10k in 2 1 second at the maximum The zoom speed varies according to the amount of movement of the W T lever The variable speed zoom function cannot be used with the remote control and sub zoom lever Adjusting the Microphone Sensitivity Level You can adjust the microphone sensitivity for recording 1 Set ADVANCE MIC...

Страница 21: ...ou can record images free from vibration Only manual focusing can be used Recorded scene is seen as if frames were missed Color night view function You can record dark locations brightly in color 0 Lux night view function You can record completely dark locations with the light of the LCD monitor Set to Tape Recording Mode 1 Press the ENTER button until the icon 1 appears 2 Press the 3 button to se...

Страница 22: ......

Страница 23: ...king it Recording in various situations Scene mode When you record images in different situations this mode automatically sets optimum shutter speeds and apertures Set to Tape Recording Mode 1 Set the AUTO MANUAL FOCUS switch to MANUAL 2 Set BASIC SCENE MODE select the desired mode 1 5 Sports mode To record sports scenes or scenes where there are quick motions 2 Portrait mode To make persons stand...

Страница 24: ...o set the white balance manually Select in Step 3 Then while viewing a white subject on the entire screen press the 3 button to select the indication ª About flashing of the indication When the manual adjustment mode is selected Flashing indicates that the white balance previously adjusted is stored This setting is stored until the white balance is adjusted again When white balance cannot be set i...

Страница 25: ...ng under fluorescent light mercury light or sodium light because the color and brightness of the playback image may change If you increase the shutter speed manually the sensitivity lowers and accordingly the gain value increases automatically which may increase the noises on the screen You may see vertical lines of light in the playback image of a brightly shining subject or highly reflective sub...

Страница 26: ...ings in AUDIO OUT Slow motion playback frame by frame playback Set to Tape Playback Mode Slow motion playback can only be performed by using the remote control Slow motion playback If the image is recorded in the SP mode then it will be played back at a speed approx 1 5 the normal speed If the image is recorded in the LP mode then it will be played back at a speed approx 1 3 the normal speed 1 Dur...

Страница 27: ...erminal then also connect an optional S Video cable 2 It allows you to enjoy more beautiful images 2 Turn on this camera recorder and set the mode switch to the Tape Playback Mode 3 Select the input channel on the TV 4 Press the 3 button to select the 1 icon to start playback The image and audio are output on the TV 5 Press the 4 button to select the icon to stop playback Whenever plugging in the ...

Страница 28: ...terminal 2 Turn on the camera recorder and set to Tape Playback Mode 3 Select the input channel on the TV set and recorder 4 Press the 3 button to select the 1 icon to start playback The image and sound are reproduced 5 Start recording Recorder 6 Press the 4 button to select the icon to stop playback 7 Stop recording Recorder For more information refer to the operating instructions for your TV set...

Страница 29: ...n recording signals from an external unit first check that video signals are supplied While signals from an external unit are being recorded do not stop output on the external unit side or disconnect any of cables This may lead to a failure to recognize the signals when you do recording again Do not apply force when connecting DV IEEE1394 cable to DV connector as this may damage the connector ª To...

Страница 30: ...cording Mode When you want to preserve the original sound taken during recording set SETUP AUDIO REC 12bit to take pictures When set 16bit the sounds taken during recording are erased after recording with audio dubbing Set BASIC REC SPEED SP to take pictures ª To play back the sound recorded with audio dubbing You can switch between the sound recorded with audio dubbing and the original sound Set ...

Страница 31: ... 23 D ZOOM 20 ZOOM MIC 20 MIC LEVEL 20 DATE TIME 32 INITIAL SET 32 3 SETUP FADE COLOR 22 AUDIO REC 32 REC LAMP 32 DISPLAY 32 REMOTE 17 BEEP SOUND 32 LCD SET 15 EVF SET 15 POWER SAVE 32 4 LANGUAGE 14 ª TAPE PLAYBACK MENU 1 BASIC DATE TIME 32 2 ADVANCE BLANK SEARCH 19 REC SPEED 19 REC STDBY 29 REC DATA 32 REPEAT PLAY 26 MIC LEVEL 20 3 SETUP 12bit AUDIO 30 AUDIO OUT 32 DISPLAY 32 REMOTE 17 LCD SET 15...

Страница 32: ...t 5 minutes passed without any operation the standby mode automatically will be set In the standby mode blinks and it takes time more than usual to start recording after you press the recording start stop button 5 MINUTES When about 5 minutes passes without any operation the camera recorder automatically turns off to protect the tape or to prevent the battery from running down When you use the cam...

Страница 33: ...ion appears when you record yourself Turn the LCD monitor towards the viewfinder and check the warning alarm indication REMOTE An incorrect remote control mode has been selected 17 2END The tape came to the end during recording The video heads are dirty 36 Textual indications 3DEW DETECT 3EJECT TAPE Condensation has occurred Take out the cassette and wait for a while It takes some time until the c...

Страница 34: ... on the usage the battery has worn out and can no longer be used 5 The camera recorder cannot be operated though powered up The camera recorder does not operate normally Remove the cassette and then press the reset button 36 If normal conditions are not restored yet turn off the power Then about 1 minute later turn on the power again 6 The cassette cannot be removed Does the power lamp comes on wh...

Страница 35: ...s 0 Is the volume too low During playback push the W T lever to display the volume indication and adjust it 26 2 Different sounds are reproduced at the same time Have you set SETUP 12bit AUDIO MIX If you set AUDIO REC 12bit and dub audio to a recorded tape you can hear the sound on recording and the sound dubbed at a later time To hear the sounds separately set to ST1 or ST2 30 Have you set SETUP ...

Страница 36: ...ith the cassette cover closed to cool or warm it to the ambient temperature When 3 in yellow You cannot use the Tape Recording Playback Mode Leave the camera recorder for about 30 minutes When 3 in red The power lamp blinks for about 1 minute and then the camera recorder automatically turns off Leave it for about 2 to 3 hours 3 Turn the camera recorder on again set it to the Tape Recording Playbac...

Страница 37: ...he camera recorder may break its housing causing it to malfunction Do not use benzine paint thinner or alcohol for cleaning the camera recorder Before cleaning detach the battery or pull out the AC mains lead from the AC mains socket The camera recorder body may be discolored and the surface finish may peel off Wipe the camera recorder with a soft dry cloth to remove dust and fingerprints To remov...

Страница 38: ...era recorder and the heads After use be sure to rewind the tape to the beginning put the cassette in the case to protect it from dust and store it upright Keep the cassette away from strong magnetism Apparatuses using magnets such as magnetic necklaces and toys have magnetic force that is stronger than expected and they may erase the contents of a recording or may increase noise ª LCD monitor view...

Страница 39: ...mong the other colors Since white color is the reference of all colors light the camera recorder can record pictures in a natural hue if it can recognize the reference white color ª Auto focus Auto focus automatically moves the focusing lens forward and backward inside the camera recorder to bring the subject into focus Auto focus has the following characteristics Adjusts so that the vertical line...

Страница 40: ...lds NTSC color signal Audio Recording system PCM digital recording 16 bit 48 kHz 2 ch 12 bit 32 kHz 4 ch Image sensor 1 6 inch 3CCD image sensor Effective pixels moving picture 290 Kk3 Total 460 Kk3 Lens Auto Iris F1 8 to F2 8 Focal length 2 45 mm to 24 5 mm Macro Full range AF Filter diameter 43 mm Zoom 10 1 Power zoom Monitor 2 5 inch LCD Viewfinder Color electronic viewfinder Microphone Stereo ...

Страница 41: ...41 Memo DVC20_Eng book 41 ページ 2006年4月6日 木曜日 午前10時10分 ...
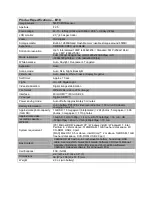
Страница 42: ...01 348 7587 Broadcast PARTS INFORMATION ORDERING 9 00 a m 5 00 p m EST 800 334 4881 24 Hr Fax 800 334 4880 Emergency after hour parts orders 800 334 4881 TECHNICAL SUPPORT Emergency 24 Hour Service 800 222 0741 Panasonic Canada Inc 5770 Ambler Drive Mississauga Ontario L4W 2T3 905 624 5010 Panasonic de Mexico S A de C V Av angel Urraza Num 1209 Col de Valle 03100 Mexico D F 52 1 951 2127 Panasonic...

Отзывы: