background image

Part Number 10400038-102 04/2007

©2007 Overland Storage, Inc.

W

Page 1 of 4

This document describes how to remove and replace an 
Overland ARCvault 48 chassis.

WARNING:  To reduce the risk of electric shock or 
damage, unplug the power cord.

CAUTION:  

A bracket and screws secure the robotics for 

shipment and MUST be removed before operating.

IMPORTANT:  If possible, document the current settings 
by printing out a Full Trace Log before swapping chassis.

Unpacking 

Carefully unpack and verify that you have all the parts: 

Spare 4U chassis

These remove & replace instructions

A Phillips screwdriver is also needed.

Electrostatic Discharge Information

A discharge of static electricity can damage micro-circuitry 
or static-sensitive devices. Observe all standard ESD 
procedures to help prevent electrostatic damage.

Unpack the spare chassis (

Figure 1

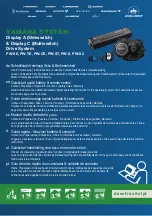
) and prepare it to receive the magazines and drives from the old unit.

Figure 1.  Unpacking the Spare Chassis

WARNING:  Due to the weight of the unit, it is 
recommended that at least two people be used to lift 
the unit out of the box to prevent injury.

1.

Open the box and remove the 

top caps

.

2.

Lift the 

chassis

 out and set it on a secure surface.

3.

Remove the chassis from the 

ESD bag

.


ARCvault  Series

4U Chassis Spare

Remove & Replace Instructions

Overview & Notes

A

RC

-0

03

6

TM

Unpack Spare Chassis

A

RC

-0

12

6

Top Caps

Carton

ESD Bag

Spare
Chassis

A

R

C

-0

07

1

Screw

Well Nut

Front Bezel

Off Table

Screws & Well Nuts

Must Be Removed

Shuttle Bracket Hole

Pull

Summary of Contents for ARCvault Series

Page 1: ...A discharge of static electricity can damage micro circuitry or static sensitive devices Observe all standard ESD procedures to help prevent electrostatic damage Unpack the spare chassis Figure 1 and prepare it to receive the magazines and drives from the old unit Figure 1 Unpacking the Spare Chassis WARNING Due to the weight of the unit it is recommended that at least two people be used to lift t...

Page 2: ...or 8 At the rear remove the AC receptacle label 9 Place all the packaging components including the bracket in the box and set aside for the old unit To replace a chassis you must first remove all the media magazines and drive assemblies Figure 4 Figure 4 ARCvault 48 Components to be Removed CAUTION Keep a loaded magazine level Don t hold magazine by the handle use both hands to support it Remove M...

Page 3: ...connector Leave the jumper cable attached to the drive assembly 5 With the wiring moved off to the right grasp the guide grips and remove the drive assembly 6 If any drives are installed in the lower drive bay repeat Steps 1 5 for the lower bay Be sure to retain the old drive cover assembly for installation on the new chassis Figure 6 Drive Assembly Connections 4 Drive Configuration Install Drive ...

Page 4: ...d screw as a handle c While continuing to hold the bracket against the shuttle tighten the screw into the well nut Figure 7 Well Nut Insertion Side View 5 Insert the remaining three well nuts using the extended screws and tighten all three 6 Carefully return the library to the upright position Repack the Chassis Once the robotics are secure repack the unit for shipment 1 Open the top of the box an...

Reviews: