Origin Acoustics SUBV10, Installation Manual
The Origin Acoustics SUBV10 is a powerful subwoofer that delivers deep, rich bass for your home audio system. Enhance your listening experience with this premium device. Ensure a seamless installation by downloading the free Installation Manual from our website today.
Share
Download


Reviews:
No comments
Related manuals for SUBV10

SW-200
Brand: Aaron Pages: 2

PB-208
Brand: Wharfedale Pro Pages: 2

Punch RFT4061A
Brand: Rockford Fosgate Pages: 52

Grand touring series
Brand: JBL Pages: 8

Stealthbox SB-GM-EQNX/10W1v3
Brand: JL Audio Pages: 4

JBL STAGE A120P
Brand: Harman Pages: 114
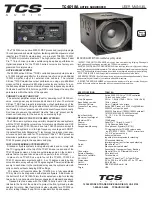
TC4018A
Brand: TCS Pages: 4

BRXBASCL
Brand: DLS Pages: 4

GT-BassPro12
Brand: JBL Pages: 9

P1224
Brand: JBL Pages: 2

NEWTON P200
Brand: Cambridge SoundWorks Pages: 14

Newton P1000
Brand: Cambridge SoundWorks Pages: 16

S100
Brand: Event electronics Pages: 5

CSW-1200
Brand: Denver Pages: 3

aero 50
Brand: D.A.S. Pages: 26

CHT-15
Brand: Velodyne Pages: 12

XTR 60
Brand: Coral Electronic Pages: 4

VSXNET Series
Brand: Tannoy Pages: 32


