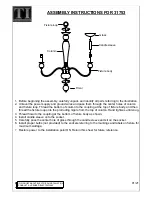
background image

WK-OC-21Y-02

5-Pieces Conversation Set

 W

A R

R A NT

Y


    1

Y E A R

1

Orange-Casual

Thank you for choosing Orange-Casual!

Our goal is to provide high quality outdoor furniture with 

outstanding customer service-all at an affordable price.

Please let us know how we are doing!

Problems?

(Missing pieces, wrong pieces...)

We will fix it Immediately. Send us an email at 

[email protected]

If you are not satisfied with our 

customer service, pls send your comments to 

[email protected]

.

Happy?

Please leave us a review!

You can make others happy too!

Summary of Contents for WK-OC-21Y-02

Page 1: ...ith outstanding customer service all at an affordable price Please let us know how we are doing Problems Missing pieces wrong pieces We will fix it Immediately Send us an email at help orange casual c...

Page 2: ...not use if you have any doubts about its Do not stand on the seat Do not sit on the armrest Do not let children play with this product Maximum load per seat 250lbs At the beginning of the season prod...

Page 3: ...In order to compress the package we put the cushions in the gap of some parts So there may be crinkle on the fabric Don t worry Just flap every corner of the cushion evenly and it will get back into...

Page 4: ...m no Reference Image Description Qty A B C D E F G H P Seat Base Seat Back COMPONENT LIST ARMCHAIR X 2 Washer Right Armrest Left Armrest 1 1 1 1 9 9 1 1 1 M6X35 Head Cap Screws Seat Cushion Pillow All...

Page 5: ...o warp If there is still wobbles or screw holes cannot be aligned loosen the screws and execute this same process If the Chair is not stable it could lead to damage to the product Attach the Seat Base...

Page 6: ...Attach the Seat Back D to the Right Armrest B and Seat Base A by securing with Head Cap Screws F and Washers E Do this in 3 places 2 5 x3 NOTE DO NOT TIGHTEN THE SCREWS COMPLETELY...

Page 7: ...Attach the Left Armrest C to the Seat Back D and Seat Base A by securing with Head Cap Screws F and Washers E Do this in 4 places 3 6 x4 NOTE DO NOT TIGHTEN THE SCREWS COMPLETELY...

Page 8: ...then place Seat Cushion H and Pillow P on the chair Your chair is ready for use 5 x9 G NOTE IF ANY SCREW HOLES CANNOT BE ALIGNED LOOSEN ALL THE SCREWS AND GO BACK STEP 1 AND RESTART ASSEMBLY Tighten a...

Page 9: ...8 Item no Reference Image Description Qty J K L M N E F G Table Top Back Panel Table Bottom COMPONENT LIST TABLE Washer Table Leg Table Leg 1 1 1 1 1 8 8 1 M6X35 Head Cap Screws Allen Key...

Page 10: ...o warp If there is still wobbles or screw holes cannot be aligned loosen the screws and execute this same process If the Table is not stable it could lead to damage to the product Attach the Table Leg...

Page 11: ...10 Attach the Back Panel M to the Table Leg K and Table Top J by securing with Head Cap Screws F and Washers E Do this in 2 places 2 x2 NOTE DO NOT TIGHTEN THE SCREWS COMPLETELY M F E K J x2...

Page 12: ...11 Attach the Table Leg L to the Table Top J and Back Panel M by securing with Head Cap Screws F and Washers E Do this in 2 places 3 x2 NOTE DO NOT TIGHTEN THE SCREWS COMPLETELY L F E M J x2...

Page 13: ...12 Attach the Table Bottom N to the Table Legs L K and Back Panel M by securing with Head Cap Screws F and Washers E Do this in 3 places 4 x3 NOTE DO NOT TIGHTEN THE SCREWS COMPLETELY F E N L K M x3...

Page 14: ...is ready for use 5 x8 G NOTE IF ANY SCREW HOLES CANNOT BE ALIGNED LOOSEN ALL THE SCREWS AND GO BACK STEP 1 AND RESTART ASSEMBLY Tighten all 8 Screws into place with Allen Key G 6 Adjust height for ba...

Page 15: ...m no Reference Image Description Qty S T U E R V G W Ottoman Top COMPONENT LIST OTTOMAN X 2 Washer Side Panel Connecting Rod 1 2 1 8 4 4 1 1 M6X15 Head Cap Screws M6X30 Head Cap Screws Allen Key Seat...

Page 16: ...p If there is still wobbles or screw holes cannot be aligned loosen the screws and execute this same process If the Ottoman is not stable it could lead to damage to the product Attach the Side Panels...

Page 17: ...16 Attach the Connecting Rod U to the Side Panels T by securing with M6 15 short Head Cap Screws V and Washers E Do this in 2 places 2 V U T T S 2 x4 NOTE DO NOT TIGHTEN THE SCREWS COMPLETELY...

Page 18: ...ottoman Your ottoman is ready for use 3 x8 G NOTE IF ANY SCREW HOLES CANNOT BE ALIGNED LOOSEN ALL THE SCREWS AND GO BACK STEP 1 AND RESTART ASSEMBLY Tighten all 8 Screws into place with Allen Key G 4...

Reviews: