opticis HDWX-10-TR, User Manual
The Opticis HDWX-10-TR is a high-definition video extender that delivers crystal-clear images over long distances. Ensure optimal performance by downloading the user manual for free from our website. This comprehensive manual provides all the information you need to set up and operate your HDWX-10-TR with ease.
Share
Download


Reviews:
No comments
Related manuals for HDWX-10-TR

6629
Brand: Oster Pages: 10

BPCT02
Brand: Oster Pages: 22

BLSTSS-PZ0
Brand: Oster Pages: 12

DL-UHDRC70
Brand: DigitaLinx Pages: 6

MIX & GO PRO
Brand: George Foreman Pages: 22

MSU440Z
Brand: Niles Pages: 2

03343D1-002
Brand: Patton Pages: 59

VT-8537
Brand: Vitek Pages: 36

NS-450
Brand: Nikrans Pages: 23
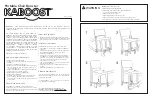
CHA-001
Brand: KABOOST Pages: 2

ARIES NAVS502
Brand: Nyrius Pages: 2

HB 07 UK
Brand: Indesit Pages: 13

40-19327
Brand: tams elektronik Pages: 24

EXT-DP12-OPT
Brand: Analog way Pages: 2

DVI-C5-R
Brand: Avenview Pages: 6

U22-160
Brand: Hall Research Technologies Pages: 9

NK188
Brand: Necchi Pages: 41

MH7601
Brand: Motorola Pages: 8


