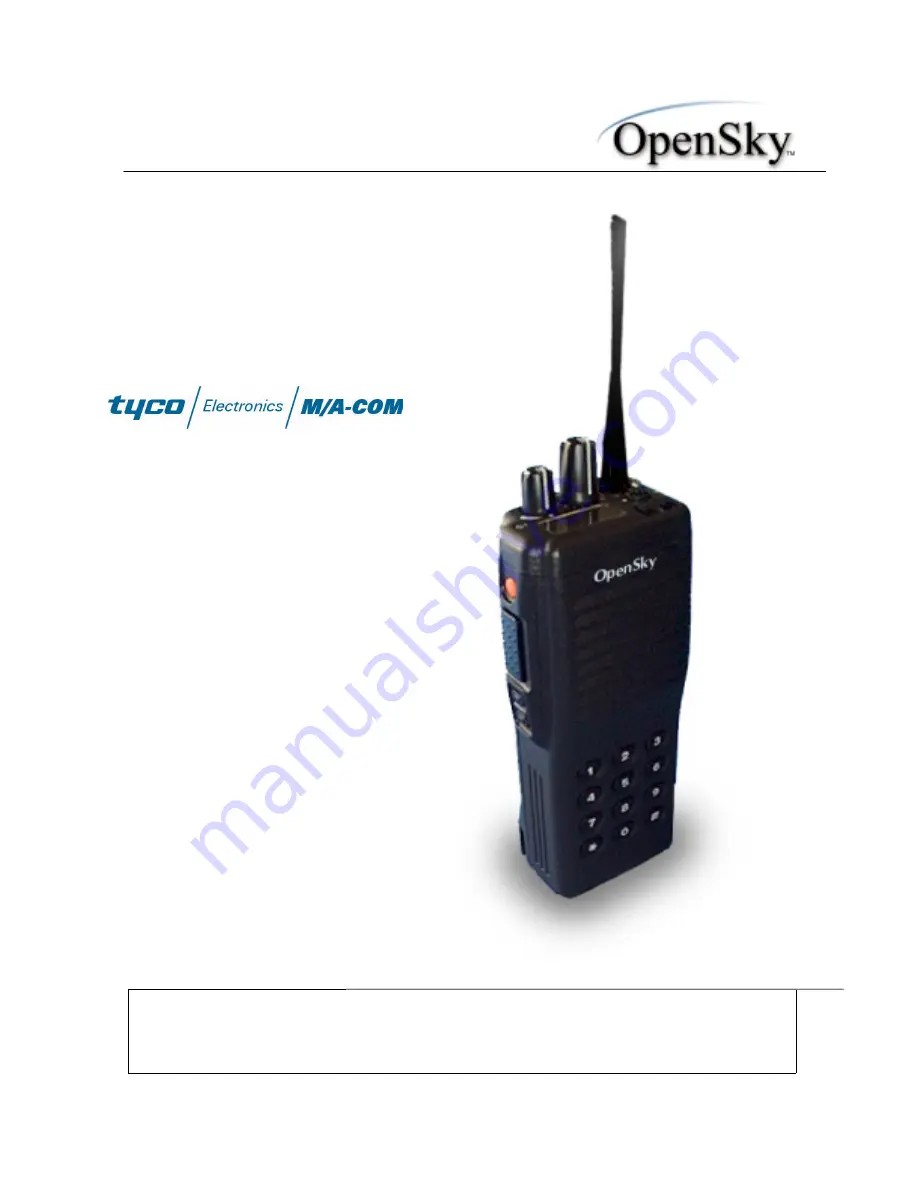
background image

User’s Manual
P-801T Portable
Radio

Copyright © 2000 M/A-COM. All rights reserved. No part of this publication may be reproduced, transmitted, transcribed, stored in a
retrieval system or translated into any language, in any from or by any means, electronic, mechanical, photocopying, recording or
otherwise, without prior written permission from M/A-COM.

The information furnished herein is believed to be accurate and reliable. However no responsibility is assumed by M/A-COM for its
use, nor any infringements of patents or other rights of third parties resulting from use.

Summary of Contents for P-801T

Page 1: ...r translated into any language in any from or by any means electronic mechanical photocopying recording or otherwise without prior written permission from M A COM The information furnished herein is believed to be accurate and reliable However no responsibility is assumed by M A COM for its use nor any infringements of patents or other rights of third parties resulting from use ...

Page 2: ...l trademarks of M A COM Inc Revision History Date Update by Description of change 05 01 2000 Matt Wachowiak New 06 05 00 Matt Wachowiak Global revision 11 22 00 Joe Xavier Added Occupational Safety Information M A COM Contact Information M A COM Inc 1011 Pawtucket Blvd Lowell MA 01853 Phone 978 442 4000 Software Version OTP 4 06 ...

Page 3: ... are designed to provide reasonable protection against harmful interference in a residential installation RF Interference This equipment generates and uses radio frequency energy and may cause harmful interference to radio communications if not installed and used in accordance with the instructions However there is no guarantee that the interference will not occur in a particular installation If t...

Page 4: ... Basic Operation 15 Turning the Radio On and Adjusting the Volume 15 Turning the Radio Off 16 Turning off the Display Lighting and Side Tones 17 Listening to Voice Calls 18 Making a Voice Call 19 Changing the Side Tone Setting 20 Adjusting the Display Brightness 21 Changing the Active Profile 22 Using Your Radio in Emergency Situations 23 Advanced Operation 24 Increasing the Scanning Priority of a...

Page 5: ...mlessly with existing applications and provides significant user benefits OpenSky Eliminates the need to carry more than one radio to communicate mission critical information by providing one communication system to many users and agencies Relieves radio users of the task of switching channels when moving to a new coverage area by automatically roaming between base stations Provides improved peak ...

Page 6: ...res such as voice grouping to be supported Operating modes The P 801T is a digital multi mode radio that can operate in one of many modes The principle operating modes are OpenSky Trunked Protocol OTP or OpenSky Conventional FM with Continuous Tone Coded Squelch System CTCSS Terms and concepts you need to know Before using the P 801T radio you may want to become familiar with some terms and concep...

Page 7: ...in a user group Your OpenSky network administration personnel establish and organize user groups An OpenSky user group is similar to a channel in a conventional FM radio system Diagram The figure below illustrates the user group concept User group Example For a state police agency the officers assigned to the same barracks might be in the same user group Individual Radio Users ...

Page 8: ...e below illustrates the profile concept Profile User Group 1 User Group 2 User Group 3 User Group 16 Example Police officers on the same shift could be in the same profile P01 The user groups that make up this profile might be organized by the physical location of the police stations The diagram below illustrates this example P01 Profile North Station East Station Southeast Station South Station ...

Page 9: ...n each profile is your talk group Listen group The rest of the 15 possible user groups in a profile are listen groups You normally hear the voice calls from the users in this group but your voice does not transmit to them Diagram The figure below illustrates the talk and listen group concepts User Group 1 User Group 2 User Group 3 User Group 16 Talk Group Listen Groups Example Police officers assi...

Page 10: ...iles you need Of the 16 possible profiles only one is active at any given time Diagram The figure below illustrates the radio personality concept Profile 1 Profile 2 Profile 3 Profile 4 Profile 16 User Group 1 User Group 2 User Group 3 User Group 16 Example The radio personality for a police officer could include the profiles Profile 1 Profile 2 and Profile 3 These profiles could represent each of...

Page 11: ...ly listen to You do not normally transmit voice to users in your listen groups Profiles are comprised of up to 16 user groups and are used to organize your radio personality into categories defined by your network administrators Each time you turn on your radio you access the OpenSky network and user features are loaded into your radio These user features are known as your radio personality Your r...

Page 12: ...cators General Four top panel switches and four side panel switches provide user control of major radio functions The display and status indicators show key operating information Diagram The following diagram shows the controls and indicators for the P 801T radio ...

Page 13: ...nd user group information When the menu or select buttons are pressed the menu display temporarily changes to show the selected menu screen If no buttons are pressed the display returns to the primary menu Indicator Light Turns red and blinks when transmitting Turns green and blinks when receiving a call Emergency Button Sends and emergency alert over the network and initiates an emergency call Al...

Page 14: ...tion Menu Display and Control Area The display panel normally provides profile and user group information to the user When Menu or Select buttons are pressed the menu display and control area temporarily changes to show information relevant to the selected menu screen Status Area The bottom of the display shows mode related information and radio protocol status The appears when you are connected t...

Page 15: ...isplay to the next available menu item Background The primary menu is displayed if you are not pressing the menu keys If you move to another menu the radio will return to the primary menu if no key is pressed for 10 seconds Diagram The diagram below shows the menu items Primary Menu Push to go forward to the next menu item Push to go back to the next menu item Lock out Mode Display Brightness Side...

Page 16: ...nges the active profile A profile is identified by its number and the name of the talk group Priority Scan User group Priority scan Displays the available user groups in the currently selected profile and chooses one of those user groups as the priority scan user group Scan Mode Identifies the chosen scan mode Scan menu indicator Changes the scan modes to either None Normal or Talkback Channel Cha...

Page 17: ...l ranges from 1 to 3 Increases or decreases the display brightness Mode Displays active software and version number Change Mode Select to Execute Mode Change Changes the mode of the radio Once selected the menu advances to the mode change menu sequence Lock out User group Indicates locked out Blank for not locked out Prevents you from hearing voice calls from the selected user group Does not lock ...

Page 18: ... than 1 inch from your body especially your face ears or eyes while transmitting 2 When using the radio angle the antenna away from your body and do not allow the antenna to touch your body during transmission 3 When using the remote speaker microphone antenna a separate accessory available to P 801T users do not allow the antenna portion to be less than 1 inch from your body especially the face e...

Page 19: ...se until it clicks The startup sequence lasts approximately 10 seconds The radio is ready to use after this sequence Use the figure below to see how the radio may appear as it is ready for use 2 Turn the Power Volume switch to adjust the volume Turning the switch clockwise increases the volume and counterclockwise decreases the volume Indicates you are connected to the OpenSky Profile number displ...

Page 20: ...the step below to shut off the radio Step Action 1 Turn the power volume switch counter clockwise until it clicks Result The display changes to show SHUTDWN and the radio shuts down The operating mode of the radio is saved and recalled on the next start up of the radio ...

Page 21: ...urpose the radio has a toggle switch which disables the radio display light indicator light and audible side tones Figure The following figure shows the location of the toggle switch and the features it controls Procedure Follow the step below to turn off the display lighting and side tones Step Action 1 Push the toggle switch in the direction of the arrow to position B A B Result The display ligh...

Page 22: ... what happens when you receive a voice call Stage Description 1 Your radio display changes briefly to show the name of the user group that the call is coming from 2 The indicator light will turn green and blink while the call is being received 3 At the end of the call you will hear a single end tone This lets you know that the person speaking is through with that portion of their transmission ...

Page 23: ...ator light tells you that a call is being received 3 Push the push to talk button and speak normally For best results hold the transceiver approximately 1 inches from your mouth If you hear 3 rapid beeps the network is busy Wait a few seconds and try your call again If you hear a 3 beep medium medium high sequence your call is in the queue When the network is available the radio automatically tran...

Page 24: ...e your next step If you want to Then Press a Select button until the display shows Hear side tones Press a Select button until the display shows SIDE ON Disable side tones Press a Select button until the display shows SIDEOFF Result You will have changed the side tone setting 3 To return to the menu display choose from the following table To return Then Immediately Press a Menu button After a brie...

Page 25: ...the table below to determine your next step If you want to Then press Increase brightness The upper Select button Decrease brightness The lower Select button 3 To return to the menu display choose from the following table To return Then Immediately Press a Menu button After a brief wait Wait approximately 10 seconds Result The radio will return to the menu display Note When the radio is turned off...

Page 26: ... of talk groups and listen groups that you communicate with Procedure Follow the step below to change the active profile Step Action 1 Turn the Profile selector to move to the desired profile Result The displayed profile is now active The radio display will change to show the name for the talk group in the selected profile and the new profile number Note When turned on the radio activates the prof...

Page 27: ...Step Action 1 Press the orange emergency button on your radio to send the emergency alert Other users hear a distinctive 3 tone burst of sound At the same time an emergency talk group is enabled 2 Press the push to talk button to send your voice out on the emergency talk group All of the radios in the emergency talk group will hear your call and see the emergency talk group displayed on their radi...

Page 28: ...or scanning priority Process The table below describes the process for increasing a user group s scanning priority Stage Description 1 The profile containing the user group you wish to prioritize is activated 2 The priority menu is accessed 3 The desired user group is prioritized Procedure Follow the steps below to increase the scanning priority of a user group Step Action 1 Turn the Profile selec...

Page 29: ...sion priority is increased 4 To return to the menu display choose from the following table To return Then Immediately Press a Menu button After a brief wait Wait approximately 10 seconds Result The radio will return to the menu display Notes Changing the priority of a listen group does not change your talk group You can prioritize one user group in each of the profiles in your radio personality Th...

Page 30: ... the profiles for your radio personality Definitions The following table defines each of the three scanning modes Mode Definition No Scanning You do not hear calls from the listen groups Normal Scanning You hear calls from the listen groups This is the default setting Talkback Scanning You hear calls from the listen groups If you press the push to talk switch before a timer expires you will be abl...

Page 31: ...layed Use normal scanning SC NORM is displayed Broaden your voice transmissions to users beyond the active talkgroup SC TLKB is displayed Result The scanning mode you chose is now active for all profiles in your radio personality 3 To return to the menu display choose from the following table To return Then Immediately Press a Menu button After a brief wait Wait approximately 10 seconds Result The...

Page 32: ...o to a different channel Procedure The table below describes the procedure for displaying and changing the active radio channel Step Action 1 Press a Menu button until the channel display shows 2 Press a Select button to display a different radio channel 3 Wait until the radio synchronizes on the new channel Result You will see the in the bottom right corner of the display This shows that the radi...

Page 33: ...n manually change the mode of operation Procedure The table below describes the steps to follow for changing the operating mode of the radio Step Action 1 Press a Menu button until the mode change menu appears 2 Press the upper Select button to access the Change Mode 2 menu 3 Choose the next step from the table below To Press Abort the mode change Menu Result The radio will display ABORTED and the...

Page 34: ...ver the Air Trunked Download 5 Press the Menu B button to change the mode 6 Choose the next step from the table below To Press Abort the mode change Menu A Result The radio will display ABORTED and the change will be aborted Continue Select Result The radio displays BOOTING and automatically shuts off and turns on in the selected operating mode Note When the radio is turned off the operating mode ...

Page 35: ... is loaded with the names of the calling user groups You then select the name of the user group to be locked out from the menu Procedure Follow the steps below to lock out a user group Step Action 1 Press a Menu button until the lockout menu appears 2 Choose the next step from the table below If Then NONE is displayed There are no user groups to lock out because you have not received any voice cal...

Page 36: ...r voice calls from the user groups you have locked out 4 To return to the menu display choose from the following table To return Then Immediately Press a Menu button After a brief wait Wait approximately 10 seconds Result The radio will return to the menu display Note Changing the active profile removes any lockouts you have made Turning off the radio removes any lockouts you have made ...

Page 37: ...ified service technician for help Symptom Likely Cause Suggested solutions Radio will not turn on Low battery Change your battery pack to a fully charged pack No audio Speaker volume is muted Increase the volume level Poor audio You are in a poor coverage area or you are not on the network Antenna connection is loose Move to a better coverage area Ensure that the antenna is fully connected to the ...

Reviews: