RESCUE
®
Select Pro
™
Motor Installation
and Configuration Guide
For technical assistance or questions
related to your RESCUE
®
Select Pro™ Motor
call the Technical Hotline:
1-888-540-5540
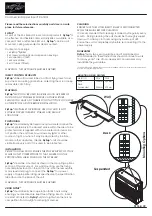
Read the entire manual prior to installation and operation
of the RESCUE
®
Select Pro™ Motor.
Follow all instructions contained herein.