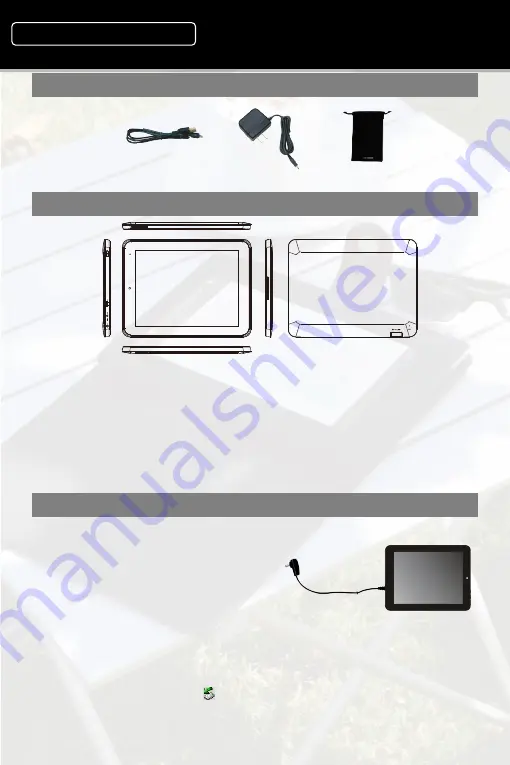
background image

1

Accessories

USB Cable

DC Adaptor

Pouch

Buttons & Ports

Step by Step to Get Started

STEP 1 Charge the Battery

Plug the DC adaptor to the POWER-­IN port of the
unit and the standard 220V power socket to start
charging. It takes about 5 hours to fully charge the
battery. The charge indicator should light up in
orange once the battery is fully charged.

STEP 2 Transfer files

(1) Connect the device to computer with the supplied USB cable.
(2) Two new removable disk drives should appear on your computer standing for the internal

memory of the device and the memory card inside it.

(3) Copy files to the removable disk drive just as you would do to your hard drive.
(4) On your computer, left click the

icon at the right bottom corner of the desktop and then

click the pop-­up message “Stop the USB Mass Storage Device – Drive (X).” to disconnect
the device from the computer safely.

8” Capacitive Touch Android Tablet

Quick Start Guide

NEXT8P12

Ver.1.0

g.

Earphone Port –

connect to

stereo earphones.

h. Charge indicator
i. Camera lens
j. Touch screen
k. Built-­in speakers
l. Micro SD card slot
m. Reset pin hole –

reset your

device if it freezes.

a. VOL+ –

turn up the volume

b. VOL-­ -­

turn down the volume

c. Power button –

press and hold to power on or off

the unit;; briefly press to turn on or off the screen.

d. Micro USB Port –

to a computer through USB

cable.

e. POWER-­IN port -­

connect to power supply through

DC adaptor

f. Built-­in microphone

a b

c

d

e

fg

h

i

j

k

l

m

Summary of Contents for NEXT8P12

Page 1: ...ive just as you would do to your hard drive 4 On your computer left click the icon at the right bottom corner of the desktop and then click the pop up message Stop the USB Mass Storage Device Drive X to disconnect the device from the computer safely 8 Capacitive Touch Android Tablet Quick Start Guide NEXT8P12 Ver 1 0 g Earphone Port connect to stereo earphones h Charge indicator i Camera lens j To...

Page 2: ...nnect it Some networks may require password Enter password before connecting Home Screen Indications Extended Home Screen Slide your finger horizontally on the screen to go to the left or right panel of the ex tended Home Screen Add an Item To add a Home Screen item shortcuts widgets folders etc tap to display applications and then hold your tap on an item and place it to the home screen Hold down...

Page 3: ......

Page 4: ...k FAQ FAQ about the unit Calendar Nextbook Guide Guide on how to use the unit Camera take photos or video clips Office Suite View Office document in WORD EXCEL etc Clock Email Send or receive e mails Downloads store downloaded applications Edit videos E book Read e books stored in the unit Net Nanny Browser An Internet filtering software that helps parents protect their children and monitor their ...

Page 5: ...plications Home Go to the Home Screen LevelUp Go back one level in the directory Multi Select more than one file Editor Copy delete move paste or rename the file or folder New Folder Create a new folder Back Go back one level in the interface Next Go forward one level in the interface Home Go to the Home Screen Up Go back one level in the directory Multi Select more than one file Edit Copy delete ...

Page 6: ...ory We strongly recommended that you observe the usage precautions laid out in this instruction In no event will E Fun be liable for any direct incidental special or consequential damages to any person caused by E Fun s negligence or for any lost profits lost savings loss of use lost revenues or lost data arising from or relating to this device even if E Fun has been advised of the possibility of ...

Page 7: ... disque dur 4 Sur votre ordinateur faites un clic gauche sur l icône dans le coin inférieur droit du bureau puis cliquez sur le message contextuel Arrêter le périphérique de stockage de masse USB Disque X pour déconnecter le périphérique de l ordinateur en toute sécurité g Port pour écouteurs connexion à des écouteurs stéréo h Indicateur de charge i Objectif de l appareil photo j Écran tactile k H...

Page 8: ...tionnez un réseau dans la liste des réseaux de la fenêtre de droite puis appuyez sur Connexion pour vous connecter certains réseaux pourraient exiger de mot de passe Entrez le mot de passe avant la connexion Écran d accueil Indications Écran d accueil étendu Faites glisser votre doigt horizontalement sur l écran pour aller ay panneau de gauche ou de droite de l écran d accueil étendu Aller à la pa...

Page 9: ......

Page 10: ...B N Nook ...

Page 11: ...tion devrait apparaître dans la page d applications Désinstaller des applications 1 Appuyez sur icône de réglage sur l écran d accueil 2 Appuyez sur Apps puis appuyez sur l application que vous souhaitez désinstaller dans la fenêtre de droite En faisant glisser votre doigt sur la barre d outils vous pouvez faire dérouler tous les outils Appuyer sur la zone grise affiche cache la barre d outils En ...

Page 12: ...un ne sera tenu responsable pour tout dommage indirect accessoire spécial ou consécutif subi par une personne suite à la négligence de E Fun ou pour toute perte de profits d économie d utilisation de revenus ou de données provenant ou lié à cet appareil même si E Fun a été avisé de la possibilité de tels dommages En aucun cas E Fun ne sera tenu responsable des dommages encourus par vous ou toute a...

Reviews: