Summary of Contents for C17DR00.0

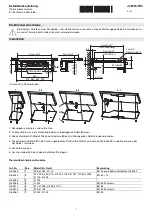
Page 1: ...Steamer en User manual and installation instructions C17DR00 0 ...

Page 2: ...roup This appliance may be used by children aged 8 or over and by people who have reduced physical sensory or mental abilities or inad equate experience and or knowledge provided that they are supervised or have been instructed on how to use the appliance safely and have understood the resulting dangers Children must not play with the appliance Children must not perform cleaning or user maintenanc...

Page 3: ...st staff If the insulation of the power cord is dam aged this is dangerous Never let the power cord come into contact with hot appliance parts or heat sources Never let the power cord come into contact with sharp points or edges Never kink crush or modify the power cord An ingress of moisture can cause an electric shock Do not use steam or high pressure clean ers to clean the appliance If the appl...

Page 4: ...for a long time with the door closed Do not store food in the cooking compartment If aluminium foil comes into contact with the door pane it could cause permanent discolouration Do not allow aluminium foil in the cooking compart ment to come into contact with the door pane Improper care may lead to corrosion in the cooking compartment Observe the care and cleaning instructions Once the appliance h...

Page 5: ...formation Displays the current temperat ure Time setting options Sets the timer cooking time and Ready at time for delayed starts Childproof lock Activates and deactivates the childproof lock Start stop Starts pauses or cancels oper ation ShiftControl control element Use the ShiftControl control elements to navigate through the rows on the display and select settings Settings that you can change h...

Page 6: ...res between 50 and 95 C and in 100 steam Suitable for meat fish vegetables and desserts A vacuum sealing machine is used to heat seal the food in special air tight heat resistant cooking bags The pro tective envelope retains the nutrients and flavours 4 4 Viewing additional information If is lit you can display additional information Press a The additional information will be displayed for a few s...

Page 7: ...tainer solid size L Boil rice pulses or cereals Catch dripping liquid e g when steaming Perforated steam container size L Steam whole fish or larger quantities of vegetables Juice large quantities of berries 5 1 Locking function The locking function prevents the accessories from tilt ing when they are pulled out You can pull out the accessories approximately halfway without them tipping The access...

Page 8: ...appliance can reliably remind you to descale it when required you must set your water hard ness range correctly ATTENTION If the wrong water hardness has been set the appli ance cannot remind you to descale it at the right time Set the water hardness correctly Using unsuitable liquids may damage the appliance Do not use distilled water highly chlorinated tap wa ter 40 mg l or other liquids Only us...

Page 9: ...ocess the appliance adjusts to the pressure conditions in the location where it is in stalled Large amounts of steam may be generated dur ing the calibration process Running the calibration process Notes Do not open the appliance door while calibration is in progress as this will abort the calibration process If you move house restore the appliance s basic factory settings once it is installed so ...

Page 10: ...he appliance door carefully Keep children at a safe distance The water in the evaporator dish is still hot even after the appliance has been switched off Never empty the evaporator dish immediately after switching off the appliance Allow the appliance to cool down before cleaning When you open the appliance door hot water may flow out of the appliance When opening the door do not stand too close t...

Page 11: ...e If the water tank does not contain sufficient water for cooking fill the water tank Filling the water tank Page 10 7 8 Heat up indicator When you start a heating function the heat up indicator will appear on the display The heat up indicator visual ises the rising temperature in the cooking compart ment Note If the Steam heating function has been set the heat up indicator will not be displayed 7...

Page 12: ... 1 Press 2 Use the button to set a timer duration of 00 00 a This cancels the current timer duration 8 3 Setting the cooking time Once the set cooking time has elapsed the appliance switches off automatically You can only use the cook ing time in conjunction with a heating function Requirement A heating function and a temperature must have been set 1 Press 2 Select the default value Button Default...

Page 13: ...pen the appliance door carefully Keep children at a safe distance 1 Press 2 Use or to select Steam programmes 3 Use to navigate to the next row 4 Use or to select the required steam programme 5 Use to navigate to the next row 6 Use to start the steam programme a The appliance starts to heat and the time counts down a The displayed cooking time may change during the first few minutes as the heat up...

Page 14: ...ated steaming tray 2 Sterilise bottles1 Unperforated steaming tray 2 Make soft boiled eggs1 Medium eggs max 1 kg Perforated unperforated steaming tray 2 1 Make hard boiled eggs1 Medium eggs max 1 8 kg Perforated unperforated steaming tray 2 1 1 You can set an end time for this dish 2 Do not season vegetables until after cooking 3 Do not place filets or other food items on top of each other 9 5 Coo...

Page 15: ...ce to prevent children from accidentally switching it on or changing the set tings 10 1 Locks Your appliance has two different locks Lock Activate deactivate Automatic childproof lock Go to Settings One time childproof lock Using the touch button 10 2 Activating the automatic childproof lock The automatic childproof lock disables the control panel to prevent children from accidentally switching on...

Page 16: ... off the button tone for the button re mains active even when the button tones are de activated Switched on Display brightness Can be adjusted to one of five different levels Clock display Digital Off Lighting Switched on during oper ation Switched off during oper ation Automatic childproof lock Deactivated Activated Setting Selection Operating mode on start up Steam Main menu Steam programs Night...

Page 17: ...gent After cleaning the surface dry it with a soft cloth Use a soft window cloth or a lint free mi crofibre cloth to apply a mild window clean ing agent to the appliance s aluminium front and wipe it horizontally across the surface without applying pressure Stainless steel Soapy water Special stainless steel cleaner After cleaning the surface dry it with a soft cloth To prevent corrosion remove an...

Page 18: ... the seal in the tank lid and the tank recess in the appliance 4 Slot the water tank back into the water tank recess 5 Close the appliance door 12 6 Descaling To ensure that your appliance continues to operate cor rectly it must be descaled regularly How often you need to descale your appliance depends on the hard ness of the water used Notes Only use the liquid descaler recommended by us for desc...

Page 19: ...other delicate surfaces it will damage them Remove descaling solution immediately with water 1 Mix 100 ml water with 20 ml liquid descaler to make a descaling solution 2 Completely fill the evaporator dish with descaling solution 3 Fill the water tank with water and then slide it all the way into the appliance 4 Close the appliance door 5 Start the descaling process Page 18 12 7 Appliance door To ...

Page 20: ... hinges can be inserted straight into the opening 2 Open the appliance door fully 3 Close the locking levers 4 Close the appliance door 12 8 Door panels To make it easier to clean the door panels you can re move the appliance door Removing the door panels WARNING Risk of injury The hinges on the appliance door move when the door is opened and closed which could trap your fingers Keep your hands aw...

Page 21: ... outs on the left and right are at the top The panel must be sitting correctly at the bottom in the retainer 4 Push the inner panel in at the top 5 Put the cover back in place and press on it until you hear it click into place 6 Open the appliance door fully 7 Close the two locking levers on the left and right 8 Close the appliance door 13 Troubleshooting You can rectify minor faults on your appli...

Page 22: ...ssage when calling Appliance will not start Appliance door not fully closed Close appliance door Appliance not switched off Switch the appliance off and then on again Time not displayed when appli ance switched off Appliance prompting you to wipe down cooking compartment and fill water tank The power supply has been disconnected or the appliance has been switched off during the descaling process W...

Page 23: ...ocess Steam escaping from ventilation slots during cooking This is standard procedure No action required 13 2 Replacing the cooking compartment bulb If the cooking compartment light has failed replace the cooking compartment bulb Note Heat resistant 25 watt 230 V halogen bulbs are available from the after sales service or specialist retail ers Only use these bulbs Hold the new halogen bulbs only w...

Page 24: ...ppliances as applicable throughout the EU 15 How it works Here you can find the ideal settings for various dishes as well as the best accessories and cookware We have tailored these recommendations to your appli ance 15 1 What is the best way to proceed WARNING Risk of scalding Hot steam may escape when you open the appliance door Steam may not be visible depending on the tem perature When opening...

Page 25: ...to use two steaming trays instead Cooking whole menus With Steam functions you can cook whole menus at once without the risk of flavours being transferred from one dish to another Place the food with the longest cooking time into the cooking compartment first Add the rest of the food at the appropriate times This means that all the food will be ready at the same time Cooking whole menus at once ex...

Page 26: ...ated un perforated steam ing tray 100 2 3 Romanesco Florets Perforated un perforated steam ing tray 100 8 10 Brussels sprouts Sprouts Perforated un perforated steam ing tray 100 20 30 Beetroot Whole Perforated un perforated steam ing tray 100 40 50 Red cabbage Shredded Perforated un perforated steam ing tray 100 30 35 White cabbage Shredded Perforated un perforated steam ing tray 100 25 35 Courget...

Page 27: ...ay 2 100 30 35 Lentils 1 2 Unperforated steaming tray 2 100 35 50 Cannellini beans pre softened 1 2 Unperforated steaming tray 2 100 65 75 Couscous 1 1 Unperforated steaming tray 2 100 6 10 Unripe spelt grain coarsely ground 1 2 5 Unperforated steaming tray 2 100 15 20 Millet whole 1 2 5 Unperforated steaming tray 2 100 25 35 Wheat whole 1 1 Unperforated steaming tray 2 100 60 70 Dumplings Perfora...

Page 28: ... foil Sausages Food Accessories cookware Shelf position Heating function Temperature in C Cooking time in min Wiener sausages Perforated un perforated steam ing tray 2 1 80 90 12 18 Bavarian veal sausages Perforated un perforated steam ing tray 2 1 80 90 20 25 15 6 Fish Recommended settings for cooking fish and mussels Fish Food Amount Accessories cookware Shelf position Heating func tion Temperat...

Page 29: ...ar and spices to taste 4 Use the recommended settings when configuring the appliance settings Making rice pudding 1 Weigh the rice 2 Add 2 5 times the amount of milk 3 Pour the rice and milk into a bowl until you have a mixture that is no more than 2 5 cm deep 4 Use the recommended settings when configuring the appliance settings 5 Stir the rice pudding after cooking a The rice pudding will absorb...

Page 30: ...rforated steaming tray 2 100 12 15 Pasta potatoes rice Unperforated steaming tray 2 100 5 25 15 10 Defrosting The Defrost steam function is suitable for defrosting frozen fruit and vegetables It is best to defrost meat and fish in the refrigerator If you want to retain liquid in the frozen food e g frozen creamed spinach use the unperforated steaming tray Notes The times specified in the table are...

Page 31: ...ving Preserve fruit and vegetables by heating them and sealing them in air tight jars Preserve food when it is fresh When foods are stored for a relatively long period their vitamin con tent is reduced and they ferment and spoil more easily Only use fruit and vegetables that are in perfect con dition You cannot preserve the following food in your ap pliance The contents of tin cans meat fish or pi...

Page 32: ...ood in the refrigerator before you starting the cooking process Once the food is cooked consume it immediately Do not store it after cooking not even in the refri gerator It is not suitable for reheating To kill germs place the vacuum sealed uncooked food in boiling water for max 3 seconds a This prepares your ingredients for sous vide cooking so that they are relatively free from germs and hy gie...

Page 33: ...you would expect from fry ing sear it for a few seconds on each side Fry the food for longer if it has not been sufficiently well cooked dur ing the sous vide cooking stage Serve the fish on pre heated plates and with a hot sauce or but ter as sous vide cooking takes place at low temperatures Vegetables Sear vegetables briefly to give them the flavours you would ex pect from frying Season vegetabl...

Page 34: ...ture in C Cooking time in min Tips and informa tion Duck breast 350 g each Perforated un perforated steam ing tray 62 70 Cut into the layer of fat season the meat side with a little salt and pep per and vacuum seal it along with a small piece of orange peel Chicken breast 250 g each Perforated un perforated steam ing tray 65 60 Vacuum seal along with some butter a little salt and thyme Fish An ove...

Page 35: ...r Vacuum seal along with some butter salt a little sugar and pep per Carrots in 0 5 cm slices 600 g Perforated un perforated steam ing tray 90 70 80 Vacuum seal along with some orange juice curry powder paste and butter Potatoes peeled and quartered 800 g Perforated un perforated steam ing tray 95 35 45 Vacuum seal along with some butter and salt Note Can be used for making dishes such as salad Ch...

Page 36: ...alved 12 16 kumquats Perforated un perforated steam ing tray 85 75 80 Note Rinse un der warm water cut in half and deseed Vacuum seal along with some butter a vanilla pod honey and apricot jam Vanilla sauce 0 5 l Perforated un perforated steam ing tray 80 15 25 Mix 0 5 l milk 1 egg 3 egg yolks 80 g sugar pulp of a vanilla pod and va cuum seal 15 14 Dough proving Recommended settings for proving do...

Page 37: ...Perforated un perforated steam ing tray 2 1 100 6 10 Peas Perforated un perforated steam ing tray 2 1 100 5 12 Carrots Perforated un perforated steam ing tray 2 1 100 4 6 Mixed vegetables Perforated un perforated steam ing tray 2 1 100 6 10 Brussels sprouts Perforated un perforated steam ing tray 2 1 100 5 10 1 Add a little water to the food 15 16 Test dishes These overviews have been produced for...

Page 38: ...pliance 17 1 General installation instructions Follow these instructions before you start with the installation of the appliance The safe operation of this appliance can only be guaranteed if it has been installed to a professional standard in accordance with these installation instructions The in staller shall be liable for damages incurred as a result of incorrect installation Check the applianc...

Page 39: ...not sup port the weight of the appliance Do not carry or hold the appliance by the door handle 17 2 Appliance dimensions You will find the dimensions of the appliance here 17 3 Installation below a worktop Observe the installation dimensions and the installation instructions when installing below a worktop To ventilate the appliance the intermediate floor must have a ventilation cut out The workto...

Page 40: ...r a clicking sound A 3 m power cable can be obtained from the after sales service The power cable must only be replaced with a cable from the original manufacturer This is available from after sales service Contact protection must be ensured during the in stallation Electrically connect the appliance with the protective contact plug Note The appliance must only be connected to a pro tective contac...

Page 41: ...the bottom 7 If required the gap between the appliance door and the side panels can be adjusted using the screws at the top left and right Note The gap between the worktop and the appliance must not be closed by additional battens Thermal insulation strips must not be fitted to the side panels of the surround unit 17 9 Removing the appliance 1 Disconnect the appliance from the power supply 2 Open ...

Page 42: ......

Page 43: ......

Page 44: ...l Wery Straße 34 81739 München GERMANY 9001593733 9001593733 010506 en Valid within Great Britain Imported to Great Britain by BSH Home Appliances Ltd Grand Union House Old Wolverton Road Wolverton Milton Keynes MK12 5PT United Kingdom ...

Reviews: