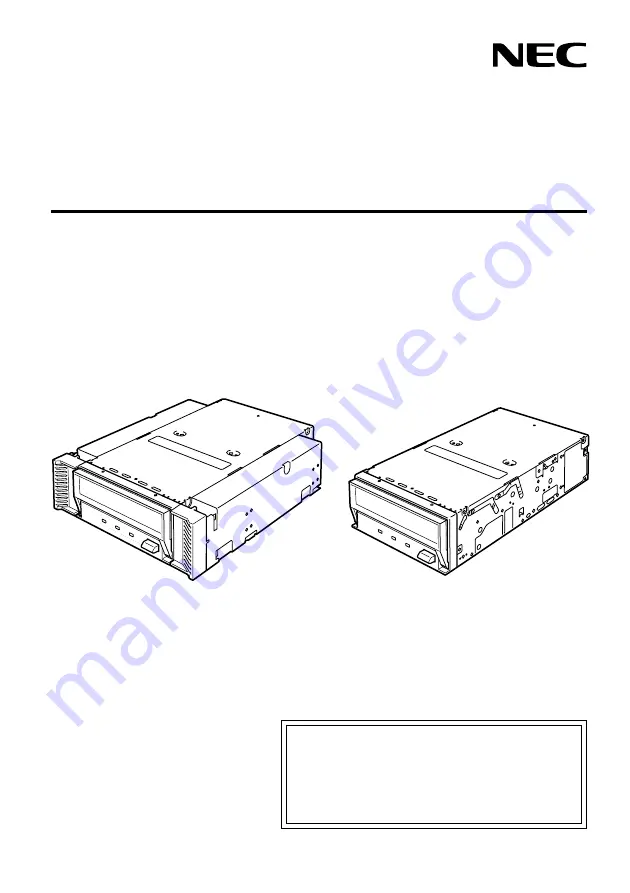
background image

N8151-50/N8151-50F

内蔵

AIT (IDE) / Built-In AIT (IDE)

取扱説明書

......................

1

ページ

User’s Guide

...............

Page 53

製品をご使用になる前に必ず本書をお読みください。

本書は熟読の上、大切に保管してください。

• Make sure you read this manual before using the

product.

After reading this manual carefully,

store it in a safe place.

4-668-674-

03

(1)

Summary of Contents for N8151-50

Page 1: ...DE Built In AIT IDE 取扱説明書 1 ページ User s Guide Page 53 製品をご使用になる前に必ず本書をお読みください 本書は熟読の上 大切に保管してください Make sure you read this manual before using the product After reading this manual carefully store it in a safe place 4 668 674 03 1 ...

Page 2: ......

Page 3: ...on network operating system version 4 0の略称です Windows 2000は Microsoft Windows 2000 Professional Microsoft Windows 2000 Server およびMicrosoft Windows 2000 Advanced Serverの略称です サンプルアプリケーションで使用している名称は すべて架空のものです 実在する品名 団体名 個人名とは一 切関係ありません ご注意 1 本書の内容の一部または全部を無断転載することは禁止されています 2 本書の内容に関しては将来予告なしに変更することがあります 3 NECの許可なく複製 改変などを行うことはできません 4 本書は内容について万全を期して作成いたしましたが 万一ご不審な点や誤り 記載もれなどお気づきのこ とがありましたら お買い求めの販売店...

Page 4: ...ラベルでは危険の程度を表す言葉として 警告 と 注意 という用語を 使用しています それぞれの用語は次のような意味を持つものとして定義されます 警告 指示を守らないと 人が死亡する または重傷を負うおそれがあるこ とを示します 注意 指示を守らないと 火傷やけがなどを負うおそれや物的損害を負うお それがあることを示します 危険に対する注意 表示は次の3種類の記号を使って表しています それぞれの記号は次 のような意味を持つものとして定義されています 注意の喚起 この記号は指示を守らないと 危険が発生するお それがあることを表します 記号の中の絵表示は 危険の内容を図案化したものです 行為の禁止 この記号は行為の禁止を表します 記号の中や近 くの絵表示は してはならない行為の内容を図案 化したものです 行為の強制 この記号は行為の強制を表します 記号の中の絵 表示は しなければならない行為の内...

Page 5: ...る電源コードをACコンセントから抜 いてください 電源コードがACコンセントに接続されたまま取り 付け 取り外しや接続をすると感電をするおそれがあります 注意を促す記号 危険に対する注意の内容 危険の程度を表す用語 感電のおそれがあることを示し ます 発煙または発火のおそれがある ことを示します 特定しない一般的な禁止を示し ます 指などがはさまれるおそれがあ ることを示します 特定しない一般的な注意 警告 を示します 本装置を分解 修理 改造しな いでください 感電や火災のお それがあります 本装置の電源プラグをコンセン トから抜いてください 火災や 感電のおそれがあります 特定しない一般的な使用者の行 為を指示します 説明に従った 操作をしてください ...

Page 6: ...りません これらの設備や機器 制御システ ムなどに本装置を使用した結果 人身事故 財産被害などが生じて も当社はいかなる責任も負いかねます 煙や異臭 異音がしたまま使用しない 万一 煙 異臭 異音などが生じた場合は ただちに基本処理装置 の電源をOFFにして電源コードをAC コンセントから抜き 本装置 のDCケーブルを抜いてください その後 お買い求めの販売店また は保守サービス会社にご連絡ください そのまま使用すると火災の 原因となります 針金や金属片を差し込まない 通気孔やカートリッジ挿入口から金属片や針金などの異物を差し込 まないでください 感電の危険があります 注意 装置内に水や異物を入れない 装置内に水などの液体 ピンやクリップなどの異物を入れないでく ださい 火災や感電 故障の原因となります もし入ってしまった ときは すぐに基本処理装置の電源をOFFにして電源コードをACコ ...

Page 7: ...端に差し込まない DCケーブルはしっかりと差し込んでください 中途半端に差し込む と接触不良のため発熱し 火災の原因となることがあります また 差し込み部にほこりがたまり 水滴などが付くと発熱し 火災の原 因となるおそれがあります 指定以外の接続をしない DCケーブルの接続や配線は本書の説明に従って正しく行ってくださ い 指定以外の接続や配線は火災や感電の原因となるおそれがあり ます 破損したケーブルを使用しない ケーブルを接続する前にコネクタが破損していたり コネクタピン が曲がっていたり 汚れたりしていないことを確認してください 破損や曲がっているコネクタおよび汚れたコネクタを使用すると ショートにより火災を引き起こすおそれがあります 指定以外のケーブルを使用しない 基本処理装置と接続するケーブルは当社指定のものを使用し 接続 先をよく確認してください 指定以外のケーブルを使用したり ...

Page 8: ...処理装置の電 源コードをコンセントから抜いて行ってください たとえ電源を OFFにしても電源コードを接続したままケーブルやコネクタに触る と感電したり ショートによる火災を起こしたりすることがありま す 指定以外のインタフェースケーブルを使用しない インタフェースケーブルは NECが指定するものを使用し 接続す る装置やコネクタを確認した上で接続してください 指定以外の ケーブルを使用したり 接続先を誤ったりすると ショートにより 火災を起こすことがあります また インタフェースケーブルの取り扱いや接続について次の注意 をお守りください ケーブルを踏まない ケーブルの上にものを載せない ケーブルの接続がゆるんだまま使用しない 破損したケーブルを使用しない 破損したケーブルコネクタを使用しない ネジ止めなどのロックを確実に行ってください ...

Page 9: ...す 本装置でお客様が行える分解は次の作業のみです 次に記述する以外の分解は絶対にしないでください ブラケットの取り外し 取り付け DC 信号ケーブルの取り付け 取り外し プラグを差し込んだまま取り扱わない お手入れは 基本処理装置の電源をOFFにして 電源コードをACコ ンセントから抜き 本装置のDCケーブルを抜いてください たとえ 電源をOFFにしても 電源コードを接続したまま装置内の部品に触 ると感電するおそれがあります 注意 中途半端に取り付けない DCケーブルやインタフェースケーブルは確実に取り付けてくださ い 中途半端に取り付けると接触不良を起こし 発煙や発火の原因 となるおそれがあります ...

Page 10: ...ジ挿入口に手を入れないでください 手を挟まれたり 巻き込まれたりしてけがをするおそれがあります 雷がなったら触らない 雷が鳴りだしたら DCケーブルに触れないでください 感電の原因 となります ペットを近づけない 本装置にペットなどの生き物を近づけないでください 排泄物や体 毛が装置内部に入って火災や感電の原因となります 近くで携帯電話やPHS ポケットベルを使わない 本装置のそばでは携帯電話やPHS ポケットベルの電源をOFF に しておいてください 電波による誤動作の原因となります ...

Page 11: ...なるおそれがあります 強い振動の発生する場所に保管しないでください 故障の原因となります 本装置にセットするデータカートリッジには 当社製の AITデータカートリッジ 型番 EF 2420L EF 2420 を使用してください 当社製以外のデータカートリッジを使用するとリード ライトエラーを起こす ことがあります 定期的にクリーニングを実施してください クリーニングについては クリーニング 36ページ を参照してください 本装置のクリーニングには 当社製の AITクリーニングカートリッジ 型番 EF 3237J を使用してください 当社製以外のクリーナーを使用すると故障の原因となることがあります カートリッジを入れたままでの移動はやめてください 衝撃が加わったとき 装置やカートリッジを傷める原因となります 本装置を使用していないとき 電源を切るときは カートリッジを取り出してくだ さい カ...

Page 12: ...ただき まことにありがとうございま す N8151 50 内蔵AITは NECのExpress5800シリーズサーバで使用できる内蔵タイプ のテープデバイスです AIT Advanced Intelligent Tape カートリッジに対応した高速ドライブは お客様の 大切なデータのバックアップ 運用 管理をよりスムーズにすることでしょう 本装置の持つ機能を最大限に引き出すためにも ご使用になる前に本書をよくお読みにな り 装置の取り扱いを十分にご理解いただけるようお願い申し上げます ...

Page 13: ...を参照して セットアップをしてください 1 箱の中身を確認する 箱の中身について 14ページ 2 取り扱う上での注意事項を覚える 使用上のご注意 2ページ 3 内蔵AITの部品の名前を覚える 各部の名称と機能 18 19ページ 4 取り付け前の設定をする セットアップ 20 22ページ 5 基本処理装置に取り付ける セットアップ 23 25ページ 6 ドライバをインストールする テープドライバのインストール 26 31ページ 7 カートリッジの取り扱い方法を覚える AITデータカートリッジ EF 2420L EF 2420 について 38 43ページ 8 カートリッジをセットする 取り扱い 32 35ページ 9 LED表示を確認する 取り扱い 35ページ 10 内蔵AITをクリーニングする クリーニング 36 37ページ Windows NT 4 0のWindows NTバックアップ およ...

Page 14: ...のを第三者に譲渡 または売却 するときは 次の 注意を守ってください 本装置本体について 本装置を第三者へ譲渡 または売却 する場合は 本書を一緒にお渡しください その他の付属品について その他の付属品もセットアップするときなどに必要となりますので 一緒にお渡し ください テープ内のデータについて 使用していたテープに保存されている大切なデータ 例えば経営情報や企業の経理情報な ど が第三者へ漏洩することのないように お客様の責任において確実に処分しておいて ください このようなトラブルを回避するために使用しているバックアップソフトでデータを完全 消去し 確実にデータを処分することを強くおすすめします データの消去についての 詳細はバックアップソフトの取扱説明書をご参照ください なお データの処分をしないまま譲渡 または売却 し 大切なデータが漏洩された場 合 その責任は負いかねます ...

Page 15: ...関す る条件を満たすこと 消耗品 装置の廃棄について 本装置 およびカートリッジの廃棄については各自治体の廃棄ルールに従ってください 詳しくは 各自治体へお問い合わせください 装置寿命について 本装置の装置寿命は5年です 保証について 本装置には 保証書 が添付されています 保証書 は販売店で所定事項を記入してお渡し しますので 記載内容を確認のうえ 大切に保管してください 保証期間中に故障が発生 した場合は 保証書 の記載内容にもとづき無料修理いたします 詳しくは 保証書 をご 覧ください 保証期間後の修理についてはお買い求めの販売店 最寄りのNECまたはNECの保守サー ビス会社に連絡してください 本装置に対し保守契約を結ばれたお客様へ 本装置の保守停止時期は 製造打ち切り後5年になります ...

Page 16: ...材は 本装置を取り外して輸送する際に必要と なります 大切に保管しておいてください 接続する環境によっては使用しない部品がありますが 環境が変わったときなどに使 用する可能性がありますので 大切に保管してください 添付のフロッピ ディスクのバックアップをとってください また 添付のディスク をマスタディスクとして大切に保管し バックアップディスクを使用してください 添付の保証書はアフターサービスを受けるときに必要となります 大切に保管してお いてください フロッピ ディスク クリーニングカートリッジ ネジ 4本 N8151 50 AIT装置 取り扱いについて 保証書 取扱説明書 本書 ブラケット 2本 をネジ止め 4本 した状態 で出荷しています 本装置を基本処理 装置に取り付ける ときのみに使用し ます IDEケーブル ...

Page 17: ...者への譲渡について 12 消耗品 装置の廃棄について 13 装置寿命について 13 保証について 13 箱の中身について 14 内蔵AITについて 特長 17 使用できるカートリッジ 17 各部の名称と機能 18 装置前面 18 装置前面 防塵カバーが開いているとき 18 装置背面 19 装置底面 19 セットアップ 20 ブラケットの取り外し 取り付け方法 20 内蔵AITの設定 ジャンパピンを使った設定 21 内蔵AITの設定 DIPスイッチを使った設定 22 基本処理装置への取り付け 23 バックアップソフト使用のご注意 25 テープデバイスドライバのインストール 26 取り扱い 32 AITデータカートリッジのセット 32 AITデータカートリッジの取り出し 34 LED表示 35 データのリード ライト 35 ...

Page 18: ...トリッジ EF 2420L EF 2420 に ついて データカートリッジの各部の名称 38 使用 保管 運搬条件 39 ラベル 39 ラベル貼り付け位置 39 ラベルへの記入上の注意事項 40 ライトプロテクト 40 取り扱い上の注意事項 41 使用上のご注意 41 一般的注意事項 41 使用禁止基準 42 寿命 42 重要なデータの保存について 43 データの3世代管理について 43 データカートリッジの保管について 43 仕 様 44 運用状況お客様記入シート 46 トラブルシューティング チェックリスト 47 ...

Page 19: ...データは データの種類に応じて圧縮率が変動することがあります 本書で は 平均圧縮率を2倍として記載しています AITデータカートリッジに記録されているデータが圧縮されているのか されていないのか を自動判別しますので 従来の機器で記録したAITデータカートリッジのデータも そのま ま読み出すことができます 出荷時は ドライブ部の両端にブラケットが取り付けられている5 25インチデバイスです が ブラケットを取り外すことにより ドライブのみの3 5インチデバイスになります 使用できるカートリッジ 本装置には 当社製AITデータカートリッジ AIT1 EF 2420L テープ長230 m EF 2420 テープ長170 m をご使用ください 当社製以外のAITデータカートリッジを 使用するとリード ライトエラーの原因となる場合があります 重要 本装置では AIT2 EF 2423 テープ長2...

Page 20: ...用して説明します 装置前面 1 防塵カバー データカートリッジ挿入口を保護するカバー 32ページ 2 通風口 ドライブ部には通風口はありません 3 EJECTボタン データカートリッジをセットするために防塵 カバーを開くとき またAITデータカート リッジを本装置から取り出すときに押す 32ページ 4 STATUS LED 本装置の状態を示すLED 35ページ 5 TAPE LED AITデータカートリッジの状態を示すLED 35ページ 6 BUSY LED データの通信状態を示すLED 35ページ 7 ブラケット 8 データカートリッジ挿入口 AITデータカートリッジをセットするスロッ ト 33ページ 装置前面 防塵カバーが開いているとき 1 2 6 5 4 3 7 8 1 ...

Page 21: ...内蔵AITについて 19 1 DIPスイッチ 内蔵AITの設定をするスイッチ 22ページ 装置背面 1 ファン 2 電源コネクタ 本体の内蔵電源ケーブルを接続する 25ページ 3 ジャンパピン 内蔵AITの設定をするピン 21ペー ジ 4 IDEコネクタ 本体の内蔵IDE Flatケーブルを接続する 25ページ 2 3 4 1 1 2 3 4 5 6 7 8 ON 装置底面 1 ...

Page 22: ...けるまでの手順を説 明します ブラケットの取り外し 取り付け方法 本装置を3 5インチデバイスで使用するときは 左右のブラケットを取り外します ブラケットの取り外し プラスドライバを使ってネジを取り外すと ブラケットが外れます 重要 取り外したブラケットとネジは 大切に保管しておいてください このネジは ブラケットを取り付けるときのみに使用します このネジはミリネジ 長さ5 0 mm ワッシャより下の長さ 4 0 mm です このネジより長いものを使用すると装置の故障 の原因となります ミリネジ 4 0 mm ...

Page 23: ...タ ジャンパ ドライブの設定 MASTER SLAVE CABLE SELECT 内蔵AITの設定 ジャンパピンを使った設定 本装置を5 25インチデバイスベイに取り付ける前に 本装置の設定を確認します 本装置を含むIDEデバイスは IDの設定が必要です 同じIDEバス上に接続されるデバイ スは それぞれ異なるIDを設定しておかないと正しく動作しません IDには MASTER SLAVE CABLE SELECT の3つがありますが 本装置は 標準装備のCD ROM RWドライブ MASTER と同一バス上に接続するため SLAVE で使用してください IDは 本装置背面にあるデバイス設定ピンのピン1 3を使って設定できます 本装置で は 工場出荷時はSLAVEに設定されています ...

Page 24: ...アップソフトからデータ圧縮の制御を有効にするか無 効にするかを設定します 設定はスイッチ8を使います ON でバックアップソフトか らのデータ圧縮制御を無効にする設定に OFF 工場出荷時 の設定 でバックアップソフトからのデータ圧縮制御を有効 にする設定になります 1 2 3 4 5 6 7 8 ON 1 2 3 4 5 6 7 8 ON 内蔵AITの設定 DIPスイッチを使った設定 本装置の底面にあるDIPスイッチでは次の設定を変更することができます DC Control 1 データ圧縮設定 工場出荷時の設定は ON DC Control 2 データ圧縮設定 工場出荷時の設定は OFF スイッチ1 6 未使用 スイッチ7 DC Control 1 スイッチ8 DC Control 2 1 2 3 4 5 6 7 8 ON ...

Page 25: ...法例を以下に示します ヒント 基本処理装置によってはレールを使用するものもあります 設置方法については 基本 処理装置の取扱説明書も参照してください 1 CD ROM RWドライブの下にN8151 50内蔵AITを取 り付けます 重要 本装置にレールを取り付ける場 合は Fig 1に示すフロントカ バー側のネジ穴を使用してくだ さい Fig 2 反対側も同様 に 片側2箇所 計4箇所をネジ 止めしてください レールが フロントカバー部の モールド部までくる場合があり ますが 問題ありません 本装置のフロントカバー面と 本体標準装備のCD ROMドラ イブなどのフロントカバーが平 行になるように レールの取り付け位置を調節してください Fig 3 レールの形状は本体装置により異なります フロントカバー ネジ穴 Fig 1 フロントカバー レール Fig 2 ...

Page 26: ...たり コネクタピンが曲 がっていたり 汚れたりしていないことを確認してください 破損や曲 がっているコネクタおよび汚れたコネクタを使用するとショートにより 火災を引き起こすおそれがあります 重要 本装置に添付のケーブルを使用してください フロントカバー レール Fig 3 5 25インチデバイスタイプ 3 5インチデバイスタイプのどちらの場合も使用するネ ジは同じです 必ず本装置に添付されているネジを使って固定してください 本装置 に添付のネジは ミリネジ 長さ5 0 mm ワッシャより下の長さ 3 5 mm です 添付のネジより長いものを使用すると装置の故障の 原因となります ミリネジ 3 5 mm ...

Page 27: ...タ 本装置 CD ROM RWドライブの順に接 続してください 3 基本処理装置にカバーを取り付けて 電源コードをコンセントに接続する 4 基本処理装置の電源をONにする バックアップソフト使用のご注意 NECのWebページである8番街 http www express nec co jp の サポート情報 テクニカル情報 テクニカルガイド Express 5800 100シリーズテクニカルガイド にありますバックアップ装置 バックアップ装置対応ソフトウェアのWindows NT 2000 を確認してください 問い合わせ先 webmaster ace comp nec co jp DC電源ケーブ ル システム内で 使用可能な空き コネクタ IDEインタフェース ケーブル ピン1 赤 ピン1 CD ROM RW ドライブ 本装置 添付のケーブル IDEコネクタ マザーボード ...

Page 28: ...バイスドライバをインストールします ドライバのインストール には 添付のフロッピーディスクを使用します あらかじめ用意しておいてください Windows NT 4 0をご使用のお客様 1 スタート ボタンをクリックし 設定 をポイントして コントロールパネル をク リックする コントロールパネル ダイアログボックスが表示されます 2 コントロールパネル の テープデ バイス をクリックする テープデバイス ダイアログボッ クスが表示されます 初回インストール時に 手順4のダ イアログボックスが表示されたと きは キャンセル ボタンをク リックしてください 3 ドライバ タブをクリックする 4 追加 ボタンをクリックする ドライバのインストール ダイアロ グボックスが表示されます ...

Page 29: ...し 参照 B ボタンをクリッ クする ファイルを見つけます ダイアロ グボックスが表示されます 7 WinNT4 0 をポイントし 開く O ボタンをクリックする ファイルを見つけます ダイアロ グボックスに Snt4ait inf が表示 されます 8 ファイル名に Snt4ait inf が指定 されていることを確認し 開く O ボタンをクリックする フロッピーディスクからインス トール ダイアログボックスが表示 されます 9 配布ファイルのコピー元 C に A WinNT4 0 が指定されてい ることを確認し OK ボタンをク リックする ドライバのインストール ダイア ログボックスが表示されます ...

Page 30: ...ックして OK ボタン をクリックする インストールが完了すると 画面 が次のように変わります 11 システムを再起動します 重要 Windows NTバックアップを使用する場合は 他のバックアップソフトをインストー ルしないでください インストールしている場合は アンインストールしてください また Windows NTバックアップ以外のバックアップソフトを使用する場合は SONY AIT Tape Drive NT4 0 を削除してください ヒント インストールしたテープデバイスドライバは システムの再起動後に有効になります ...

Page 31: ...トロールパネル をポイン トし システム をクリックする システムのプロパティ ダイアログボックスが表示されます 2 ハードウェア タブをクリックし デバイスマネージャ ボタンをク リックする デバイスマネージャ ダイアログ ボックスが表示されます 3 その他のデバイス に SONY SDX 420C と表示されていることを確認し SONY SDX 420C をダブルクリックする SONY SDX 420Cのプロパティ ダイアログボックスが表示されます 4 ドライバ タブをクリックし ド ライバの更新 ボタンをクリックす る ...

Page 32: ...ド が表示されます 5 次へ ボタンをクリックする ハードウェアデバイスドライバの インストール 画面が表示されま す 6 デバイスに最適なドライバを検索 する 推奨 を選択し 次へ ボタ ンをクリックする ドライバファイルの特定 画面が 表示されます 7 添付のフロッピーディスクを挿入 します 8 フロッピーディスクドライブ に のみチェックを入れ 次へ ボタ ンをクリックする ドライバファイルの検索が始ま り ドライバファイルの検索 画 面が表示されます ...

Page 33: ...内蔵AITについて 31 9 次へ ボタンをクリックする 新しいハードウェアの検索ウィ ザードの完了 画面が表示されま す 10 完了 ボタンをクリックする 以上でテープデバイスドライバのインストールが完了しました ...

Page 34: ...トするデータカートリッジには 当社製の AITデータカートリッジ 型 番 EF 2420L EF 2420 を使用してください 当社製以外のデータカートリッ ジを使用するとリード ライトエラーを起こすことがあります データカートリッジをセットしている間は 基本処理装置の電源をOFFにしないで ください 誤動作やデータの破壊の原因となります 1 基本処理装置の電源をONにした 後 本装置のSTATUS LEDと BUSY LED TAPE LEDが消灯し たことを確認する 2 EJECTボタンを押し 防塵カバー を指で開く ...

Page 35: ...は自動的に本装置内部に セットされ TAPE LEDが点灯し ます 4 防塵カバーを閉める 重要 データカートリッジのライトプロテクトプラグ でデータカートリッジにデータを書き込めない ように設定している場合は STATUS LEDが 点灯します 防塵カバーの取り付け 防塵カバーは破損防止のため 力が加わると外れる構造になっ ています 防塵カバーが外れた 場合は Fig 1に示す矢印の方 向に押し込むことで取り付ける ことができます ライトプロテクトプラグ 右にスライド させると書き込み禁止になる 40ページ STATUS LED 防塵カバー Fig 1 ...

Page 36: ...いないこと を確認する 2 EJECTボタンを押し 防塵カバー を指で開く EJECTボタンを押すと テープの 巻き戻しが始まります 巻き戻しに 数分かかる場合があります 重要 EJECT ボタンを軽く押しただけで は 防塵カバーのみが開き テープは 排出されません テープを取り出す場 合は EJECTボタンをしっかりと押 してください 巻き戻しが終わるとデータカート リッジは自動的に装置内から排出 されます 3 データカートリッジ挿入口から データカートリッジを取り出し 防塵カバーを閉める ...

Page 37: ...ッ リ ト ー カ タ ー デ る い て し ト ッ セ る あ に 態 状 る め 込 き 書 灯 点 を タ ー デ が ジ ッ リ ト ー カ タ ー デ る い て し ト ッ セ さ ト ク テ ロ プ ト イ ラ る あ に 態 状 い な め 込 き 書 る い て れ の 灯 消 い 短 と 灯 点 い 長 滅 点 し 返 り 繰 る あ で 要 必 が グ ン ニ ー リ ク ド ッ ヘ の 置 装 本 隔 間 等 滅 点 リ ト ー カ グ ン ニ ー リ ク 中 グ ン ニ ー リ ク ド ッ ヘ た し 了 終 が プ ー テ の ジ ッ 灯 点 い 短 滅 点 1 し い な 回 2 し 返 り 繰 の 灯 消 い 長 と 回 る い て し 障 故 が 置 装 本 BUSY LEDが点灯 または点滅している間は 基本処理装置の電源をOFFにしない でください ...

Page 38: ...グカートリッジを取り出してください 重要 本装置のクリーニングには 当社製の AITクリーニングカートリッジ 型番 EF 3237J を使用してください 当社製以外のクリーナーを使用すると故障の原因と なることがあります クリーニングカートリッジのテープ面 を手で触ったり テープを巻き戻して 使用したりしないでください クリーニングカートリッジは約70回使 用することができます 本装置では 使い切ったクリーニングカートリッジ を挿入した場合や クリーニング中に テープが使い切られたために正常にク リーニングが終了しなかった場合で も クリーニングカートリッジは自動 的に排出されません このような場合 は EJECTボタンを押して クリー ニングカートリッジを取り出してくだ さい 新しいクリーニングカートリッ ジを別途お買い求めください ヒント リード ライトヘッドは 1週間に1回 使用する...

Page 39: ...内蔵AITについて 37 本体のクリーニング 本装置の外観が汚れたときは やわらかい布に水または洗剤を含ませて軽く拭いてくださ い 重要 ベンジン シンナーなど 揮発性のもの の薬品で拭くと 変形や変色の原因となること があります また 殺虫剤をかけた場合も変形や変色の原因となることがあります 薬 品が付着したら 早めに水を含ませた柔らかい布で拭き取ってください ...

Page 40: ...38 AITデータカートリッジについて AITデータカートリッジ EF 2420L EF 2420 について AITデータカートリッジの取り扱い方法について説明します データカートリッジの各部の名称 ラベル貼り付け位置 ライトプロテクト プラグ 取り付け 取り外し時 の取っ手 反対側にも あります ラベル貼り付け位置 ...

Page 41: ...用環境になじませてから使用し てください 温度勾配は10 時間とします 保管条件 温度 5 32 湿度 20 60 ただし 湿球の最高温度は26 とします 保管状態 AITデータカートリッジは 保護ケースに入れて フタをして保管し てください 置き方は水平 垂直どちらでもかまいません 運搬条件 温度 40 45 湿度 5 80 ただし 湿球の最高温度は26 とします 温度勾配 10 時間 運搬状態 AITデータカートリッジを保護ケースに収納してください 輸送の場 合には AITデータカートリッジに力が加わらないように包装してく ださい ラベル どのAITデータカートリッジにどのデータをバックアップしているかなどがすぐにわかる ようにAITデータカートリッジにラベルを貼り付けておくことをお勧めします ラベル貼り付け位置 ...

Page 42: ...添付されています ラベルを貼るときは 前項で指定された位置に確実に貼り さらに取り換える場合 は古いラベルを取り除いてから新しいラベルを貼ってください 指定のINDEXラベル以外のものを使用する場合は 大きさが合ったものを使用し てください 添付のINDEXラベルには 使用開始年月日を記入してください AITデータカート リッジの寿命をチェックする目安となります ライトプロテクト ライトプロテクトプラグを右図のように 設定すると テープの内容が保護されま す 書き込んだデータを消去したくないとき は このプラグを SAFE 側 書き込み 不可 に設定してください また プラ グを REC 側 書き込み可能 に設定す るとテープに書き込み可能となります ライトプロテクト プラグ 書き込み不可 書き込み可能 EF 2420L EF 2420 ...

Page 43: ...に10 以下になるようにして AITデータ カートリッジを使用場所の温度になじませてください 装置への装着 AITデータカートリッジのセット での説明に従ってAITデータカートリッジをセットし てください AITデータカートリッジを取り出した後の保護ケースは しっかりと閉じ チリやホコリの少ない場所で保管してください 使用した後 使用済みのAITデータカートリッジは 必ず保護ケースに入れてチリやホコリの少ない場 所で保管してください 置き方は水平 垂直どちらでもかまいません 一般的注意事項 テープに手を触れないでくださ い また テープカバーを開閉 しないでください 磁気を発生するものを近づけな いでください 直射日光や暖房器具の近くには 置かないでください 強い衝撃を与えないでください 飲食や喫煙をしながらの取り扱いは避けてください また シンナーやアルコール などを付着させないように注...

Page 44: ...とになります 寿命 AITテープの寿命は 温度 湿度 ヘッドクリーニング回数などによって左右されます 毎日1回使用した場合 使用開始より1年後に交換することをお勧めします また 1年未 満でもエラーが頻繁に発生する場合は その前に交換をお願いします AITデータカートリッジの寿命管理として下記の手順を実施していただくことをお勧めし ます 新しいAITデータカートリッジに管理番号を割り当て その番号をAITデータカー トリッジのラベルに記入しておきます AITデータカートリッジ管理台帳を作り 使用日を記録し AITデータカートリッ ジの使用年数と使用回数を見積もります 定期的にAITデータカートリッジの管理台帳と標識ラベルを調べ 長く使用されて いたり 書き込み 読み取りエラーが発生するなど信頼性が低いAITデータカート リッジを廃棄します また テープ磁性層は 化学物質で構成されており 時...

Page 45: ...ータの3世代管理について ディスク上のデータを保存する場合は 保存したデータの3世代管理をお勧めします 3世代管理は テープ3巻 A B C を使用して ディスク上のデータを1日目はテープA に保存し 2日目はテープBに 3日目はテープCに保存していくものです これにより 例えば一巻のテープCがリードエラーを起こした場合には データBを使用 してデータを復旧でき また テープBがリードエラーを起こした場合でもテープAのデー タを使用して大切なデータを復旧することができます データカートリッジの保管について 決められた保管条件を守り 保管場所を常に清潔に保ってください 書き込みを禁止にしておくことをお勧めします 長期間にわたって保管する場合は 常にバックアップデータが復旧可能であることを確認 するため 定期的にデータの読み出しを行ってください 万一の場合を想定してシステムから遠く離れた場所に...

Page 46: ...内部転送レート 2 5 Mbyte 秒 システム環境により 遅くなる場合があり ます IDEバス上転送レート Ultra DMAモード4 66 6 Mbyte 秒 PIO転送モード4 16 6 Mbyte 秒 PIO転送モード0 3 33 Mbyte 秒 接続する基本処理装置により 選択され るモードは異なります イニシャライズ時間 5秒未満 ロード時間 14秒未満 EF 2420L アンロード時間 20秒未満 EF 2420L 巻き戻し時間 105秒未満 EF 2420L 環境条件 使用時 温度 10 35 湿度 20 80 結露なきこと 最大湿球温度 26 非動作時 温度 40 70 湿度 5 95 結露なきこと 電源仕様 電圧 5 V 5 12 V 10 電流 Typ 1 4 A 0 45 A 電流 Max 2 5 A 1 2 A ...

Page 47: ...仕 様 45 149 0 mm 41 2 mm 172 4 mm 重量 1 13 kg N8151 50 5 25インチデバイスタイプ N8151 50 3 5インチデバイスタイプ 101 6 mm 41 2 mm 172 4 mm 重量 0 75 kg 寸法 重量 ...

Page 48: ...置モデル名 オペレーティングシステム OS 名称 バージョン サービス パック パッチの適用状況 バックアップソフト 名称 バージョン サービス パック パッチの適用状況 IDEバス構成 ジャンパ 同一バス上のデバイ ス 装置設置環境 装置設置環境 温度 湿度 ホコリの状況な ど カートリッジ種類 メーカ名 EF型番 クリーニングカートリッジ種類 メーカ名 EF型番 クリーニングカートリッジ使 用状況 クリーニング周期 使 用回数や使用開始月の管理方 法など カートリッジ使用状況 使用回数や使用開始月の管理 方法など カートリッジの管理状況 ...

Page 49: ...認して正 しく接続されていることを確認してください DCケーブルの接触不良が無いか 挿抜して確認 してください ドライブにACケーブルが正しく接続されている ことを確認してください ACケーブルが正しくコンセントに接続されてい ることを確認してください ドライブにSCSIケーブルが正しく接続されてい ることを確認してください SCSIケーブルが正しくSCSI I F SCSIボードの コネクタ MBのコネクタなど に接続されている ことを確認してください 同一SCSIバス上の他のドライブとSCSI IDが同 じではないか確認してください 同じSCSI IDのドライブがある場合 どちらか のIDを使われていない番号へ変更してくださ い 7 はホスト側が使用しているため 割り当 てないでください ドライブの電源が入らな い LEDが点灯しない 1 2 内蔵型 外付型 項番 症状 内蔵型 処置 ...

Page 50: ...ないことを確認してください PINタイプのSCSIコネクタの場合 PIN折れが発 生していないか確認してください 内蔵型50pinの ドライブ側 内蔵 外付68pinのケーブル側 外 付型50pin PINタイプ のケーブル側など 折れたPINを元に戻して使わずに ドライブあ るいはケーブルを交換してください SCSI BIOSの設定が正しいか確認してください 取扱説明書に設定方法がかかれている場合は参 照してください SCSI BIOSが変更できないも のもあります システム構成上 正しい位置に接続されているか 確認してください デバイスドライバが正しくインストールされてい るか確認してください 自動的にインストールされる場合と 手動でイ ンストールする必要のある場合があります ま たデバイスドライバが製品に添付されている場 合があります 取扱説明書を参照してくださ い デバイスドライバ...

Page 51: ...ください エラーの発生していたテープを使用してい ないか確認してください SCSIケーブル コネクタ 終端抵抗等の接続に 問題がある可能性があります もう1度接続を確認してください 温度 湿度の異なる環境から持ち込んだドライブ は 使用環境に十分馴染んでいない場合がありま す 環境の馴染ませを行ってから使用してくださ い 空調管理の行われていない環境でシステム起動直 後にバックアップを行うと ドライブが環境に十 分馴染んでいない場合があります 環境に十分馴 染んでからバックアップするように運用の変更を 行ってください 夜間のシステム起動 バック アップ開始などで発生しやすい バックアップソフトが正しくインストールされて いるか確認してください SCSIバス上の他のデバイスとIDが重複していな いか確認してください ソフトウェア同士の競合が発生していないか確認 してください 同時に使用できな...

Page 52: ...ップソフトによるソフ トウェア的なロックのはたらいていることが考え られます ソフトウェアを終了させてください システムを再起動してください 電源のOFF ONを行ってください ドライブが何らかの不具合を検出して排出させな いようにしていることが考えられます 強制排出の手順に従い 手動で取り出すこ とをお勧めします システムを停止できないため手動取り出し が行えない場合 EJECTキーを一定時間 5 秒または10秒 以上押下し続けることで強 制排出されるドライブがありますので こ れを行ってください システムを再起動してください 電源のOFF ONを行ってください テープがドライブ内部で絡まっていること テー プジャム が考えられます 強制排出の手順に従い 手動で取り出して ください テープジャムを起こしたドライブは 内部 のヘッド ドラム 各ガイドピンなどを傷 めていることが考えられるた...

Page 53: ...かっている可能性 があります テープの読み取りが終わるまでお 待ちください 読み取りエラーが発生した場合 はテープを交換してください 正しいデータテープを使用しているか確認してく ださい DDS2ドライブにDDS3テープを使用して いないか また AIT1ドライブにAIT2 テープを使用していないかなど ドライブ とテープの組み合わせは正しいか確認して ください 動作保証のされたテープ EF型番テープな ど を使用しているか確認してください 寿命に達したテープを使用していないか確 認してください エラーの発生していたテープを使用してい ないか確認してください ヘッドが汚れている可能性があります ヘッドが汚れていた場合 書き込み 読み取り 時に失敗しテープを排出する場合があります クリーニングを行ってください クリーニングテープを使い切っている可能性があ ります 新しいクリーニングテープに交...

Page 54: ...0 内蔵AIT取扱説明書 2002年 9月 初版 2002年 10月 第2版 2003年 5月 第3版 日本電気株式会社 東京都港区芝五丁目7番1号 TEL 03 3454 1111 大代表 NEC Corporation 2002 日本電気株式会社の許可なく複製 改変などを行う ことはできません 本書の内容は予告なく変更することがあります このマニュアルは再生紙を使用しています Printed in Japan ...

Page 55: ...erver and Microsoft Windows 2000 Advanced Server All names used in the sample applications are fictitious They have no relation with any product party or individual names Remarks 1 Reproduction of this document or portions thereof without prior approval is prohibited 2 The information contained in this document is subject to change at any time without prior notice 3 Reprinting or changing of this ...

Page 56: ...e defined as follows Warning Failure to heed this sign could result in serious injury or death Caution Failure to heed this sign could result in personal injury or damage to properties Precautions and notices against hazards are presented with one of the follow ing three symbols The individual symbols are defined as follows Attention Prohibited Action Mandatory Action This symbol indicates the pre...

Page 57: ...ent of possible danger A term indicating a hazard level Indicates that improper use may cause an electric shock Indicates that improper use may cause fumes or fire Indicates that improper use may cause fingers to be caught Indicates a general notice or warning that cannot be specifically identified Indicates a general prohibited action or warning that cannot be specifically identified Do not disas...

Page 58: ...s a result of using this device in such facilities equipment or control systems Do not use the Built in AIT if any smoke odor or noise is present If smoke odor or noise is present immediately turn off the POWER switch and disconnect the power plug from the outlet then contact your sales agent Using the Built in AIT in such conditions may cause a fire Keep needles or metal objects away from the Bui...

Page 59: ...eat will also be generated if condensation is formed on dusty blades of the halfway inserted cable increasing the possibility of a fire Do not connect the Built in AIT by unspecified cabling Connecting or cabling with DC cable should be done in accordance with the procedure specified in the User s Guide Unspecified connecting or cabling may cause an electric shock or a fire Do not use any damaged ...

Page 60: ...e main power unit from the outlet If the power is off but the power plug is still connected you may get an electric shock Do not use the unspecified interface cables Use only the cable authorized by NEC and locate the device and connector before connection Use of an unauthorized cable or displaced connection may cause a short circuit resulting in a fire When handling or connecting the interface ca...

Page 61: ...assembly than described here Remove or install brackets Remove or install the DC signal cable Do not handle while the power plug is connected Before handling or cleaning the Built in AIT disconnect the power plug of the main power unit from the outlet If the power is off but the power plug is still connected you may get an electric shock Caution Insert the cables into the connectors as far as it g...

Page 62: ...ause an injury Do not touch the Built in AIT when it thunders If it starts thundering do not touch any part of the Built in AIT Failure to follow this warning may cause an electric shock or a fire Keep away pets Keep away pets from the Built in AIT Insertion their hair or excrements may cause a fire or an electric shock Do not use a cellular phone or a pager Turn off the power of the cellular phon...

Page 63: ... subject to strong vibrations This may cause a machine failure As the data cartridge set in the Built In AIT use our AIT Data Cartridge model AIT1 If you use a data cartridge of other manufacturer a read write error may occur Clean the Built In AIT on a regular basis For details about cleaning the Built In AIT see Cleaning page 87 When cleaning the Built In AIT use our AIT Cleaning Cartridge If yo...

Page 64: ...Advanced Intelligent Tape cartridge compatible high speed drive will help ensure the smooth backup application and management of your important data To maximize the N8151 50F Built In AIT functions please read the instruction manual carefully before use and fully understand how to handle the device ...

Page 65: ...used first time refer to the instruction manual in the following sequence to perform the setup after unpacking the driver 1 Check the contents in the package Package Contents P 66 2 Learn the operational precaution Safety Consideration P 54 3 Learn the parts of the Built In AIT Part Name and Function P 70 to 71 4 Set before installation Setup P 72 to 75 5 Mount the drive in the basic processing un...

Page 66: ...concerning the operation of this device Refer to the beginning of this document for an explanation of the symbols used for safety related cautions Important This symbol indicates important information concerning the handling of the device or the operation of the software Hint Indicates useful information and operational help ...

Page 67: ...ngly recommend that you dispose of all backed up data through your backup software before transferring or selling the unit For details about how to perform this operation refer to your backup software documentation NEC does not accept responsibility for information leaks to third parties Supplied software When you transfer or sell the N8151 50F make sure that you include all the software supplied ...

Page 68: ...nt Locking parts contained in the package or box will be required when removing the Built In AIT for transportation Store them securely Depending on the environment connected to some parts may not be usable However when the environment is changed these parts may become usable therefore store them securely N8151 50F Cleaning cartridge Screws 4 Instructions on handling the AIT unit Instruction manua...

Page 69: ... parts and equipment 65 Product life 65 Package Contents 66 Built in AIT Features 69 Usable Cartridges 69 Part Name and Function 70 Front 70 Front when the dust cover is open 70 Rear 71 Bottom 71 Setup 72 Removing and installing the brackets 72 Setting the Built In AIT Setting with the jumper pins 74 Setting the Built In AIT Setting with the DIP switch 75 Mounting on the basic processing unit 76 I...

Page 70: ...paste position 90 Precautions on entry to label 91 Write protect 91 Precautions on Handling 92 Operational precautions 92 General precautions 92 Usage Inhibition Standard 93 Service Life 93 Storing Important Data 94 Managing 3 generation Data 94 Data cartridge storage 94 Specifications 95 Customer s Application Sheet 97 Troubleshooting Checklist 98 ...

Page 71: ...r recorded data may differ depending on the type of data In this manual an average compression rate of 2 is used The basic processing unit automatically determines whether data recorded on the AIT data cartridges is compressed It can also read data recorded on AIT data cartridges with conven tional AIT drives Upon shipment the 5 25 in device comes with brackets installed at both ends of the drive ...

Page 72: ... cartridge slot against dust P 83 2 Ventilation holes The drive does not have ventilation holes 3 EJECT button Press this button when opening the dust cover to set an AIT data cartridge or when ejecting a data cartridge P 83 4 STATUS LED LED that shows the Built In AIT status P 86 5 TAPE LED LED that shows the status of the AIT data cartridge P 86 6 BUSY LED LED that shows the data communication s...

Page 73: ...he Built In AIT s built in power cable P 78 3 Jumper pin Pins which set the Built In AIT P 74 4 IDE connector Connect the Built In AIT s built in IDE Flat cable P 78 Bottom 1 2 3 4 5 6 7 8 ON 1 DIP switch Switches which set the Built In AIT P 75 1 1 3 2 4 ...

Page 74: ...5 in device you need to remove the left and right brackets To remove the brackets Using a Phillips screwdriver remove the screws and then the brackets Important Make sure that you store the brackets and screws in a safe place Only use these screws when installing the brackets They are metric screws length 5 0 mm length below washer 4 0 mm Using longer screws could result in damage to the device 4 ...

Page 75: ...Built in AIT 73 To install the brackets Align the Built In AIT screw holes with the far end of the bracket adjustable screw holes With a Phillips screwdriver tighten the screws ...

Page 76: ...T An ID setting is necessary required to use IDE device integrated with the Built In AIT Different IDE devices connected to the same IDE bus have different IDs so that the devices operate properly Available ID settings are MASTER SLAVE and CABLE SELECT However because the Built In AIT is connected to the same bus as the CD ROM RW drive MASTER use the SLAVE setting The ID can be set with jumper pin...

Page 77: ...enabled or disabled Use Switch 8 Setting Switch 8 to ON will disable control of data compression from the backup application setting Switch 8 to OFF factory set to OFF will enable control of data compression from the backup software Setting the Built In AIT Setting with the DIP switch The DIP switch on the bottom of the Built In AIT enables you to change the following settings DC Control 1 Data co...

Page 78: ... details on how to install the rails refer to the server s operating manual 1 Install the N8151 50F Built In AIT under the CD ROM RW drive Important When using the rails with this device use the screw holes in the front cover illustrated in Fig 1 see Fig 2 Perform the same operation on the opposite side Secure two screws on each side four screws total In some cases the rails may extend all the way...

Page 79: ... are provided with this device could result in damage to the device 2 Connect the Built In AIT to the motherboard and the CD ROM RW drive using the provided interface cable Caution Do not use any damaged power cord If the power cord is damaged immediately replace it with a new part of same type Do not repair the damaged section for reuse Otherwise the section repaired with vinyl tape or the like w...

Page 80: ... in a safe place Connect the provided cable to the IDE connector on the motherboard then connect it to the Built In AIT and the CD ROM RW drive 3 Attach the cover to the basic processing unit Plug the power cable to the outlet 4 Turn on the basic processing unit DC power cable unused power supply connector in the computer IDE interface cable Pin 1 Red pin 1 CD ROM RW drive Built In AIT Provided ca...

Page 81: ...og box appears 5 Click the Use Disk button The Install from floppy disk dialog box is displayed 6 Confirm that A is specified for the distributed file copy source C and click the Browse button The Browse dialog box appears 7 Point to WinNT4 0 then click the Open button Snt4ait inf is displayed in the Search Files dialog box 8 Confirm that Snt4ait inf is specified as the file name then click the Op...

Page 82: ...Tape Drive NT 4 0 Hint The tape device driver installed after restarting the system is enabled For Windows 2000 Users 1 Click the Start button then point to Settings and click Control Panel Then click System The System Properties dialog box appears 2 Click the Hardware tab then click the Device Manager button The Device Manager dialog box appears 3 Confirm that SONY SDX 420C is displayed under Oth...

Page 83: ...The Found New Hardware Wizard appears 5 Click the Next button The Install Hardware Device Drivers screen appears 6 Select Search for a suitable driver for my device recommended and click the Next button The Locate Driver Files screen appears 7 Insert the floppy disk provided ...

Page 84: ...t button The basic processing unit starts searching for driver files and the Driver Files Search Results screen appears 9 Click the Next button The Completing the Found New Hardware Wizard screen is displayed 10 Click the Finish button Installation of the tape device driver is now complete ...

Page 85: ...e our AIT Data Cartridge model AIT1 If you use a data cartridge of other manufacturer a read write error may occur While setting the data cartridge do not turn off the basic processing unit This may cause a malfunction or damage data 1 Turn on the basic processing unit Check that the drive s STATUS LED BUSY LED and TAPE LED go off 2 Press the EJECT button and open the dust cover ...

Page 86: ... enabled using the AIT data cartridge write protect plug so that you cannot write data in the data cartridge the STATUS LED lights Mount the Dust Proof Cover In order to avoid disrepair the Dust Proof Cover is designed to come away easily It is easy to attach the cover by fitting it into the direction which is indicated by arrows in Fig 1 when the cover came off Write protect plug Sliding it to th...

Page 87: ...ding the tape this may take a few minutes Important Firmly press the EJECT button to remove the data cartridge from the AIT drive Pressing the EJECT button lightly will open the dust cover without ejecting the data cartridge When the tape is completely rewound the data cartridge is automatically ejected from the Built In AIT 3 Remove the data cartridge from the slot and close the dust cover ...

Page 88: ...not set ON The data cartridge is set Blink at a given interval The data cartridge is being set or ejected The data cartridge set in the Built In AIT is deteriorated STATUS LED OFF The data cartridge set in the Built In AIT is ready to write data ON The data cartridge set in the Built In AIT is not enabled to write data write protected The Built In AIT head needs cleaning Blink at a given interval ...

Page 89: ...AIT Cleaning Cartridge to clean the Built In AIT If you use a cleaner of other manufacturer a machine failure may be caused Do not touch the cleaning cartridge tape surface or rewind the tape You can use the cleaning cartridge for about 70 times Even if you insert a spent cleaning cartridge or cleaning ends because the tape came to an end the device does not eject the cleaning cartridge automatica...

Page 90: ...with water or detergent Important Do not clean the Built In AIT using chemicals such as benzine or thinner volatile chemicals which may cause the unit to be deformed or discolored For the same reason do not spray insecticide If a chemical adheres to the drive surface immediately wipe it with soft cloth mois tened with water ...

Page 91: ...idge This chapter explains how to handle the AIT data cartridge Data Cartridge Part Name and Function Label paste position Label paste position Write protect plug Handle for insertion ejection The same one is provided on the opposite site ...

Page 92: ...Temperature 5 to 32 C Humidity 20 to 60 The maximum temperature of wet bulb is 26 C Storage condition Store an AIT data cartridge in a protective case with cover You can place the case horizontally or vertically Transportation requirement Temperature 40 to 45 C Humidity 5 to 80 The maximum temperature of wet bulb is 26 C Temperature gradient 10 C hour Transportation condition Store an AIT data car...

Page 93: ...replace the label peel the old label and paste a new one When using a label other than the specified INDEX label its size should be the same as the specified label Enter the date when starting to use the cartridge in the provided INDEX label It will help you check the AIT data cartridge service life Write protect By setting the write protect plug as shown at right the tape data can be protected Wh...

Page 94: ...hour Mounting to the Built In AIT Set the cartridges as explained in Setting the AIT data cartridge Close the empty protective case firmly and store it in a place free of dust and dirt After use Be sure to put the AIT data cartridge that you used in the protective case and store it in a place free of dust and dirt You can place it horizontally or vertically General precautions Tape cover Tape surf...

Page 95: ...e life of the AIT data cartridge varies greatly depending on temperature and humidity in the operating storage environment dust and dirt and head abrasion condition You can judge its service life in the following sequence Assign a management number to a new AIT data cartridge Enter the number in the AIT data cartridge label Create the AIT data cartridge management book Record the date when each AI...

Page 96: ...ee tapes A B C On the first day store the data on the disk in tape A On the second day store the data in tape B On the third day store the data in tape C This method allows you to protect your important data For example if tape C generates a read error you can use tape B to recover the data If tape B generates a read error you can use tape A to recover the data Data cartridge storage Always store ...

Page 97: ...5 Mbytes second Note The actual transfer rate depends on your system IDE transfer rate Ultra DMA mode 4 66 6 Mbytes second PIO transfer mode 4 16 6 Mbytes second PIO transfer mode 0 3 33 Mbytes second Note The transfer mode entrusts to each host Initialize time Less than 5 seconds Load time Less than 14 seconds Unload time Less than 20 seconds Rewind time Less than 105 seconds Environmental requir...

Page 98: ...96 Specification Dimensions weight 41 2 mm 149 0 mm 172 4 mm Weight 1 13 kg 41 2 mm 101 6 mm 172 4 mm Weight 0 75 kg N8151 50F 5 25 in device N8151 50F 3 5 in device ...

Page 99: ...ckup software name version service pack batch application IDE bus configuration Jumper device on the same bus Built In AIT installation environment Built In AIT installation environment temperature humidity dust Cartridge type manufacturer EF model code Cleaning cartridge type Cleaning cartridge usage method of managing cleaning frequency operation frequency and starting month Cartridge usage meth...

Page 100: ...equire a special DC cable Check the User s Guide and make sure that the drive is correctly plugged into a power outlet Check the power contacts of the DC cable by unplugging the cable and then plugging it back Make sure that the AC cable is correctly connected to the drive Make sure that the AC cable is correctly plugged into the power outlet Make sure that the SCSI cable is correctly connected to...

Page 101: ...mentation for details Make sure that the terminator setting is OFF for any drive that is not at the remote end of the SCSI bus If the SCSI connector is a pin type connector make sure that none of the pins are bent internal drive 50 pin connector internal or external cable 68 pin connector external cable 50 pin PIN type connector etc If pins are bent do not try to bend them back into position Repla...

Page 102: ...SCSI cable connector the terminator etc Check the connections If the drive was moved to an environment with different temperature and or humidity the drive may not have fully adapted to its new environ ment Allow the drive time to adapt to the new environment before using it If the backup process is initiated immediately after system startup in an environment that is not air conditioned the drive ...

Page 103: ...he backup process may not have been performed correctly See numbers 4 through 6 If the cartridge is not ejected even though the EJECT button is pressed the EJECT function may be locked by the backup software Exit the backup software Restart the system Turn the power off and then turn it on again The drive may have detected a problem and is not allowing the cartridge to be ejected We recommend that...

Page 104: ...s may be damaged Replace the drive Make sure that the BUSY LED is not blinking The unit may still be reading data to tape Wait until the reading is done If a reading error occurs replace the tape Make sure that you are using the correct type of data cartridge Make sure that you are using a correct drive and cartridge combination for example that you are not using a DDS3 cartridge in a DDS2 drive o...

Page 105: ......

Page 106: ......

Page 107: ...cond Edition October 2002 Third Edition May 2003 NEC Corporation 5 7 1 Shiba Minato ku Tokyo Tel 03 3454 1111 Main switchboard 2002 NEC Corporation No copying or modifying without permission of NEC Corporation The contents of this document may be changed without notice ...

Page 108: ...Printed in Japan Printed on recycled paper ...

Reviews: