


Reviews:
No comments
Related manuals for ROGUE Series

XL
Brand: Jata electro Pages: 20

GR195
Brand: Jata electro Pages: 20

EASYCLEAN GR7200
Brand: Sunbeam Pages: 9

Carleton GBC1449W-C
Brand: BackyardGrill Pages: 14

Triton PTS 4.1
Brand: Landmann Pages: 64

HDCB1230G
Brand: Wells Pages: 32

Monterey II A10-1225-2
Brand: Magma Pages: 8

184543
Brand: Blue Rhino Pages: 24

EarthquakeXT EQ38XT-20V
Brand: Harbor Freight Tools Pages: 16

ALFRESCO BG229SB-G
Brand: Barbeques Galore Pages: 26

HU 16 T
Brand: Huvema Pages: 24

vida 910-05005
Brand: Paderno Pages: 35
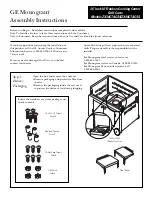
ZX48CTACSS
Brand: GE Pages: 4

ZGG420LCPSS
Brand: GE Pages: 2

ZGG542LCPSS
Brand: GE Pages: 2
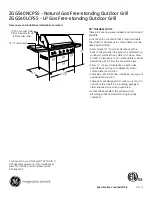
ZGG540LCPSS
Brand: GE Pages: 2

RK959
Brand: GE Pages: 23

KOTAKEITTIO APETIVO
Brand: MUURIKKA Pages: 15


