Nakamichi ARIES 36, Owner'S Manual
The Nakamichi ARIES 36 is a cutting-edge audio system that delivers crystal-clear sound quality. Ensure you get the most out of your device by downloading the Owner's Manual for free on our website. This comprehensive manual will guide you through setup and usage. Visit manualshive.com to download your manual now.
Share
Download


Reviews:
No comments
Related manuals for ARIES 36

30 Series
Brand: Gale Pages: 16

NEAX 2000
Brand: NEC Pages: 10

CT-5
Brand: RBH Sound Pages: 12

HT-P40
Brand: Samsung Pages: 35

HT-F5500W
Brand: Samsung Pages: 3

HT-F4500
Brand: Samsung Pages: 2

HT-DS100
Brand: Samsung Pages: 32

HT-DS100
Brand: Samsung Pages: 2

HT-C9950W
Brand: Samsung Pages: 2

HT-DB350
Brand: Samsung Pages: 35

HT-BD1250
Brand: Samsung Pages: 3

HT-C550
Brand: Samsung Pages: 48

MX-FS9000
Brand: Samsung Pages: 2

MM-DX7
Brand: Samsung Pages: 33

HT-Z210
Brand: Samsung Pages: 2

EOLE 2
Brand: CABASSE Pages: 16
GWS 10 Marine Wind Sensor
Brand: Garmin Pages: 2

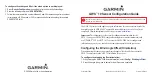
GHC 10
Brand: Garmin Pages: 26


