


Visit our website service.mtlogic.com
TE-57 TE-57 TE-57 TE-5740MTWG
V 1.0 - 03/2015
1 Safety instructions
•
Only use the charger plug supplied. Do not use other chargers as this may damage the battery cells.
•
Only insert rechargeable batteries of the same type. Never use ordinary, non-rechargeable
batteries. Insert rechargeable batteries so they connect to the right poles (indicated in the battery
compartment of the handset).
•
Do not touch the charger and plug contacts with sharp or metal objects.
•
The operations of some medical devices may be affected.
•
The handset may cause an unpleasant buzzing sound in hearing aids.
•
Do not place the basic unit in a damp room or at a distance of less than 1.5 m away from a water
source. Keep water away from the handset.
•
Do not use the telephone in environments where there is a risk of explosions.
•
Dispose of the batteries and maintain the telephone in an environment-friendly manner.
•
As this telephone cannot be used in case of a power cut, you should use a mains-independent
telephone for emergency calls, e.g. a mobile phone
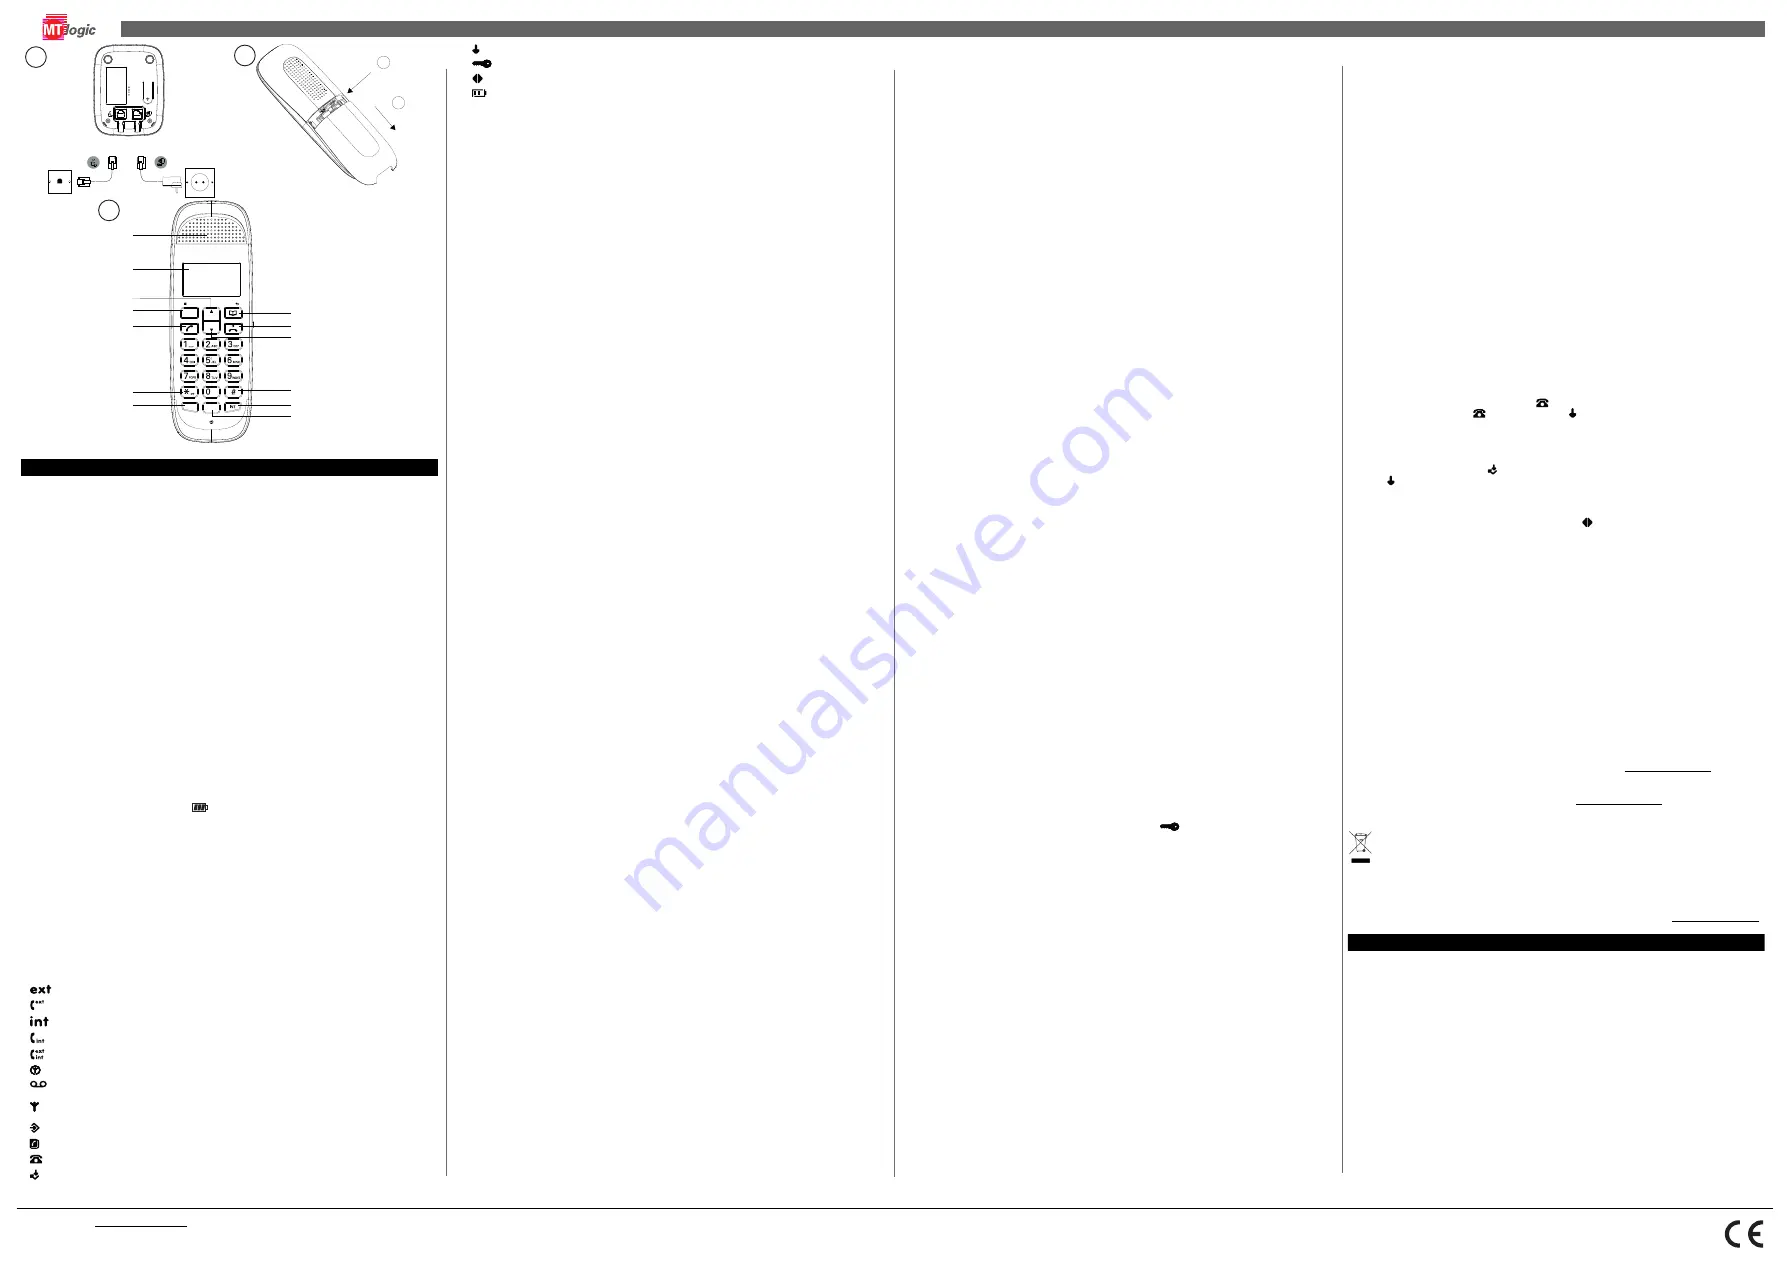
2 Getting started
2.1
Installing the base (Picture 1)
•
Plug one end of the adaptor into the mains power outlet and the other end into the adaptor jack on
the back of the base.
!!! The mains power must be close and easy accesible.
•
Connect one end of the telephone cord with the wall phone jack and the other end to the bottom of
the base.
•
Put the telephone- and AC power line cord in the base guides as shown on picture 1A.
2.2
Installing the handset (Picture 2)
•
Open the battery compartment.
•
Insert the 2 supplied rechargeable AAA NiMH rechargeable batteries, respecting the polarity (+
and -).
!!!Use only approved rechargeable batteries supplied with the phone.
•
Close the battery compartment.
Note: Leave the handset on the base unit for 24 hours before use.
When the handset is fully charged, icon
will appear on the display.
The display will show the handset name and number to indicate that it is registered to the base.
Note that new batteries do not reach their full capacity until they have been put to normal use for
several days. To keep the batteries in the best condition, leave the handset off the base for a few
hours at a time.
2.3
Keys / LED’s
Handset (Picture 3)
2.4
Display icons descriptions
* For this feature to work, subscribe to the caller ID from the network operator. A subscription fee may be
payable.
3 Navigating the menus
The phone has an easy to use menu system. When the handset is switched on and in standby:
•
Press Menu (D) to open the main menu.
•
Then use Up (C) or Down (J) buttons to scroll through the available options.
•
Press Menu (D) to select or confirm an option.
•
To return to the previous menu level, press Phonebook (H).
•
To exit the menu and return to standby, press End call (I).
If no buttons are pressed for 20 seconds, the handset returns to standby automatically.
4 Getting started
4.1
Switching the handset on/off
•
Press and hold the On/Off key (I) until the display turns on. The handset will search the base.
•
Press and hold the On/Off key (I) for 5 seconds. The display will go off.
4.2
Changing the menu language
•
Press Menu (D), scroll down (J) to
“HANDSET”
and press Menu (D) to confirm.
•
Scroll down to
“LANGUAGE”
and press Menu (D).
•
Press Up (C) or Down (J) to select the preferred language and press menu (D) to confirm.
4.3
Set the date
If subscribed to Caller ID, the date and time will be set automatically whenever a call is received (see “10
Caller ID and the Calls list”). The date and time can also be set manually on the individual handsets.
•
Press Menu (D), scroll down to
“DATE-TIME”
and press Menu (D). The display shows
“DATE
SET”
.
•
Press Menu (D) to select.
•
Enter the date (e.g. 12--08 for 12th of August) and press Menu (D) to confirm.
4.4
Set the time
•
Press Menu (D), scroll down to
“DATE-TIME”
and press Menu (D).
•
Scroll down to
“CLOCK SET”
and press Menu (D).
•
Enter the time in 24 hour format (e.g. 18--30 for 6.30pm) and press Menu to
•
confirm.
5 Using the telephone
5.1
Receiving a telephone call
•
Press talk (E) to answer the call, or simply lift up the handset from the charger to answer the call.
•
Press End call (I) to finish the call.
5.2
Making a telephone call
•
Press talk (E). When there is the dial tone, dial the number.
•
During a call, press Up (C) or Down (J) to increase or decrease the volume.
Note: The handset will automatically time the duration of all external calls. The call timer will display after
the first 15 seconds of the call. When the call ends, the total duration of the talk time flashes for 2
seconds.
5.3
Pre-dialing
•
Dial the telephone number. If a mistake is made press Phonebook (H) to delete the last digit.
•
Press talk (E) to start the call.
•
Press the on-hook key to hang up or put the handset back on the base.
5.4
Handsfree mode
You can speak with your correspondent without picking up the handset.
•
Press the Handsfree button (E) during a call to activate or deactivate the handsfree mode.
•
Press End call (I) to finish the call.
5.5
Microphone mute
It is possible to mute the microphone during a conversation.
•
Press the mute button (D). You can talk freely without being heard by the calling party.“MUTE” is
displayed.
•
Press the mute button (D) again to return to normal mode.
5.6
Call from the redial list
The last 10 dialed numbers are stored in the redial list.
•
Press redial (M) to open the redial list.
•
Press up (C) or down (J) to scroll through the list.
•
Press talk (E) to dial the displayed entry. Press End call (I) to return to standby.
6 Het alfanumerieke toetsenbord gebruiken
Use the keypad letters to enter names, e.g. to store TOM:
•
Press 8 once to enter T.
•
Press 6 three times to enter O.
•
Press 6 once to enter M.
•
Press Phonebook (H) to delete the last character or digit.
•
Press Up (C) or Down (J) to move between characters/digits.
•
Press 1 to insert a space.
•
Use 1 twice to insert a dash.
7 Phonebook
7.1
Storing name and numbers
The phonebook can store up to 50 names and numbers. Names can be up to 12 characters long and
numbers up to 24 digits. Different ringer melodies can also be selected for the phonebook entries.
•
Press Menu (D). Scroll down to
“PHONEBOOK”.
•
Press Menu (D) to select. The display show
“ADD ENTRY”
•
Press Menu (D) to select. The display shows
“NAME”
•
Enter the name using the alphanumerical keypad and press menu (D). The display shows
“NUMBER 1”.
•
Enter the number and press menu (D). The display shows
“MELODIE 1”
•
Press up (C) or down (J) to select the required ringer melody and press menu (D). the display shows
“ADD ENTRY”
•
Enter the next name and number entry that needs to be stored in the phonebook or press end call
(I) to return to standby.
•
To dial a number from the phonebook key (H), press up (C) or down (J) to scroll and press talk (E).
The number will be dialed automatically.
7.2
Edit or name or number in the phonebook
•
Press Menu (D). Scroll down to
“PHONEBOOK”
.
•
Press Menu (D) to select.
•
Scroll Down to
“MODIFY ENTRY”
and press Menu (D).
•
Scroll Up or Down to the entry that needs to be edited, or search alphabetically and press Menu (D).
The existing name is displayed.
•
Press Phonebook (H) to delete the name if required, then enter the new name and press Menu. The
existing number is displayed.
•
Follow the same instructions as mentioned in “7 Phonebook”
8 Handset settings
8.1
Handset ringer volume
The ring volume can be set to different volume levels for internal and external calls.
Choose from 5 volume levels or Off.
•
Press Menu (D), scroll Down to
“HANDSET”
and press Menu (D).
•
Press Up (C) or Down (J) to select
“EXT RING VOL”
and press Menu (D).
•
Press Up (C) or Down (J) to select the volume (1 - 5 or
“OFF”
).
•
Press Menu (D) to confirm or Phonebook (H) to return to the previous menu.
Note: When the phone is ringing, adjust the ringer volume by pressing Up or Down.
“INT RING VOL” is only used when you have more handsets connected to the base station, See
8.2
Handset ringer melody
Different ringer melodies can be set for internal and external calls. Choose from 10 different ringer
melodies. While scrolling a sample ring will be heard for each melody.
•
Press Menu (D), scroll Down to
“HANDSET”
and press Menu (D).
•
Press Up (C) or Down (J) to select
“EXT MELODY”
and press Menu (D).
•
Press Up (C) or Down (J) to select the ringer melody (1 - 10).
•
Press Menu (D) to confirm or Phonebook (H) to return to the previous menu.
Note: Calls from the numbers that have been stored in the phonebook will ring using the ringer melody set
when the entry was stored.
“INT MELODY” is only used when you have more handsets connected to the base station, See
8.3
Auto answer
The phone is set to answer calls by lifting the handset off the base or charger. This feature can be
switched off so that calls can only be answered by pressing Talk.
•
Press Menu (D), scroll down to
“HANDSET”
and press Menu (D).
•
Scroll Down (J) to
“AUTO ANSWER”
and press Menu (D).
•
Press Up (C) or Down (J) to select
“ON”
or
“OFF”
and press Menu (D) to confirm.
8.4
Handset name
The handset can be personalized by name (up to 10 characters long).
•
Press Menu (D), scroll down to
“HANDSET”
and press Menu (D).
•
Scroll Down (J) to
“NAME”
and press Menu (D).
•
Enter the new handset name and press Menu (D) to confirm.
Note: The handset name will only be displayed for approximately 20 seconds when no button is pressed.
If a mistake is made, press Phonebook to delete the last character or digit.
8.5
Language
•
Press Menu (D), scroll down to
“HANDSET”
and press Menu (D).
•
Scroll Down (J) to
“LANGUAGE”
and press Menu (D).
•
Press Up (C) or Down (J) to select the preferred language and press Menu (D) to confirm.
8.6
Key beep
When pressing a button on the handset keypad, a beep will be heard. This can be switched on or off.
•
Press Menu (D), scroll down to
“HANDSET”
and press Menu (D). The display shows
“BEEP”
.
•
Press Menu (D) to select. The display shows
“KEYTONE”
.
•
Press Menu (D) to confirm.
•
Press Up (C) or Down (J) to select
“ON”
or
“OFF”
and press Menu (D) to confirm.
8.7
Battery low warning beep
When the battery is almost fully discharged, a warning beep will be heard every minute during a call.
These beeps can be switched on or off.
•
Press Menu (D), scroll Down to
”HANDSET”
and press Menu (D). The display shows “BEEP”.
•
Press Menu (D) to select.
•
Scroll down to
“LOW BATTERY”
and press Menu (D).
•
Press Up (C) or Down (J) to select
“ON”
or
“OFF
” and press Menu (D) to confirm.
8.8
Out of range warning beep
If the handset goes out of range, warning beeps will be heard during a call. These warning beep can be
switched on or off.
•
Press Menu (D) and scroll down to
“HANDSET”
and press Menu.The display shows
“BEEP”
.
•
Press Menu (D) to select.
•
Scroll down to
“OUT RANG”
and press Menu.
•
Press Up or Down to select
“ON”
or
“OFF”
and press Menu (D) to confirm.
8.9
Keypad lock using the menu
The menu can be used to lock the keypad.
•
Press Menu, scroll Down to
“HANDSET”
and press Menu.
•
Scroll down to
“KEYLOCK ?”
and press Menu to confirm.
is displayed.
Note: To unlock the keypad, press any button on the keypad, then press * within 5 seconds.
9 Base settings
9.1
Change base PIN code
Some functions are protected by a 4 digit PIN code which must be entered if the settings are changed.
The default PIN is
“0000”
. The PIN can be changed to a preferred number.
•
Press Menu (D) , scroll Down to
“SETUP”
and press Menu (D) .
•
Scroll down to
“PIN CODE”
and press Menu (D) .
•
Enter the 4 digit PIN code (default = 0000, digits are shown as ****) and press Menu (D) .
•
Enter a new 4 digit PIN and press Menu (D).
•
Re-enter the new PIN again and press Menu (D) to confirm.
IMPORTANT: If the PIN code is changed, please keep a record of the new number.
9.2
Dial mode
The phone is set to tone dialing. The dialing mode should only need to change if connected to an older
type of switchboard/PABX which requires pulse dialing.
•
Press Menu (D), scroll down to
“SETUP”
and press Menu (D).
•
Scroll Down to
“DIAL MODE”
and press Menu (D) .
•
Press Up (C) or Down (J) to select
“TONE DIAL”
or
“PULSE DIAL”
and press Menu (D) to confirm.
9.3
Recall Mode
Press the flash key R (G) to use certain services on your external line such as “call waiting” (if your phone
company offers this feature); or to transfer calls if you use a telephone exchange (PABX). The flash key R
is a brief interruption of the line. You can set the flash time to 100ms, 300ms.
•
Press Menu (D), scroll Down to
“SETUP”
and press Menu (D).
•
Scroll down to
“RECALL”
and press Menu (D).
•
Press Up (C) or Down (J) to select “
TIMED BR,1”
(100ms) or
“TIMED BR,2”
(300ms) and press
Menu (D) to confirm.
9.4
Restore default settings
The phone can be restored to its default (original) settings.
IMPORTANT - Resetting the phone to its default settings will delete all entries in the Phonebook
and Calls list.
•
Press Menu (D) , scroll down to
“SETUP”
and press Menu (D).
•
Scroll down to
“DEFAULT”
and press Menu (D).
•
Enter the 4 digit PIN code (default = 0000) and press Menu. The display shows
“CONFIRM ?”.
•
Press Menu (D) to confirm or Phonebook to return to the previous menu. The phone will restart
automatically.
9.5
Emergency default
If the PIN code has been lost, the phone can still be restored to its default settings.
•
Remove the batteries from the handset.
•
Press and hold * while replacing the batteries. The display shows
“DEFAULT?”
.
•
Press Menu (D) to confirm. The phone will restart automatically.
9.6
Eco mode
By operating the phone in Eco mode, the level of power emissions can be reduced.
When the ECO mode is set to ON, the base transmission power will be reduced. This feature is set to
OFF by default. To switch Eco mode on:
•
Press Menu (D), scroll down to
“SETUP”
and press Menu (D).
•
Scroll Down to
“ECO MODE”
and press Menu.
•
Press Up (C) or Down (J) to select
“ON”
or
“OFF”
and press Menu (D) to confirm.
9.7
Set alarm
•
Press Menu (D), scroll down to
“DATE-TIME”
and press Menu (D).
•
Scroll down to
“ALARM SET”
and press Menu (D).
•
Press Up (C) or Down (J) to select
“ON”
or
“OFF”
and press Menu (D) to confirm.
•
If ON is selected, enter the time in 24 hour format and press Menu (D) to confirm.
10 Caller ID and the Calls list
This service only works when you have a caller ID/Clip subscription. Please contact your telephone
company.
If the caller’s number is stored in the phonebook, the name assigned to it will be displayed. To ensure
that, make sure the full telephone number, including the area code is stored in the phonebook.
10.1
Calls list
The Calls list stores details of the last 40 received calls, including the phone number and date and time of
the call.
The caller’s details are stored in the call list whether or not the call has been answered.
When the memory is full, the new calls automatically replace the oldest calls in the memory.
When a new call is received in the call list, icon
will flash on the display in standby mode. When the
new call has been viewed, icon
disappears but icon
will remain.
10.2
View the Calls list
In stand-by:
•
Press Down (J) to open the Calls list. If there are no calls in the list, the display shows
“EMPTY”
.
•
Press Up (C) or Down (J) to scroll through the list. Press Talk (E) to dial the displayed entry.
•
If the call was answered, icon
is displayed when the entry is viewed. If the call was unanswered,
icon
is displayed when the entry is viewed. When the end of the list is reached, the handset will
beep.
•
If the caller’s number exactly matches an entry stored in the phonebook, the display will show the
caller's name. Press Menu (D) to see the caller’s number.
•
.If the telephone number is longer than 12 digits, icon
is displayed. Press Menu (D) to see the
remaining digits.
•
Press Menu (D) again to see the time and date of the call.
•
Press Menu (D) again to access the option to store the entry in the phonebook.
10.3
Copy a call list number to the phonebook
When the call number is displayed:
•
Press Menu (D) repeatedly until the display shows
“ADD ?”
.
•
Press Menu (D) again. The display shows
“NAME?”
.
•
Enter the name and press Menu (D). The number is displayed.
•
Edit the number if necessary, then press Menu (D).
•
Press up (C) or down (J) to select the required ringer melody and press Menu (D). The number is
stored.
10.4
Delete an entry
•
When the call number is displayed, press Phonebook. The display shows
“DELETE ?”
.
•
Press Menu (D) to confirm or Phonebook to cancel.
10.5
Delete the entire Calls list
1. Press down (J) to open the Calls list.
2. Press and hold Phonebook. The display shows
“DELETE ALL ?”
.
3. Press Menu to confirm or Phonebook to cancel.
11 Using additional handsets
You can register 3 extra handsets on the base if these handsets support the DECT GAP protocol.
For more information on the use of extra handset, check our website:
service.mtlogic.com
12 Troubleshoot
Frequently asked questions can be found on our website
service.mtlogic.com
13 Waste disposal (environmental protection)
This appliance should not be put into the domestic garbage at the end of its durability, but must
be offered at a central point for the recycling of electric and electronic domestic appliances. This
symbol on the appliance, instruction manual and packaging puts your attention to this important
issue. The materials used in this appliance can be recycled. By recycling of used domestic
appliances you contribute an important push to the protection of our environment. Ask your local
authorities for information regarding the point of recollection.
This product is in compliance with the essential requirements and other relevant provisions of the
R&TTE directive 1999/5/EC. The Declaration of conformity can be found on: service.mtlogic.com
1 Veiligheidsinstructies
•
Gebruik alleen de stekker van het laadstation die is meegeleverd. Gebruik geen andere laadstations
omdat dit de batterijcellen kan beschadigen.
•
Plaats alleen oplaadbare batterijen van hetzelfde type. Gebruik nooit gewone, niet-oplaadbare
batterijen. Plaats de oplaadbare batterijen met de polen correct (aangegeven in de batterijhouder
van de handset).
•
Raak het laadstation en de stekkercontacten niet met scherpe of metalen voorwerpen aan.
•
De werking van sommige medische apparaten kan worden beïnvloed.
•
De handset kan een onaangenaam zoemgeluid in gehoorapparaten veroorzaken.
•
Plaats het basisstation niet in een vochtige ruimte of op een afstand van minder dan 1,5 m van een
waterbron. Houd water uit de buurt van de handset.
•
Gebruik de telefoon niet in omgevingen waar een explosiegevaar bestaat.
•
Verwijder de batterijen en onderhoud de telefoon op een milieuvriendelijke wijze.
•
Omdat deze telefoon bij een stroomstoring niet gebruikt kan worden, moet u voor noodoproepen
een telefoon gebruiken die niet op het lichtnet werkt, bijvoorbeeld een mobiele telefoon
2 Aan de slag
2.1
Installeren van het basisstation (afbeelding 1)
•
Sluit één uiteinde van de adapter aan op een gewoon stopcontact en het andere uiteinde in de
adapteraansluiting op achterzijde van het basisstation.
Het stopcontact dient dichtbij en
gemakkelijk bereikbaar te zijn.
A
Earpiece speaker
B
Display
C
Up key
D
Menu / OK / Mute key
E
Talk/Handsfree key
F
*/Pulse to Tone dialling/Keylock
G
Recall key
H
Phonebook / delete / back key
I
End call / Menu Exit / handset On/Off key
J
Down / Enter calls list key
K
# / Pause key
L
Internal call key
M
Redial key
Flashes to indicate an incoming external call
External call in progress
Flashes to indicate an incoming internal call (only with optional extra handsets)
Internal call in progress
3-way call in progress or transfer an
external
call to another handset registered to the base
Eco mode is ON
Flashes to indicate new voicemail messages received Off when there is no voicemail
messages
Indicates signal strength Flashes when handset is not registered to the base or if it goes out of
range
Menu is opened
Phone book is opened
Flashes to indicate new calls list entries received*
Answered call (when viewing the Calls list)*
Press
down
Slide
MENU
OK
LNR
R
A
B
D
C
E
F
G
H
I
J
K
L
M
1
2
3
ENGLISH
Unanswered call (when viewing the Calls list)*
Keypad is locked
Displayed number is longer than 12 digits
Battery power level
NEDERLANDS


