CD-R
W/DVD Combo Drive
Multi-language Quick Installation Guide
Layout
F
R
E
N
C
H
H ardw are Installation
1.
S tart your com puter. W ait for the operating system to load.
2.
Connect the power supply and cable to the drive.
3.
Turn on the power on rear panel of the device. The green power indicator on the drive will
be on at this tim e.
4.
Connect the H i-S peed USB 2.0 cable B Type plug to the drive, and A Type plug to the US B
port on your computer.
5.
Once you finish the above steps, the system will autom atically detect the installation of the
device. (NOTE: if this is the first tim e you install the USB device to your W indows 98 OS ,
you will need to install the US B driver for W in98. Please follow the instructions on the
screen to install the US B driver properly. If your system still cannot identify the USB 2.0
device connection, please refer to the docum entation of your USB 2.0 card. If you do not
have a USB 2.0 adaptor card installed, you can still connect the device to a standard US B
connection.)
A .
Connect the included audio cable to the rear audio port of the device.
B .
Connect the other end of the audio cable to the A udio-In port of your com puter.
C.
Insert an Audio C D; press the play button of the device for A udio CD playback.
If your DV D C ombo cannot be detected autom atically, please do as follow s:
a.
Restart your com puter, and then Click on the
“control panel”
icon under
“m y
computer.”
b.
Double-click on the
“add new hardw are”
icon, then, click
“next”
and
“yes”
at the
dialog boxes.
c.
A llow W indows to search for your new external DV D Com bo drive autom atically,
and loads the driver software to com plete the installation.
E mergency E ject Hole:
W hen the tray cannot be opened autom atically for any reasons, please
insert an eject bar
Æ
a straightened paper clip with diam eter of 1.2mm can be used as an
eject-bar, press it inside of em ergency eject hole, then, eject the tray m anually. Make sure to
turn off the power before doing this action.
Installation matérielle
1. Démarrez votre ordinateur. Attendre que votre système d’exploitation soit chargé.
2. Connecter le câble d’alimentation ainsi que le câble de liaison de votre graveur externe.
3. A l’arrière du graveur, commuter le bouton sur “on”. Une lumière verte s’allumera alors sur la
façade du graveur.
4. Connecter le câble USB 2.0 de type B sur le lecteur et le type A sur votre ordinateur.
5. Une fois ces opérations terminées, votre ordinateur détectera automatiquement ce nouveau
périphérique. (NOTE: Si vous installez pour la première fois un périphérique USB sous
Windows 98, vous aurez besoin d’installer par la même occasion les drivers USB nécessaires
pour Windows 98. Si votre ordinateur ne reconnaît toujours pas votre périphérique USB 2.0,
veuillez vous référer à la documentation de votre carte USB 2.0. Si vous n’avez pas de carte
additionnelle USB 2.0, vous pouvez quand même vous connecter au port USB 1.0 traditionnel.)
A.
Connecter le câble audio fourni à l’arrière de votre graveur sur la sortie “audio out”.
B.
Connecter l’autre bout de ce même câble sur “audio in” de votre carte son.
C.
Insérer un CD audio et appuyer sur le bouton “play” de votre graveur externe pour jouer
le CD préalablement inséré.
Si votre graveur n’est pas reconu automatiquement , procéder comme indiqué ci-dessous:
a. Redémarrer votre ordinateur, et cliquer sur “panneau de configuration” du menu
démarrer
b. Double cliqué sur “ajout/ supression” de matériel, puis sur “suivant” et “oui”.
c. Laisser Windows rechercher votre graveur externe automatiquement et charger les
pilotes nécessaires.
Ejection du CD en cas d’urgence:
Lorsque le tiroir de votre graveur ne peut s’ouvrir normalement,
insérer dans le petit trou situé sur la face avant du lecteur, une pointe de 1.2 mm de diamètre. En
enfonçant cette pointe, le tiroir s’ouvrira alors automatiquement. Veillez à ce que le graveur soit hors
tension lors de cette manipulation d’urgence.
In stallazio n e d ell’H ard w are
1. A ccendete il com puter e attendete che il sistem a sia correttam ente caricato.
2. C olleg ate il ca vo e l’adattatore al m asterizzatore.
3. A ccendete il m asterizzatore, l’ind icatore sul drive dovrebbe a questo pun to essere
acceso di verde.
4. C olleg ate l’estrem ità B del cavo H i-S peed U S B 2.0 a l drive e l’estrem ità A de llo s tesso
cavo alla porta U S B del vostro P C .
5. U na volta giunti a qu esto punto, il sistem a autom aticam ente rivelerà l’insta llazione del
m asterizzatore. (N O TA : se qu esta è la prim a vo lta che insta llate sul vostro sistem a
operativo W indow s 98 un dispositivo U S B , dovrete prim a assicurarvi di aver installato
correttam ente il driver U S B . P er fare ciò vi basterà seguire attentam ente le istru zioni che
appariranno sullo scherm o. S e il vostro sistem a operativo continua a non riconoscere la
connessio ne del dispositivo U S B 2.0 visionate e rileggete la guida de l vostro adattatore
U S B 2.0. S e non avete installato un adatta tore U S B 2.0 potrete sem pre utilizzare la
connessio ne U S B standard).
A . C ollegate il cavo audio che troverete incluso al connettore audio che trovate sul
retro del m asterizzatore.
B . C olleg ate l’altra estrem ità del ca vo audio alla porta A udio-In del vostro com puter.
C . Inserite un C D A udio e attivate il m asterizzatore sele zionan do il tasto pla y.
S e il vo stro m aste rizzato re D V D C o m b o n o n vien e au to m aticam en te id en tificato
seg u ite q u este istru zio n i:
a
R iavviate il vostro com puter e cliccate su ll’icona
“co n tro l p an el”
che si tro va nella
sezione
“m y co m p u ter”
.
b. F ate doppio click sull’icon a
“ad d n ew h ard w are
”
, poi cliccate
“n ext”
e
“yes”
nelle finestre d i dialogo che vi appariranno.
c. C onsentite al vostro sistem a operativo W indows di ricercare autom aticam ente la
nuova periferica hardw are installata , il m asterizzatore, e caricate i driver software
che si rich iederanno necessari per com pletare l’installazione.
E ject H o le d ’em erg en za:
quando il cassettino del D V D C om bo, per qualsiasi ragione, non si
apre au tonom am ente inserite un dispositivo ch e agevoli l’operazione => una graffetta aperta
di 1,2m m di diam etro può ad esem pio essere usata a tale scopo, spingetela all’interno
dell’H ole d’em ergenza e poi estraete m anualm ente il cassettino. A ssicuratevi di spegnere il
m asterizzatore prim a di co m piere questa operazione.
For the best performance and disc compatibility, please check MSI home page at www.msi.com.tw for the latest firmware update.
Hardware-Installation
1. Starten Sie Ihren Computer und warten Sie bis das System vollständig geladen ist.
2. Verbinden Sie das DVD Combo-Laufwerk mit der Stromzufuhr.
3. Schalten Sie das Laufwerk an der Geräterückseite an. Nach dem Einschalten leuchtet die grüne
Power-LED.
4. Verbinden Sie das USB 2.0-Kabel (B Typ) mit dem Laufwerk und verbinden Sie das andere
Kabelende (A Typ) mit dem USB-Anschluss Ihres Computers.
5. Das System wird das Laufwerk anschließend automatisch erkennen und installieren. (Hinweis:
wenn Sie das Gerät zum ersten mal auf Ihrem Win98-System installieren, müssen Sie den
Win98-USB-Treiber installieren. Bitte folgen Sie den Installationsanweisungen auf Ihrem Bildschirm.
Falls Ihr System das USB-Laufwerk nicht erkennt, konsultieren Sie bitte das Handbuch Ihrer USB
2.0-Karte. Ist keine USB 2.0-Karte installiert, so können Sie das Laufwerk auch an eine Standard
USB-Schnittstelle anschließen.)
A.
Verbinden Sie das enthaltene Audio-Kabel mit dem Audio-Anschluss Ihres Gerätes.
B.
Verbinden Sie das andere Ende des Audio-Kabels mit dem Audio-In-Anschluss Ihres
Computers.
C. Legen Sie eine Audio-CD in das Laufwerk ein und betätigen Sie den Play-Schalter des
Laufwerks um den Abspielvorgang zu starten.
Falls Ihr DVD Combo-Laufwerk nicht automatisch erkannt werden kann, gehen Sie bitte wie folgt
vor:
a. Führen Sie einen Neustart aus und klicken Sie anschließend auf
Start
und
Systemsteuerung
.
b. Führen Sie einen Doppelklick auf
Hardware
aus. Bestätigen Sie die weiteren Fragen mit
weiter
und
ja
.
c. Lassen Sie Windows nach Ihrem neuen externen DVDCombo-Laufwerk suchen und die
entsprechende Software installieren.
Notauswurfsöffnung:
Falls die Laufwerkslade nicht automatisch geöffnet werden kann, führen Sie
einen dünnen Metallstift, z.B. eine gerade gebogene Büroklammer (Durchmesser ca 1.2mm) in die
Notauswurföffnung an der Gerätevorderseite ein. Damit wird die CD-Lade manuell geöffnet. Schalten
Sie das Gerät zuvor aus.
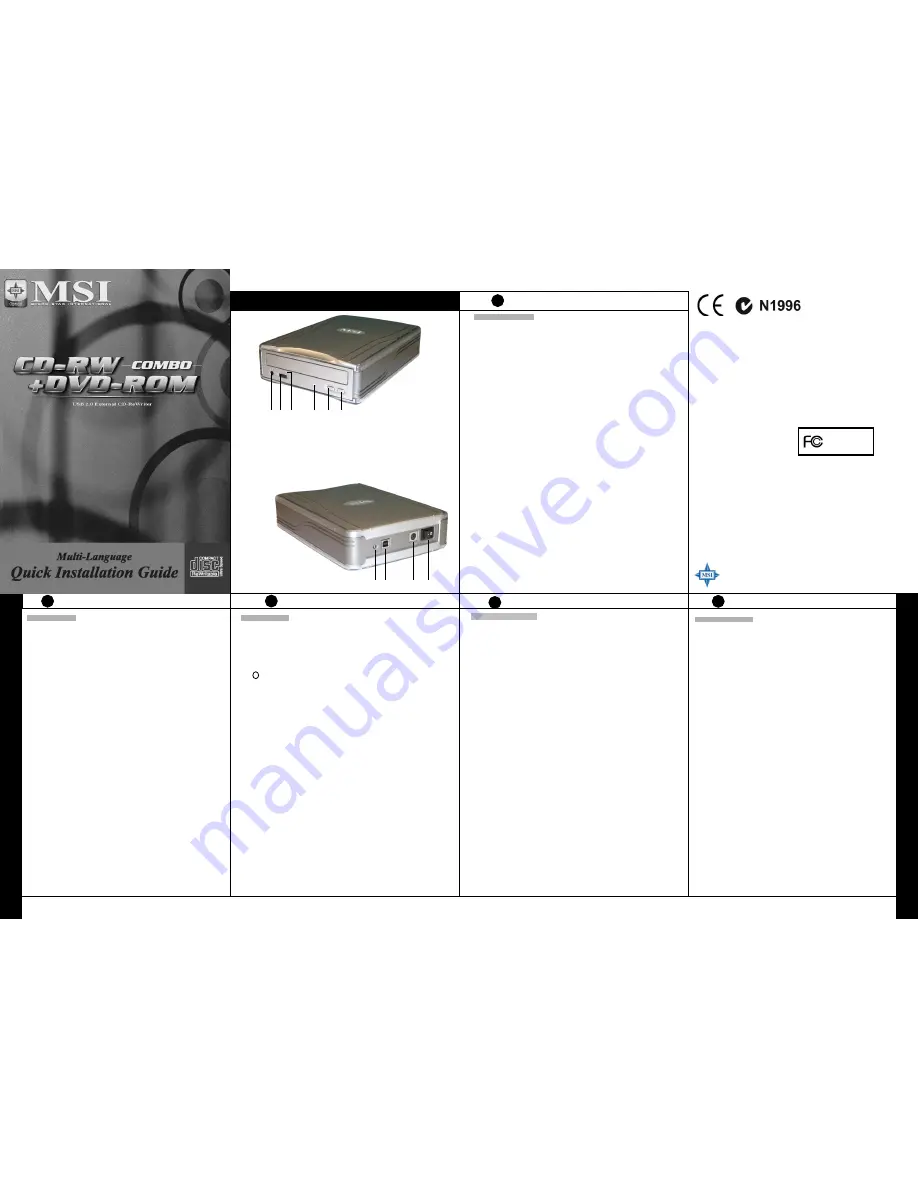
1. Headphone Jack: Output analog
audio by plugging in speaker or
headphone connector.
2. Volume Knob: Allow adjusting
volume manually.
3. Emergency Eject Hole: Insert
0.5 mm diameter pin to force
tray out in case function failure.
4. Power On / Busy LED
5. Play Button: Play or seek audio
track and output via headphone
jack.
6. Eject Button: Tray out disc.
7 8
9
10
7. Audio Out
8. USB Connector
9. Power Supply Connector
10. Power Off / On Switch
1 2
3
4
5
6
FCC-B Radio Frequency Interference Statement
This equipment has been tested and found to comply with the limits for a class B digital device, pursuant to
part 15 of the FCC rules. These limits are designed to provide reasonable protection against harmful inter-
ference when the equipment is operated in a commercial environment. This equipment generates, uses and
can radiate radio frequency energy and, if not installed and used in accordance with the instruction manual,
may cause harmful interference to radio communications. Operation of this equipment in a residential area
is likely to cause harmful interference, in which case the user will be required to correct the interference at
his own expense.
Notice 1
The changes or modifications not expressly approved by the party responsible for compliance could void the
user’s authority to operate the equipment.
Notice 2
Shielded interface cables and A.C. power cord, if any, must be used in order to comply with the emission
limits.
VOIR LA NOTICE D’INSTALLATION AVANT
DE RACCORDER AU RESEAU.
This device complies with Part 15 of the FCC Rules. Operation is subject to the following two conditions:
(1) this device may not cause harmful interference, and
(2) this device must accept any interference received, including interference that may cause undesired
operation.
Copyright Notice
The material in this document is the intellectual property of
MICRO-STAR INTERNATIONAL
. We take
every care in the preparation of this document, but no guarantee is given as to the correctness of its contents.
Our products are under continual improvement and we reserve the right to make changes without notice.
Trademarks
All trademarks used in this manual are the property of their respective owners.
Pentium is a registered trademark of Intel Corporation.
Windows is a registered trademark of Microsoft Corporation.
Part No.: G52-O8452E1
Micro Star International
MS-8452E
E
N
G
L
I
S
H
G
E
R
M
A
N
S
P
A
N
I
S
H
Instalación del Hardware
1. Encienda la com putadora. Espere a que cargue el sistem a operativo.
2. Conecte el adaptador de corriente y el cable al dispositivo.
3. Encienda el dispositivo en el panel de atrás. Se encenderá una luz verde indicadora
de corriente.
4. Conecte el cable US B 2.0 de alta velocidad, con el conector Tipo B en el dispositivo y
el conector Tipo A en el puerto U SB de su com putadora.
5. Una vez efectuados los pasos anteriores, el sistem a detectará autom áticam ente la
instalación del dispositivo. (NO TA: Si es la prim era vez que instala un dispositivo USB
a su sistem a operativo W indows 98, deberá instalar el driver de U SB para W in98.
Siga las instrucciones en la pantalla para instalar el driver de U SB correctam ente. Si
su sistema todavía no puede identificar la conexión al dispositivo USB 2.0, refiérase a
la docum entación de su tarjeta USB 2.0. Si no tiene una tarjeta adaptadora USB 2.0
instalada, aún puede conectar el dispositivo a una conexión USB estándar).
A.
Conecte el cable de sonido incluido al puerto de sonido en la parte posterior
del dispositivo.
B. Conecte la otra punta del cable de sonido al puerto Audio-In de su
com putadora.
C. Inserte un CD de sonido; presione el botón de “play” del dispositivo para
escuchar el CD.
Si su D VD Combo no se detecta automáticam ente, haga lo siguiente:
a. Vuelva a encender la com putadora y haga clic en el ícono de
“control p anel”
bajo
“my computer.”
b. Haga doble-clic en el ícono de
“add new hardware”
, luego clic en
“next”
y
“yes”
en las cajas de diálogo.
c. Perm ita que W indows busque su nuevo dispositivo DVD Com bo externo
autom áticam ente y cargue el software del driver para com pletar la instalación.
Orificio de Expulsión de Emerg encia:
Si la bandeja no puede abrirse autom áticam ente
por cualquier m otivo, asegúrese de que no haya un CD girando en su interior y que la
corriente esté apagada antes de efectuar ninguna acción. Luego inserte una barrita de
expulsión
Æ
Un sujetador de papel estirado (de 1.2mm de diám etro) puede ser utilizado
com o barra de expulsión. Introdúzcalo en el orificio de expulsión de em ergencia y abra la
bandeja m anualm ente.
I
T
A
L
I
A
N