RADIO
A
LA
R
M
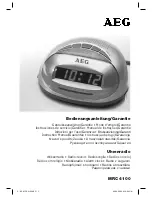
Illustration
Location of controls
Robot Escargot
clock radio
28010
OPERATING INSTRUCTIONS
P.2
P.3
P.4
1 Snooze button
2 Tuning control
3 Volume control
4 Sleep button
5 Clock display
6 Minute/Hour button
7 Time button
8 Battery compartment
9 Alarm set button
10 Alarm off button
11 AM/FM band switch
12 Function selector switch
13 Adaptor socket (at rear of unit)
14 Wire FM aerial (at rear of unit)
Batteries (not included)
The radio is operated by internal batteries.
1
Remove the battery compartment cover (8) located underneath the unit by
pushing in the tab and lifting upwards.
2
Insert the batteries: 4 x (AA size) into the battery compartment.
3
Replace the battery compartment cover (8).
Ensure batteries are fitted correctly.
If the unit is not to be used for a prolonged period, remove the batteries in order
to avoid battery leakage.
In the interests of environmental safety: dispose of batteries safely.
AC mains adaptor (not included)
The radio has the facility for an ac mains adaptor polarity () input
voltage indicated on the rear of the product.
Make sure to use a correct adaptor that matches the size of the DC jack,
1.3mm diameter.
Connect the AC adaptor plug into the adaptor socket (at the rear of the unit)
and plug the adaptor into the mains outlet.
AC adaptors are readily available from electrical retailers.
Electro luminescent light
This unit is equipped with a light for easy viewing. You can push any button
on the front panel including the SNOOZE button to switch on the light. After 8
seconds the light will automatically switch off.
To set the time
1
Press the
TIME
button (7) once. The time set indicator will be displayed. You
now have approximately 5 seconds to start setting the time.
2
Press the
MINUTE/HOUR
button (6) once to move the minute hand
clockwise by 1 minute.
3
Press and hold the
MINUTE/HOUR
button, the minute hand will move
automatically 8 minutes and then the hour hand will start moving
instead.
4
Release the
MINUTE/HOUR
button and press to set the minutes, each press
will move the hand by one minute.
Note: If the minute hand goes past 12, then the hour hand will advance by 1
hour.
To play the radio
1
Slide the
FUNCTION SELECTOR
switch (12) to the ON position.
2
Set the
AM/FM BAND
switch (11) to the desired wave band.
3
Adjust the
TUNING CONTROL
and the
VOLUME CONTROL
for the desired
station and listening level.
4
To turn off the radio, set the
FUNCTION SELECTOR
switch to the ‘OFF’
position.
To obtain the maximum FM reception fully extend the wire FM aerial (14) which is
located at the rear of the unit and alter the direction of the wire.
The aerial for the AM waveband is located inside the unit. To obtain, the
maximum AM reception rotate your clock radio.
To set the alarm time
1
Press the
ALARM SET
button once. The alarm set indicator will be displayed.
2
Press the
MINUTE/HOUR
button (6) once to move the minute hand
clockwise by 1 minute.
3
Press and hold the
MINUTE/HOUR
button, the minute hand will move
automatically until 8 minutes and then the hour hand will start moving
instead.
4
Release the
MINUTE/HOUR
button and press to set the minutes, each press
will move the hand by one minute.
5
After setting the desired alarm time, the alarm set indicator will disappear
automatically after a few seconds and the clock will return to the current
time.
1
2
3
4
5
6
7
8
9
10
11
12
Function switch
Alarm buzzer
Alarm radio
Radio off
Radio on
Sleep on
indicator
Alarm on
indicator
Alarm set
indicator
Sleep set
indicator
Time set
indicator
Hour hand
○
○
○
○
13
○
○
○
○
○
14