Minolta MNCD36, User Manual
The Minolta MNCD36 is a top-notch digital camera that captures stunning images with precision. To maximize your shooting experience, make sure to refer to the detailed user manual available for free download at manualshive.com. This manual provides step-by-step instructions, allowing you to master all features and functionalities effortlessly.
Share
Download


Reviews:
No comments
Related manuals for MNCD36
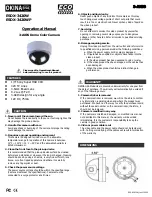
ECO Series
Brand: Okina USA Pages: 2

WB550
Brand: Samsung Pages: 34

WB500
Brand: Samsung Pages: 34

WB2100
Brand: Samsung Pages: 139

WB100
Brand: Samsung Pages: 123

Vluu PL200
Brand: Samsung Pages: 12

Vluu PL170
Brand: Samsung Pages: 126

Vluu PL20
Brand: Samsung Pages: 106

NV10 - Digital Camera - Compact
Brand: Samsung Pages: 74

DMC-GH1K - Lumix Digital Camera
Brand: Panasonic Pages: 200

TL220 - DualView Digital Camera
Brand: Samsung Pages: 110

VEGA 140S
Brand: Samsung Pages: 64

HX-A100
Brand: Panasonic Pages: 32

WB650
Brand: Samsung Pages: 38

TR-H2L1
Brand: TRASSIR Pages: 2

S304
Brand: Megxon Pages: 35

Zoom I60c
Brand: Konica Minolta Pages: 33

DH-8
Brand: distianert Pages: 126


