Mikrofill Ethos 24cc, Maintenance Instructions Manual
The Mikrofill Ethos 24cc is a high-quality heating system that ensures efficient and reliable performance. To ensure optimal functionality, it is crucial to follow the "Maintenance Instructions Manual." Download this essential manual for free from manualshive.com today and maximize the lifespan of your Mikrofill Ethos 24cc.
Share
Download


Reviews:
No comments
Related manuals for Ethos 24cc

Upsilon
Brand: A.O. Smith Pages: 68

VFC 15-150
Brand: IBC Pages: 4
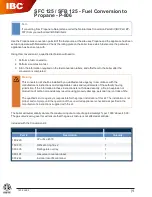
SFC-125
Brand: IBC Pages: 6

SL 30-175
Brand: IBC Pages: 74

RBS 20 E
Brand: Radiant Pages: 22

Vap 100
Brand: ECOFOREST Pages: 140

Alpha eTec33
Brand: tado° Pages: 20

Optima 901
Brand: Optima Pages: 8

Heatpac 12-18kW
Brand: FireBird Pages: 36

SEAGOLD 1A HR
Brand: broag Pages: 259

Gold Combi 28 HE LPG
Brand: Potterton Pages: 12

VITOCELL-V 100
Brand: Viessmann Pages: 32

SZM A 18 KW
Brand: SOLZAIMA Pages: 94

Biomatic plus 50
Brand: Ariterm Pages: 32

SCB Series
Brand: Wolf Pages: 2

ECOflo EC230/600
Brand: andrews Pages: 52

350 Combi
Brand: Worcester Pages: 44

Dura-Max DW-1810
Brand: A.O. Smith Pages: 4


