background image

Instruction Manual

  1

Instruction Manual

Mini Chopper CH - 173

Summary of Contents for CH - 173

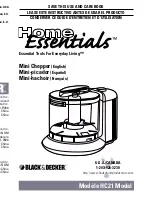
Page 1: ...Instruction Manual 1 Instruction Manual Mini Chopper CH 173...

Page 2: ...s not working properly or presents signs of damages In such cases directly contact an authorized service center see list in warranty certificate Any intervention other than cleaning and normal mainten...

Page 3: ...andard blade or the Mouloukhia blade see Mouloukhia blade section below 3 Fit the bowl cover C in place The appliance will not work if the bowl cover is not fitted correctly 4 Place the motor base A o...

Page 4: ...Parsley 30 g 10 sec 1 or 2 Onions 200 g In pulses 1 Shallots 200 g In pulses 1 Garlic 150 g 5 sec 1 Rusk s 20 g 15 sec 1 or 2 Almonds 100 g 15 sec 2 Hazelnuts 100 g 15 sec 2 Walnuts 100 g 15 sec 2 Gru...

Page 5: ...pliance and take out a part of the food before continuing If necessary push the damp food back to the middle of the bowl using a spoon or a similar object Under no circumstance use your fingers An eve...

Page 6: ...Cut the chicken in 4 quarters In a medium skillet add 2 tbsp margarine Fry the chicken pieces until golden In a deep pan heat the reserved broth and bring to a boil over high heat Add 1 tbsp coriander...

Page 7: ...Instruction Manual 7 Mode D emploi Mini Hachoir CH 173...

Page 8: ...mag Dans un cas pareil contactez un centre de service agr voir le certificat de garantie Toute intervention l exception du nettoyage et l entretien normal doit tre effectu e par un centre de service a...

Page 9: ...uloukhia ci dessous 3 Montez le couvercle du bol C en place L appareil ne fonctionnera pas si le couvercle du bol n est pas correctement fix 4 Placez le bloc moteur A sur le bol couvert et raccordez l...

Page 10: ...ropre go t Ingr dients Quantit maximale Temps maximal Vitesse recommand e Mouloukhia 50 g 10 sec En impulsions Persil 30 g 10 sec 1 au 2 Oignons 200 g En impulsions 1 Echalotes 200 g En impulsions 1 A...

Page 11: ...eur pleine vitesse en quelques secondes d branchez l appareil et retirez une partie de la nourriture avant de continuer Si n cessaire poussez la nourriture humide qui remonte de nouveau vers le milieu...

Page 12: ...v rifiez que Il est bien raccord une prise de courant Les accessoires sont bien mont s et positionn s Le couvercle du bol est bien positionn et que le bloc moteur est bien mont sur le bol assembl Les...

Page 13: ...Mode D emploi 13...

Page 14: ...7 CH 173 220 240V 50 60Hz 400...

Page 15: ...6 25 25 4 1 2 3 1 1 1 2 1 1 2 4 4 3...

Page 16: ...5 G E C A 500...

Page 17: ...4 2 1 1 2 0 4 G D C D F A 50 10 30 10 2 1 200 1 200 1 150 5 1 20 15 2 1 100 15 2 100 15 2 100 15 2 100 15 2 200 10 2 200 15 2 200 15 2 0 4 30 2 1 0 4 30 2 130 9 2 130 9 2...

Page 18: ...3 A A B B 2 1 C C D D E E F F G G H H I I 1 1 G C A 2 2 G E D 0 5 3 3 C 4 4 B A 1 B 2 B 5 5 6 6 7 7 E D D E F A B C H I G...

Page 19: ...2...

Page 20: ...1 CH 173...

Reviews: