Miele Novotronic T1 570 C, Operation Manual
The Miele Novotronic T1 570 C is a cutting-edge appliance that offers advanced features to simplify your laundry routine. With its intuitive operation, it ensures hassle-free usage. To make the most of this product, download the free operation manual from our website manualshive.com and unlock its full potential.
Share
Download


Reviews:
No comments
Related manuals for Novotronic T1 570 C

Supercare PRO AC7200
Brand: Remington Pages: 88

TCM 80
Brand: Ariston Pages: 24

XEF463-207V
Brand: Gazi Pages: 15

AF-602A
Brand: Häfele Pages: 17

7FRI/G415
Brand: Baron Pages: 109

FR326E
Brand: Jata electro Pages: 24

9VXRD Series
Brand: Gardner Denver Pages: 16

WDF147-2
Brand: Smeg Pages: 31

AD-530 HS
Brand: ADC Pages: 68

DLLLR33EJ
Brand: GE Pages: 3

GE Profile DCCB330EG
Brand: GE Pages: 3
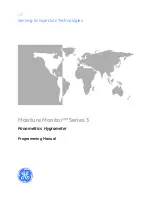
Moisture monitor series 3
Brand: GE Pages: 99

WDI1210
Brand: Caple Pages: 12

130 FG-m
Brand: AEG Pages: 32

950 008 672
Brand: AEG Pages: 44
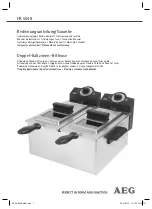
FR 5548
Brand: AEG Pages: 54

FR 5553
Brand: AEG Pages: 54

FT 350 FRITESSE PROFI
Brand: AEG Pages: 8


