background image

5

4

3

1

2

11

10

9

8

7

6

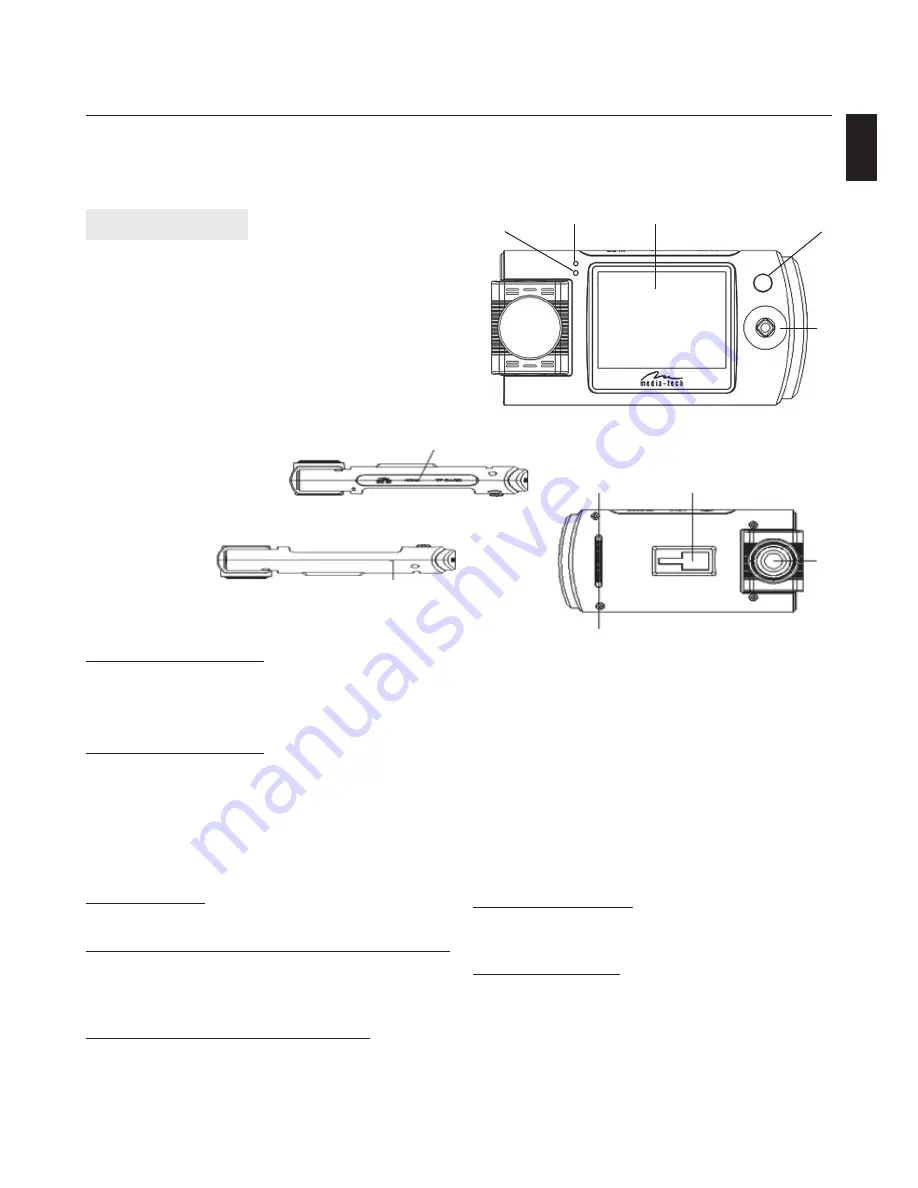
Car Black Box Device

Device description

  1. ON / OFF button

  2. Manipulator (up/down, left/right, OK button),

  3. LCD Screen

  4. Charging LED

  5. Power LED,

  6. Lens

  7. Car mounting system,

  8. Reset button,

  9. Speaker

 10. HDMI / USB  / micoSD,

 11.  Microphone.

Drive Eye

Instructions Manual

MT4042

EN

To turn on the device

Press the “ON / OFF”
Note: when the battery runs out, driving recorder 

turns off automatically after low battery indication.

Charging the battery

During charging, the red LED will turn on when the 

unit is fully charged the LED turns off when charging is 

complete. Charging will take about an hour.
There are two ways to charge the battery

1. Charging via Car Lighter Socket

2. Charging via USB

Memory Card

The device supports microSD HC class 4 up to 32GB.

Switching the camera/photography/settings

To change the mode, use the keypad (Figure 1), and 

direct it toward the left until you see the mode you 

want to use.

Take photos / photo mode options

Switch the keypad to the top and select the mode 

(photo). Press the OK button to take the picture. To 

activate the options menu photographs switch the 

keypad to the right

In the settings menu lists the following options:

Resolution: 12M (4032x3024) / 8M (3264x2448) / 5M 

(2560x1920) / 3M (2048x1536)

Image Quality: High, medium, low.

White Balance: (Auto / sunlight / cloudy / fluorescent )

Digital Effect: Normal, black and white, nostalgic

Time timer: No / 10 minutes / 20 minutes

Shooting: on / off

Date Stamp: on / off

Exposure compensation: (-2.0 ~ +2.0)

Setting the system

Press the left  keypad button until you see the settings 

for the BEEPER, there are system settings.

Product Features

  132 degrees wide-angle lens

  Rotating lens in 180 degree 

  Built-in battery

  Built-in microphone/speaker

  Micro SD card support high capacity (up to 32GB)

  Motion detection and video recording

  Automatic recording when You start do drive.

Summary of Contents for Drive Eye MT4042

Page 1: ...nge the mode use the keypad Figure 1 and direct it toward the left until you see the mode you want to use Take photos photo mode options Switch the keypad to the top and select the mode photo Press the OK button to take the picture To activate the options menu photographs switch the keypad to the right In the settings menu lists the following options Resolution 12M 4032x3024 8M 3264x2448 5M 2560x1...

Page 2: ...nić tryb należy użyć manipulatora rys 1 i skierować go w lewym kierunku aż wyświetli się tryb którego chcemy użyć Robienie zdjęć tryb opcji foto Przełącz manipulator do góry i wybierz tryb fotogra fii Naciśnij klawisz OK aby zrobić zdjęcie Aby włączyć menu opcji fotografii należy skierować manipulator w prawo W menu ustawień mamy do wyboru następujące opcje Rozdzielczość 12M 4032x3024 8M 3264x2448...

Page 3: ...ete li změnit režim použijte tlačítko ovládání obrazek 1 a posouvejte se doleva dokud se nezobrazí režim který chcete aktuálně použít Fotografování možnosti foto režimu Stiskněte tlačítko ovládání směrem nahoru a vyberte si režim Photo Pro pořízení fotky zmáčkněte tlačítko OK Chcete li aktivovat možnost fotografie stiskněte tlačítko ovládání vpravo V nabídce nastavení mate následující možnosti Roz...

Page 4: ...el modo use el teclado Figura 1 y di rigirla hacia la izquierda hasta que aparezca el modo que desea utilizar Tome fotos opciones del modo Fotografía Cambia el teclado a la parte superior y seleccione el modo foto Pulse el botón Aceptar para hacer la foto Para activar las fotografías menú Opciones para cam biar el teclado a la derecha En el menú Ajustes muestra las siguientes opciones Resolución 1...

Page 5: ... Kamera fényképezés beállítások A mód választásához használja a gombot ábra 1 és irányítsa arra a módra amelyiket használni akarja Fotó készítés fotó mód opciók Válassza ki a fotó módot Az OK gombbal képet készíthet Az fotók menüopciójához állítsa a gombot jobb oldali irányba A beállítások között az alábbi opciókat találja Felbontás 12M 4032x3024 8M 3264x2448 5M 2560x1920 3M 2048x1536 Képminőség m...

Page 6: ...ngar Til að skipta um ham notaðu stýritakkana mynd 1 og ýttu til vinstri þar til viðeigandi hamur kemur upp Taka myndir myndastillingar Ýttu efst á stýritakkann og veldu Photo Ýttu á OK til að taka mynd Til þess að komast í myndastillingar þá er hægt að ýta til hægri Eftirfarandi stillingar eru í boði Upplausn 12M 4032x3024 8M 3264x2448 5M 2560x1920 3M 2048x1536 Myndgæði High medium low Hvítstilli...

Page 7: ...nger de mode utilisez le clavier Figure 1 et l orienter vers la gauche jusqu à ce que vous voyez le mode que vous souhaitez utiliser Prendre des photos les options du mode photo Mettez le clavier vers le haut et sélectionnez le mode photo Appuyez sur le bouton OK pour prendre la photo Pour activer les options du menu photogra phies basculer le clavier vers la droite Resolution 12M 4032x3024 8M 326...

Page 8: ...тройки Для смены режима используйте манипулятор рис 1 нажи майте налево пока не найдете нужный вам режим Режим фотосъемки настройки режима фотосъемки Нажмите вверх на манипуляторе и выберите режим фото съемки Чтобы сделать снимок нажмите кнопку ОК Нажми те направо чтобы активировать меню опций Настройки меню опций Resolution разрешение 12M 4032x3024 8M 3264x2448 5M 2560x1920 3M 2048x1536 Image Qua...

Page 9: ... nummer 2 van figuur 1 en blijf op de linker knop drukken tot u bij de juiste mode komt Fotosmaken foto mode instellingen Schakel het pijltjes schema naar boven en selecteer de modus foto Druk op de knop OK om de foto te maken Voor het activeren van het optiemenu van het Pijltjes schema over te schakelen naar de juiste In het menu met instellingen vindt u de volgende op ties Resolutie 12M 4032x302...

Reviews: