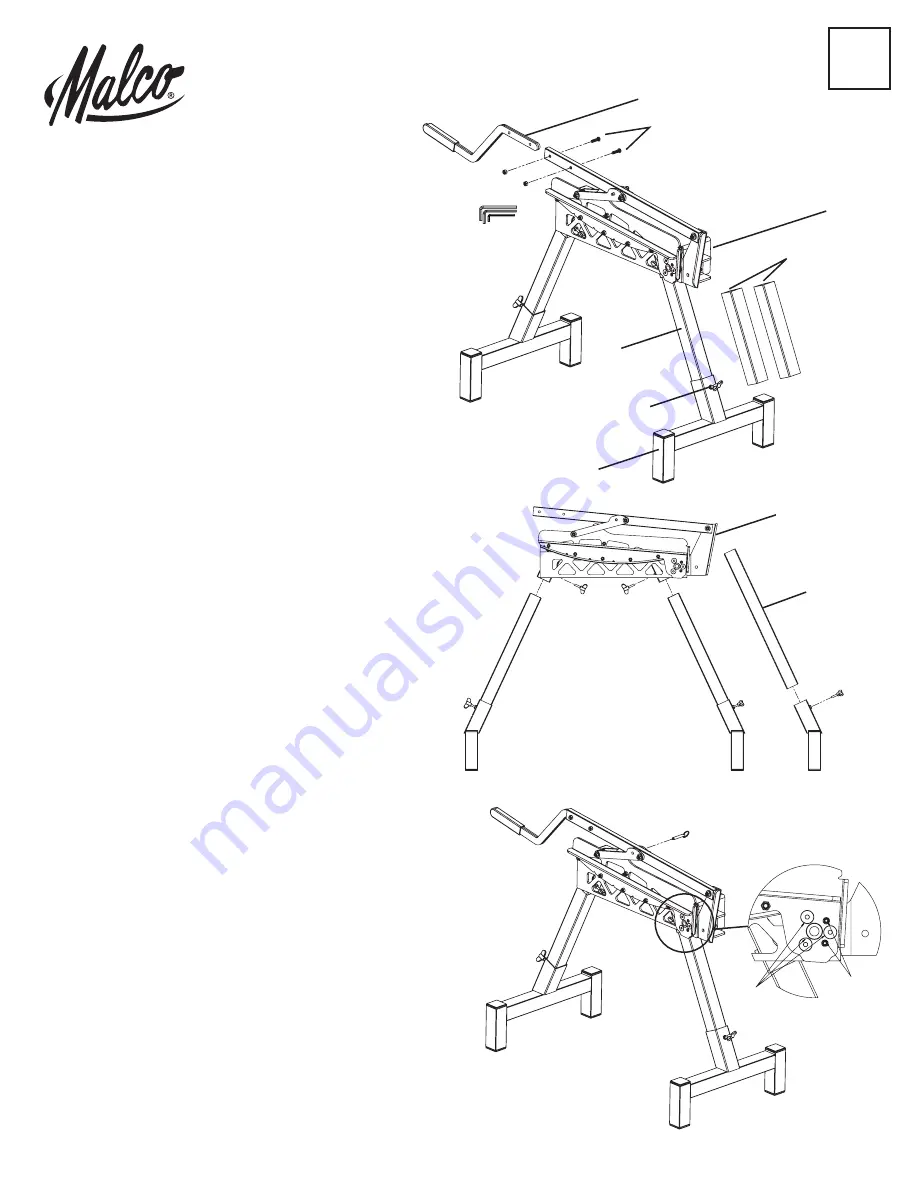
background image

1

SL16365A

Set-up:

1. 

A

 - 

Tool Body

 B

 - 

Foot Assembly (2)

 C

 - 

Short Legs (2)

 D

 - 

Long Legs (2)

 E

 - 

Wing Screws (4)

 F

 - 

Handle (1)

 G

 - 

Handle Fasteners (2 nuts and 2 bolts)

 H

 - 

Hex Wrenches (3)

Instructions

2.  Determine desired leg length and insert the appropriate
  tube into each foot assembly 

B

, Short Legs: Tube 

C

, produce  

  a 21-1/4 inch working table height; Tube 

D

, Long Legs, produce  

  a 29-1/4 inch working table height.  Secure leg to foot with  
  included wing screws 

E

.  

3.  Insert the other end of each leg/foot assembly into the    
  receivers on the main body of the tool 

A

 so that the feet sit  

  flush on the ground. 
4.  Secure the legs to tool body using the included wing screws 

E

5.  Insert the handle 

F

 into the tool as shown above and secure  

  using included fasteners 

G

.  Tighten fasteners until the handle  

  is securely attached.
6.  The tool is now ready for use. 

SCSRC1 / SCSRC1 EV

A

C or D

E

SCSRC1 
SCSRC1EV

F

A

G

C

D

E

B

H

Blade & Die Lateral Adjustment:

The Malco Stone Coated Steel Roofing Cutter is factory adjusted 
for optimum performance. In the unlikely event that this tool needs 
adjusting to re-establish performance, follow instructions below.

1.  Close the tool and insert the cross pin lock 

J

.

2.  Locate the 3-M10 flat head screws 

K

 around the pivot and, using an  

  included wrench, loosen these screws 1 to 1-1/2 turns.
3.  Locate the 2-M8 set screws 

L

 around the pivot and, using an  

  included wrench, tighten these 2 screws a maximum of 1/4 turn each.   
  Make sure to tighten each screw the same amount.
4.  Retighten the 3-M10 screws 

K

 very securely, making sure to cycle  

  around the screw pattern at least 2 times.

Cross Pin

K

J

L

EN

Summary of Contents for SCSRC1

Page 1: ...e and secure using included fasteners G Tighten fasteners until the handle is securely attached 6 The tool is now ready for use SCSRC1 SCSRC1 EV A C or D E SCSRC1 SCSRC1EV F A G C D E B H Blade Die La...

Page 2: ...nd blade assembly Keep pin for future use 4 Lower handle to cut 2 Lift handle to open tool throat 5 For long cuts repeat steps 1 3 as needed 3 Steady material on table 6 When transporting tool replace...

Page 3: ...pport P2 10 Replace the blade with new or reverse the current blade so that a new cutting edge is exposed 11 Reassemble and secure the screws and nuts Q holding the blade P1 to the blade support P2 TI...

Page 4: ...i dessus et le fixer avec les attaches fournies G Serrer les attaches jusqu ce que le manche soit solidement fix 6 L outil est maintenant pr t l emploi A C or D E SCSRC1 SCSRC1EV F A G C D E B H Ajust...

Page 5: ...tilisation ult rieure 4 Abaisser le manche pour couper 2 Lever le manche pour ouvrir la gorge de l outil 5 Pour les coupes longues r p ter les tapes 1 3 au besoin 3 Stabiliser le mat riau sur la table...

Page 6: ...lame actuelle afin qu un nouveau tranchant soit expos 11 Remettre et fixer les vis et crous Q retenant la lame P1 sur le support de lame P2 SERRER CES FIXATIONS JUSQU CE QU ELLES SOIENT SIMPLEMENT BI...

Page 7: ...en Verbindungselementen G Ziehen Sie sie an bis der Griff sicher befestigt ist 6 Das Werkzeug ist bereit zur Verwendung A C or D E SCSRC1 SCSRC1EV F A G C D E B H Justierung der Klinge Matrize Der Mal...

Page 8: ...Schnitt zu setzen 2 Ziehen Sie den Griff nach oben um die Ausladung des Werkzeugs zu ffnen 5 Wiederholen Sie diese Schritte f r l ngere Schnitte wenn n tig ein bis dreimal 3 Legen Sie das Material so...

Page 9: ...eine neue aus bzw wenden Sie die aktuelle Klinge sodass eine neue Schnittkante verwendet wird 11 Setzen Sie die Teile wieder zusammen und ziehen Sie die Schrauben und Muttern Q die die Klinge P1 mit d...

Page 10: ...ome indicato sopra e fis sarlo con dispositivi di fissaggio inclusi G Serrare il dado e il bullone fino a quando la maniglia 6 Lo strumento pronto per l uso A C or D E SCSRC1 SCSRC1EV F A G C D E B H...

Page 11: ...4 Abbassare la maniglia per tagliare 2 Sollevare la maniglia per aprire la ganascia dello strumento 5 Per lunghi tagli ripetere i passaggi 1 3 come necessario 3 Fissare il materiale sul tavolo 6 Duran...

Page 12: ...a lama con una nuova o invertire la lama in uso in modo che sia esposto un nuovo bordo di taglio 11 Rimontare e fissare le viti e i dadi Q che tengono la lama P1 fissata al supporto della lama P1 SERR...

Page 13: ...a que el mango quede bien instalado 6 La herramienta ya est lista para ser utilizada A C or D E SCSRC1 SCSRC1EV F A G C D E B H Ajuste lateral de la hoja y el troquel La cortadora para techados de ace...

Page 14: ...sos 4 Baje el mango para realizar el corte 2 Levante el mango para abrir la gar ganta de la herramienta 5 Para cortes largos repita los pasos 1 a 3 seg n sea necesario 3 Sujete el material sobre la me...

Page 15: ...la vuelta para exponer el nuevo borde de corte 11 Reinstale y coloque los tornillos y las tuercas 6 M8 Q que sujetan la cuchilla P11 al soporte de la cuchilla P2 APRIETE ESTAS FIJACIONES HASTA QUE QU...

Reviews: