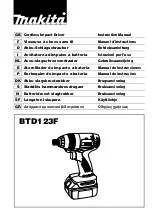
background image

Dimensions: mm (")

Width (W)
Height (H1)

*

2

Height (H2)

*

3

*2:

 with BL1815

*3:

 with BL1830

Length (L)

171 (6-3/4) 

79 (3-1/8) 

250 (9-7/8) 

233 (9-1/8) 

BTP141 (LXPT02

*

1

)

Cordless 4 Mode Impact Driver

*1: 

Model number for North and Central American countries

Model BTP141 (LXPT02

*1

) Cordless 4 mode Impact Driver is an advanced version

of model BTP140.   While maintaining the same high versatility as Model BTP140,

BTP141 additionally features more compact design achieved by using BLDC motor

(

B

rush

L

ess 

DC

 motor) and Makita’s first electronic clutch mechanism. 

This product is powered by 18V-1.3Ah Li-ion battery BL1815 and 18V-3.0Ah 

Li-ion battery BL1830.
This product is available in the following variations.

Battery

Clutch torque setting on screwdriver mode

Charging time: min.

Max. fastening torque:

                N.m (in.lbs)

Capacity: Ah
Cell

Voltage: V

18

Drill mode

Soft joint

Impact driver mode

*

5

13 (115)

1.3, 3.0

Li-ion

15, 22 with DC18RC

Hard joint

22 (195)

Lock torque

16 (142)

150 (1,330)

No load speed:

      min.

ˉ

¹=rpm 

Impact driver mode

0 - 2,700/ 0 - 2,200/ 0 - 1,300 

0 - 3,200/ 0 - 2,400/ 0 - 1,200 

Screwdriver mode

Drill mode

Hammer drill mode

0 - 2,700/ 0 - 700
0 - 1,100/ 0 - 300

    (0 - 2,300/ 0 - 600)

*

4

Impacts per minute:

              min.

ˉ

¹=ipm

Impact driver mode

Hammer drill mode

0 - 32,400/ 0 - 8,400

18 (9 each for high/low speeds)

+ Teks screw mode

Driving shank

6.35mm (1/4") Hex

Weight according to

EPTA-Procedure 01/2003: kg (lbs) 

Torque range (approx.): N.m (in.lbs)

0.7 - 4.0 (6 - 35)/ 1.5 - 12.0 (13 - 106)

1.6

*2

 (3.5)

*2

, 1.8

*3

 (3.9)

*3

Drilling:

  mm (")

Steel

Masonry

Wood

21 (13/16)

M4 - M8 (5/32" - 5/16")

10 (3/8)

8 (5/16)

Yes

Energy capacity: Wh

24, 54

Drill mode

Fastening

Machine screw

M5 - M14 (3/16" - 9/16")

Standard bolt

M5 - M12 (3/16" - 15/32")

High tensile bolt

22mm - 125mm (7/8" - 4-7/8")

Coarse-thread

Impact driver mode

LED Job light

*4:

 Teks screw mode

*5:

 Torque at 3 seconds after seating, when fastening M14 high tensile bolt

Hammer drill mode

Capacity

PRODUCT

P  1/ 

18

All models also include the accessories listed below in "Standard equipment".

Model No.

Type

Quantity

Charger

Plastic

carrying

case

Battery

cover

No

Battery

BTP141Z

No

No

BTP141RFE

DC18RC

Yes

2

BL1830

1

Battery

fuel gauge

Yes

Yes

No

No

T

ECHNICAL INFORMATION

Models No.
 Description

C

ONCEPT AND MAIN APPLICATIONS

S

pecification

Hard/ Medium/ Soft
High/ Low

High/ Low
Hard/ Medium/ Soft

High/ Low

High/ Low

H

W

L

Summary of Contents for BTP141Z

Page 1: ... 200 0 2 400 0 1 200 Screwdriver mode Drill mode Hammer drill mode 0 2 700 0 700 0 1 100 0 300 0 2 300 0 600 4 Impacts per minute min ˉ ipm Impact driver mode Hammer drill mode 0 32 400 0 8 400 18 9 each for high low speeds Teks screw mode Driving shank 6 35mm 1 4 Hex Weight according to EPTA Procedure 01 2003 kg lbs Torque range approx N m in lbs 0 7 4 0 6 35 1 5 12 0 13 106 1 6 2 3 5 2 1 8 3 3 9...

Page 2: ...k Drill bits for masonry with 6 35mm Hex shank Phillips bits Socket bits Fast charger DC18RA for U S Canada Guam Panama Mexico and Columbia Fast charger DC18RC for all countries except U S Canada Guam Panama Mexico and Columbia Charger DC18SD Charger DC24SC Automotive charger DC18SE Li ion battery BL1815 Li ion battery BL1830 P 2 18 Standard equipment Optional accessories ...

Page 3: ... magnetizer removing Steel ball 5 6 1R291 Retaining ring S and R pliers mounting Retaining ring WR 15 1R351 Anvil holding Jig disassembling assembling Anvil 1R390 Cam A assembling jig assembling Cam A 1R391 Hammer holding jig disassembling assembling Hammer Socket 32 50 134848 9 disassembling assembling Hammer case 2 1 LUBRICATION Fig 1 Item No Description Grease Amount Portion to lubricate 28 Bet...

Page 4: ... 1 2 Motor bracket assembly 1 Disassemble Bit holder section and Bumper for attaching 1R224 Fig 2 3 1 Remove Ring spring 11 2 Remove Flat washer 12 Compression spring 13 3 Remove Sleeve and Steel ball 3 5 2 pcs 4 Remove Bumper Compression spring 22 Outer hammer Flat washer 14 49 61 61 Internal gear 41 Groove portion where 4 pcs of Pin 1 2 fit Item No Description Grease Amount Portion to lubricate ...

Page 5: ...Remove Change ring and Leaf spring Fig 3 Fig 4 DISASSEMBLING Change ring Leaf spring Hammer case assembly 1R224 1R223 Socket 32 50 Housing R Switch unit Speed change lever assembly 1 Separate Housing R from Housing L 3 Separate Impact assembly from Motor section 2 Remove Impact assembly together with Motor section And separate Speed change lever assembly and a pair of Switch unit Motor section Hou...

Page 6: ...5 pcs Spur gear 21 3 pcs Gear case assembly Anvil Compression spring 5 1 Remove Pin guide and Pin 1 2 3 5 from the both side of Gear case assembly And remove Change sleeve 2 Pull up Hammer change plate while pressing down Hammer change down Internal gear 41 Spur gear 14A Pin 1 2 4 pcs Pin guide Sleeve 24 Change case Gear case assembly Hammer change ring Compression spring 2 Pin 1 2 3 5 Pin guide P...

Page 7: ...aining ring WR 15 can be removed with Pliers Anvil wings 2 Put Anvil wings onto Shallow notches of 1R351 and set 1R390 to Retaining ring WR 15 1 Set Gear case assembly to 1R351 by inserting Anvil wings in Deep notches of 1R351 2 Press down Anvil with Arbor press 3 Anvil drops in Deep notches of 1R351 So Anvil and Cam A are removed from Gear case assembly Retaining ring WR 15 Cam A Deep notch 1R351...

Page 8: ...while fitting its wings to Shallow notch of 1R351 And set Gear case assembly to the Anvil O ring 12 5 3 Set 1R390 on the Cam A and press it with Arbor press until Cam A stops 4 While expanding Retaining ring WR 15 with 1R291 set the Retaining ring to tips of 1R003 with 1R212 And mount the expanded Retaining ring WR 15 to the groove on Anvil Note Cam A must be mounted until the groove for Retaining...

Page 9: ... Elliptical hole 1 Align the elliptical hole of Change case to that of Gear case assembly by turning Change case The groove of Change sleeve is seen through the elliptical holes of Change case and Gear case assembly Elliptical hole Groove of Change sleeve Change sleeve Change sleeve Groove of Change sleeve Change case 3 Mount 2 pcs of Compression spring 2 to Gear case assembly and assemble Hammer ...

Page 10: ...se 3 Provisionally assemble Hammer case assembly to Gear case assembly by turning it clockwise Sleeve 24 Leaf spring Steel ball 5 6 Hammer case assembly Change ring Compression spring 5 Steel ball 3 6 pcs Wide depression with a notch Gear case assembly Hammer section 7 Assemble Spur gear 41 while facing the depression to Motor side 8 Assemble five Spur gear 14B Wide depression 6 Insert Hammer sect...

Page 11: ... Motor bracket assembly while aligning three arms of Change lever to the inner grooves of Motor bracket assembly Spur gear 21 3 pcs Spur gear 14A Internal gear 41 Change lever Groove for Pin 1 2 Ball bearing 607ZZ Motor bracket assembly equipped with Internal gear 50 Spur gear 21 3 pcs Spur gear 14A Motor bracket assembly with Internal gear 50 Change lever Pin 1 2 4 pcs Internal gear 41 Projection...

Page 12: ... change lever assembly 2 Mount Speed change lever assembly by fitting the space between two Compression springs to Projection of Change lever Put end of Spring in this frame Compression spring 3 Projection of Change lever 11 Tighten Hammer case assembly with Socket 32 50 1R223 and 1R224 Fig 3 Note The fastening torque for Hammer case assembly is 15 20 N m F R Change lever Switch 3 Facing the symbo...

Page 13: ... 6805LLB 2 Mount 1R391 to Hammer by fitting its Deep notches to Hammer projections 1 Insert 1R282 into the hole of Spindle complete 4 Turn the handle clockwise until the opening for Steel ball insertion on Hammer is aligned to top of groove on Spindle Deep notch fitted to Hammer Shallow notch to be held by 1R391 1R391 1R282 Spindle complete 1R391 1R282 1R045 5 Using a magnetized screwdriver remove...

Page 14: ...ndle Fig 19 6 Mount Steel ball 5 6 2pcs Fig 19 7 Mount Ball bearing 6805LLB and Bearing case to Spindle complete And mount 6 pcs of Steel ball 3 to Outer hammer Fig 18 Fig 20 1 In order to avoid dispersing of Steel balls 34 pcs keep the direction of Hammer section downward as illustrated below when removing 1R045 from Hammer section 2 Now the following parts are disassembled from Outer hammer Oute...

Page 15: ...r down to separate it from Rotor Rotor Stator set Insert Rotor into Stator set on Workbench held by hand to control strong Magnet force of Rotor Slowly lift up Stator set while controlling the magnet force of Rotor so as not to stick to Fan side abruptly Note Assemble them by following steps in Fig 23 while being careful not to pinch your finger between Stator set and Rotor fan due to strong magne...

Page 16: ...ller Switch Two pin Connnector This Lead wire is red in stead of white in case of BTD131 14 4V Three pin Connnector Switch units for detecting work mode Terminal AS Blue Yellow Gray Color index of lead wires sheath Black Red Fig D 2 Stator P 16 18 ...

Page 17: ...d wire holder Do not let the Lead wires cross this Rib otherwise Switch interferes with Housing R Assembling Switch unit for detecting work mode Impact Assembly viewed from Switch side Switch unit for detecting work mode with Lead wires red Switch unit for detecting work mode with Lead wires black Mount Switch unit with Lead wires red to Pin on Housing R side red point mark side Switch unit with L...

Page 18: ... Switch Rib Rib Rib Ribs on Controller Switch units for detecting work mode Stator Put slack portion of Lead wires from Stator in this place Route Lead wires of Switch units for detecting work mode and the Lead wires from Stator between these Ribs Route Lead wires from Controller to Terminal behind Ribs on Controller Circuit diagram P 18 18 ...

Reviews: