Majestic Archangel, Installation Manual
The Majestic Archangel is a powerful product that promises divine protection and guidance. Ensure proper installation and usage by downloading the free Installation Manual from manualshive.com. Find all the instructions you need in the detailed manual to fully experience the majestic power of this archangelic product.
Share
Download


Reviews:
No comments
Related manuals for Archangel
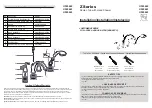
Z Series
Brand: Ultra Pages: 2

Focus
Brand: Hans Grohe Pages: 42

URBAN URHCMCA
Brand: Felton Pages: 2

H3123360831201
Brand: Laufen Pages: 12

Nuva E-32
Brand: Helvex Pages: 4

Safe-Cell 50110C
Brand: Galvin Specialised Pages: 4

Talis M51 200 2jet 72813007
Brand: Hans Grohe Pages: 16

Kauai III
Brand: Pulse Pages: 4

ESPREE ET200
Brand: FORENO Pages: 2

SUPRIMO 10.271.033.700
Brand: KWC Pages: 1

4008033841726
Brand: Fackelmann Pages: 16

434-498
Brand: CUR AQUA Pages: 15

DU-5020
Brand: baliv Pages: 36

NOVA2 CARE GRAB RAIL 2
Brand: FROST Pages: 3

MIRRS1025RBN
Brand: Mirabelle Pages: 2

DISCOVERY
Brand: Mira Pages: 44

FUJI FFPD20400
Brand: Franke Pages: 2

F3EM1022
Brand: Franke Pages: 36


