MAINLINE Kleiss MCS60-1016, System Manual
The MAINLINE Kleiss MCS60-1016 System Manual is a comprehensive guide for operating and maintaining your MCS60-1016 product. You can download the manual for free from our website, providing detailed instructions on setup and troubleshooting. Ensure optimal performance with the official manual available for download at manualshive.com.
Share
Download


Reviews:
No comments
Related manuals for Kleiss MCS60-1016

VCL Series
Brand: Vahle Pages: 96

875
Brand: ParaBody Pages: 5

TN-300
Brand: Baileigh Industrial Pages: 28

BP-3305CNC
Brand: Baileigh Industrial Pages: 56

PowerGlide
Brand: Bard Pages: 36

Excalibur
Brand: Bard Pages: 2

Site-Rite 5
Brand: Bard Pages: 30

True
Brand: Bard Peripheral Vascular Pages: 44

S/5 Aespire
Brand: Datex-Ohmeda Pages: 80

D65
Brand: MacDon Pages: 2

7817
Brand: V-TAC Pages: 6

NI 9264
Brand: National Instruments Pages: 10

F3 0-90
Brand: Nautilus Pages: 17

PXIe-8240
Brand: National Instruments Pages: 6
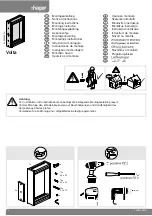
Volta
Brand: hager Pages: 4

F12-152 Series
Brand: Parker Pages: 24

TEAR N
Brand: Kanlux Pages: 4

INTRA PROPHYwiz 181 P
Brand: KaVo Pages: 22


