background image

Magnum DeltaForce Updates and Modifications

Export Frequency Modification Instructions:

1.  Power up the radio for a minimum of 10 seconds.

2.  Turn off and remove power and antenna.
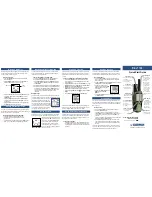
3.  Remove covers.

4.  Add a 47K resistor to R509 pads. (NOTE: Not necessary on newer units)

5.  Remove frequency control knob on the front panel.

6.  Remove diode D555 located directly above frequency control switch.

7.  Reset the CPU by shorting the two pads as shown.

8.  Assemble the radio.

9.  Use the (CALL) button to select bands.

    To switch between channel and frequency display, press (FUNC)

    and press (CALL).

Note: Not necessary on newer units

Copyright (C) 2000  -  http://www.cbtricks.com

12345

12345

12345

12345

12345

1234567

1234567

1234567

1234567

1234567

1234567

1234567

(25.165 - 29.000 Mhz)

Summary of Contents for DeltaForce

Page 1: ... frequency control knob on the front panel 6 Remove diode D555 located directly above frequency control switch 7 Reset the CPU by shorting the two pads as shown 8 Assemble the radio 9 Use the CALL button to select bands To switch between channel and frequency display press FUNC and press CALL Note Not necessary on newer units Copyright C 2000 http www cbtricks com 12345 12345 12345 12345 12345 123...

Page 2: ...G AM CARRIER POWER LEVEL The stock DeltaForce has the AM carrier power level set at 4 watts minimum and 10 watts maximum Follow the steps below to set the AM carrier power level to 1 watt minimum and 10 watts maximum 1 Turn off the radio and disconnect from power source 2 Remove the bottom or speaker cabinet 3 Locate 470 ohm resistor on the power calibrate front panel control potentiometer 4 Add a...

Page 3: ... calibration with AM S meter readings at 30dB Smoothes out the SSB AGC Corrects channel bleed over problems Follow the steps below to correct the above issues 1 Turn off the radio and disconnect from power source 2 Remove the cabinets 3 Locate and remove the 2 2K ohm resistor at 8188 Install replace with a 510 ohm resistor 4 Locate and remove the 10gF electrolytic capacitor at C 161 Install replac...

Page 4: ...volume adjustment Follow the steps below to achieve the desired echo sound 1 Remove the bottom or speaker cabinet 2 Locate the SVR2 potentiometer on the solder side of the echo board Adjust this SVR2 to obtain the desired echo range 3 To set for maximum echo effect do the following a Turn the front panel echo volume control full clockwise and the front panel echo delay control full counter clockwi...

Page 5: ... j Adjust SVR1 until a slight feedback sound is achieved The echo board will now be set a maximum effect k Turn off the radio and remove the jumper from the microphone jack 1 Turn on the radio and rotate the front panel echo delay control full clockwise and test for desired echo Audio Output Level Adjustments An audio output level potentiometer is located on the echo board If a low output micropho...

Reviews: