Magic Bullet MB07200, User Manual
The Magic Bullet MB07200 is a versatile kitchen appliance that can handle a variety of tasks with ease. Ensure you unlock its full potential by downloading the free User Manual from manualshive.com. This comprehensive manual will guide you through using your Magic Bullet to its fullest capabilities.
Share
Download


Reviews:
No comments
Related manuals for MB07200
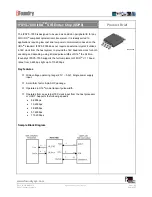
IrDA SIR Endec Chip (SOP8) IFSYS -7000
Brand: IFoundry Systems Pages: 2

MIRACLE CHEF
Brand: Beem Pages: 52

MA2J727
Brand: Panasonic Pages: 3

FP511
Brand: MOA Pages: 53

FPC14
Brand: Waring Pages: 8

WFP11S-SC
Brand: Waring Pages: 27

WFP14SC
Brand: Waring Pages: 60

WFP14SE
Brand: Waring Pages: 64

WFP16SCD
Brand: Waring Pages: 76

LEO 8
Brand: H.Koenig Pages: 44

QSM-622E
Brand: ROHS Pages: 50

A32135
Brand: TurMix Pages: 15

USK HA 33143
Brand: Kalorik Pages: 17

LVP608
Brand: Vdwall Pages: 37

CHO 162SS
Brand: Goddess Pages: 20

7AM
Brand: Omnia Pages: 139

DX 2006
Brand: RCF Pages: 36

MCM6 Series
Brand: Bosch Pages: 229


