Magellan eXplorist 350H, User Manual
The Magellan eXplorist 350H is a reliable handheld GPS device designed for hunting and outdoor enthusiasts. Featuring a rugged design and an easy-to-use interface, this device helps users navigate through challenging terrains with precision. Download the user manual for free from manualshive.com to unlock its full potential.
Share
Download


Reviews:
No comments
Related manuals for eXplorist 350H
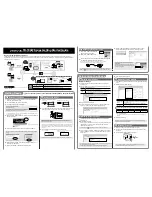
TR-701NW
Brand: T&D Pages: 2

GolfBuddy I
Brand: Golf Buddy Pages: 18

Oyster 2
Brand: Westcoast GPS Pages: 14

ASTRO 900/T9
Brand: Garmin Pages: 18

IK205
Brand: Icar Pages: 7

CF LP GPS
Brand: Transplant Computing Pages: 30

GPS 16A
Brand: Garmin Pages: 2

PG300
Brand: Audiovox Pages: 12

BE A00
Brand: Becker Pages: 155

Pearl+
Brand: OYSTA Pages: 26

Papaya3
Brand: Polstar Technologies Pages: 17

MX 2000
Brand: MVP Recovery Pages: 6

GPS 12CX
Brand: Garmin Pages: 67
IQL 4G VEHICLE TRACKERA
Brand: Tramigo Pages: 16

RDS-TMC
Brand: TomTom Pages: 13

Daihatsu
Brand: TomTom Pages: 76

Map Guide Pro
Brand: Eagle Pages: 71

S116
Brand: Seeworld Pages: 14


