background image

Installation 

 Operation 

 Care

Luxaflex

®

 Duette

® 

EasyRise


Operating Systems

18.019.008-DUETTE-EASYRISE-INSTALL.indd   1

4/06/2019   10:51:49 AM

Summary of Contents for EasyRise Duette

Page 1: ...Installation Operation Care Luxaflex Duette EasyRiseOperating Systems 18 019 008 DUETTE EASYRISE INSTALL indd 1 4 06 2019 10 51 49 AM ...

Page 2: ...the Shade 7 Attach the Universal Cord Tensioner s 7 OPERATION Operate the Shade 12 Level the Rail s If Necessary 13 Troubleshooting 14 CARE Removing the Shade If Necessary 16 Cleaning Procedures 16 CHILD SAFETY Warning 18 Copyright 2019 Hunter Douglas Limited ABN 98 009 675 709 Registered Trade Marks of Hunter Douglas Limited 18 019 008 6 19 18 019 008 DUETTE EASYRISE INSTALL indd 2 4 06 2019 10 5...

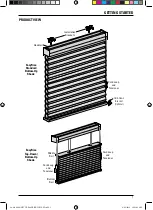
Page 3: ...p Shade EasyRise Top Down Bottom Up Shade Cord Loop and Tensioner Cord Loop and Tensioner Middle Rail Bottom Rail Cord Loop and Tensioner Headrail Installation Brackets Hold Down Bracket Optional 18 019 008 DUETTE EASYRISE INSTALL indd 1 4 06 2019 10 51 49 AM ...

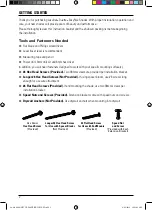
Page 4: ...mounting surface s 6 Hex Head Screws Provided Two 38mm screws are provided per installation bracket Longer 6 Hex Head Screws Not Provided If using spacer blocks use 6 screws long enough for a secure attachment 6 Flat Head Screws Provided If end mounting the shade use two 38mm screws per installation bracket Speed Nuts and Screws Provided Extension brackets come with speed nuts and screws Drywall A...

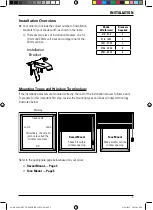
Page 5: ...s easily To prepare for this important first step review the mounting types and basic window terminology illustrated below Refer to the appropriate page below based on your order Reveal Mount Page 4 Face Mount Page 5 Shade Width mm Brackets Required 310 915 2 916 1830 3 1831 2745 4 2746 3040 5 3041 4400 6 Face Mount Shade mounts outside window opening Reveal Mount Shade fits within window opening ...

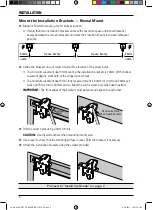
Page 6: ... holes The minimum casement depth for a fully recessed mount is 60mm for 10mm and 20mm cell sizes and 75mm for the 30mm cell size Mark the centre screw hole when depth permits IMPORTANT The front edges of the brackets must be level and aligned to each other Drill the screw holes using a 3mm drill bit CAUTION Use drywall anchors when mounting into drywall Use a level to check that the mounting surf...

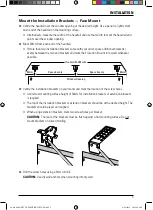
Page 7: ...sible Centre the installation brackets on your marks and mark the location of the screw holes A minimum mounting surface height of 30mm for installation brackets or extension brackets is required The top of the installation brackets or extension brackets should be at the desired height The brackets should be level and aligned When using extension brackets mark two screw holes per bracket CAUTION T...

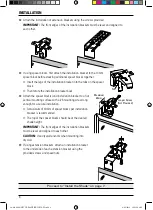
Page 8: ...acket to a flat vertical mounting surface with a 6 mounting screw long enough for a secure installation A maximum of 40mm of spacer blocks per installation bracket is recommended The top of the spacer blocks should be at the desired shade height IMPORTANT The front edges of the installation brackets must be level and aligned to each other CAUTION Use drywall anchors when mounting into drywall If u...

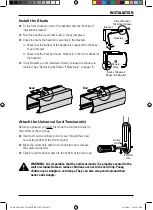
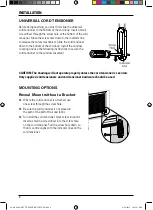
Page 9: ... proceed you must first slide the cord tensioner s to the bottom of the cord loop Insert a small screwdriver punch or awl through the screw hole at the bottom of the cord tensioner Move the screw hole down to the indicator line to release the safety mechanism Slide the cord tensioner down to the bottom of the cord loop WARNING It is imperative that the cord tensioner s be properly secured to the w...

Page 10: ...r into the screw hole on the cord tensioner Pull the screw hole down so that its centre aligns with the indicator lines on the cord tensioner MOUNTING OPTIONS Before doing anything you must first slide the universal cord tensioner to the bottom of the cord loop Insert a small screwdriver through the screw hole at the bottom of the cord tensioner Move the screw hole down to the indicator line to re...

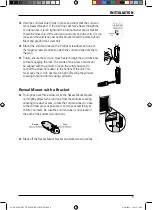
Page 11: ...er without engaging the lock The centre of the screw hole should be aligned with the indicator line on the cord tensioner Do not pull the screw hole down to the bottom of the slot This may cause the cord to become too tight affecting the window covering function and increasing cord wear Reveal Mount with a Bracket This option uses three screws with the Reveal Mount bracket and slightly projects th...

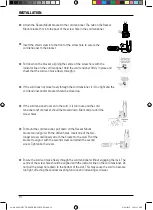
Page 12: ... locks onto the cord it is too loose and the cord tensioner and or bracket should be moved down Mark and pre drill the screw holes To mount the cord tensioner pull down on the Reveal Mount bracket and align it with the drilled holes Insert one of the two longer screws and loosely attach the bracket to the wall Pivot the bracket to align it with the second screw and attach the second screw Tighten ...

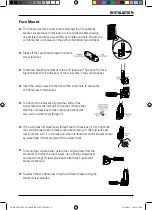
Page 13: ...ligning the centre of the screw hole with the indicator line on the cord tensioner Hold the cord tensioner firmly in place and check that the cord can move freely through it If the cord does not move freely through the cord tensioner it is too tight and the cord tensioner and or bracket should be moved up If the cord tensioner locks onto the cord it is too loose and the cord tensioner and or brack...

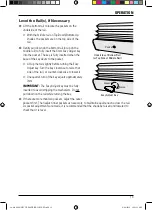
Page 14: ...te properly See the instructions in the Universal Cord Tensioner Installation on page 8 To operate Top Down Bottom Up shades the right cord operates the middle rail and the left cord operates the bottom rail unless reverse controls were specified on the order IMPORTANT You must first lower the bottom rail before lowering the middle rail Likewise you must first raise the middle rail before raising ...

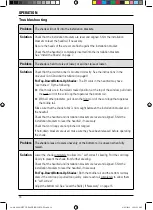
Page 15: ...lockwise to raise that side of the rail or counter clockwise to lower it One quarter turn of the key equals approximately 7mm IMPORTANT The Easy Adjust key must be fully inserted to avoid stripping the mechanism Do not pull down on the rail while turning the key If there are more than two pockets adjust the outer pockets first Then adjust inner pockets as necessary to maintain equal tension across...

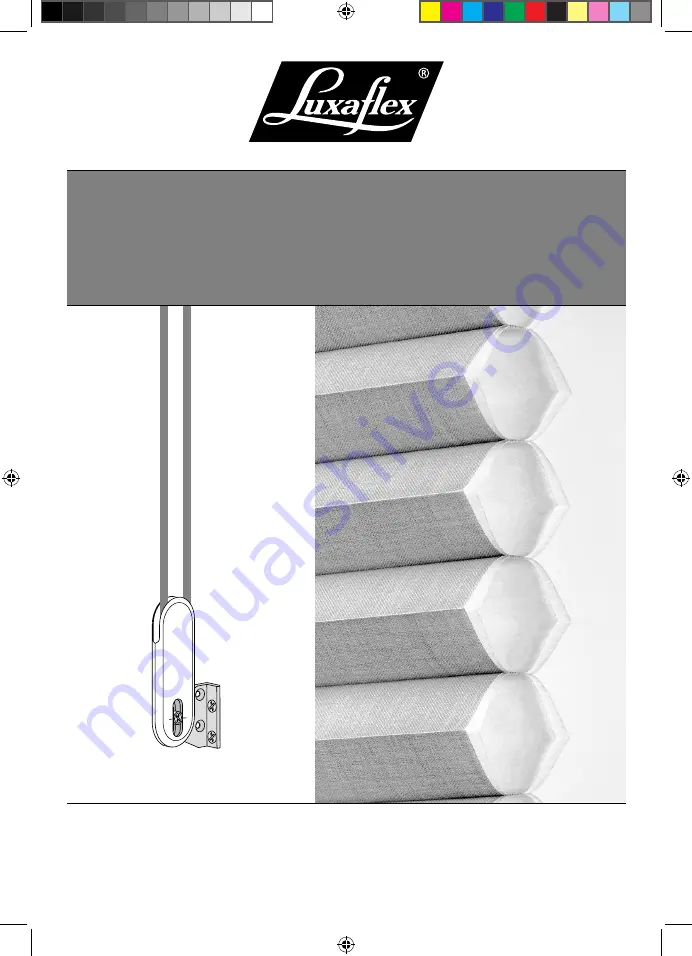
Page 16: ... cord of the cord loop that operates the middle rail Make sure that the shade fabric is not caught between the installation bracket and the headrail Check that the headrail and installation brackets are level and aligned Shim the installation brackets to level the headrail if necessary Check that cord loops are not pinched or tangled If hold down brackets are used make sure they have been released...

Page 17: ...y mount the cord tensioner See the instructions in the Universal Cord Tensioner Installation on page 8 Problem The universal cord tensioner grabs onto the cord upon operation Solution Check that the universal cord tensioner is mounted properly Reinstall if necessary See the instructions in the Universal Cord Tensioner Installation on page 8 18 019 008 DUETTE EASYRISE INSTALL indd 15 4 06 2019 10 5...

Page 18: ...ded in most circumstances Vacuuming CAUTION Do not vacuum Architella Elan translucent or blockout fabrics For deeper cleaning vacuum gently with a brush attachment Compressed Air Hair Dryer Cool Setting Use compressed air or a hair dryer on a cool setting to blow dust and dirt off shades Spot Cleaning CAUTION Do not spot clean Alexa Architella Elan or fabric covered valance Prepare a solution of w...

Page 19: ... tilt it to allow excess water to drain off Dry the shade completely in the lowered or closed position Ultrasonic Cleaning CAUTION Do not ultrasonically clean Sunterra all blockout fabrics and fabric covered valances Specify that a mild detergent solution be used IMPORTANT Never immerse the headrail into the solution Dry the shade completely in the lowered or closed position Headrail Cleaning CAUT...

Page 20: ...rd Tensioner Device Hardware This pack includes the following child safety devices Universal Cord Tensioner 4152336XXX Cord Tensioner Hardware 4150459000 These safety devices are suitable for installation onto the following surfaces Timber Aluminium Gyproc Spring Toggle Brick Wall Plug NOTE The Spring Toggle and Wall Plug are not included in this pack For the shading to operate properly and your w...

Page 21: ...NOTES 19 18 019 008 DUETTE EASYRISE INSTALL indd 19 4 06 2019 10 51 53 AM ...

Page 22: ...NOTES 20 18 019 008 DUETTE EASYRISE INSTALL indd 20 4 06 2019 10 51 53 AM ...

Page 23: ...NOTES 21 18 019 008 DUETTE EASYRISE INSTALL indd 21 4 06 2019 10 51 53 AM ...

Page 24: ...18 019 008 DUETTE EASYRISE INSTALL indd 22 4 06 2019 10 51 53 AM ...

Reviews: