

HD Wire-Free Security System
English Version 3.0
Quick Reference Guide
www.lorex.com
Lorex Cirrus:
App Overview
Before You Start
LHWF1000_QRG_EN_R3
Lorex Cirrus:
Playback
GUIDE
2
/
2
• Upgrade your recorder firmware and mobile app to the latest
versions.
• Please note that an upload speed of 3.5Mbps is required for remote
video streaming. Up to 3 devices may connect to the system at the
same time.
• Ensure you have completed initial setup of the Lorex Cirrus app and
the recorder as detailed in the
Quick Connection Guide
.
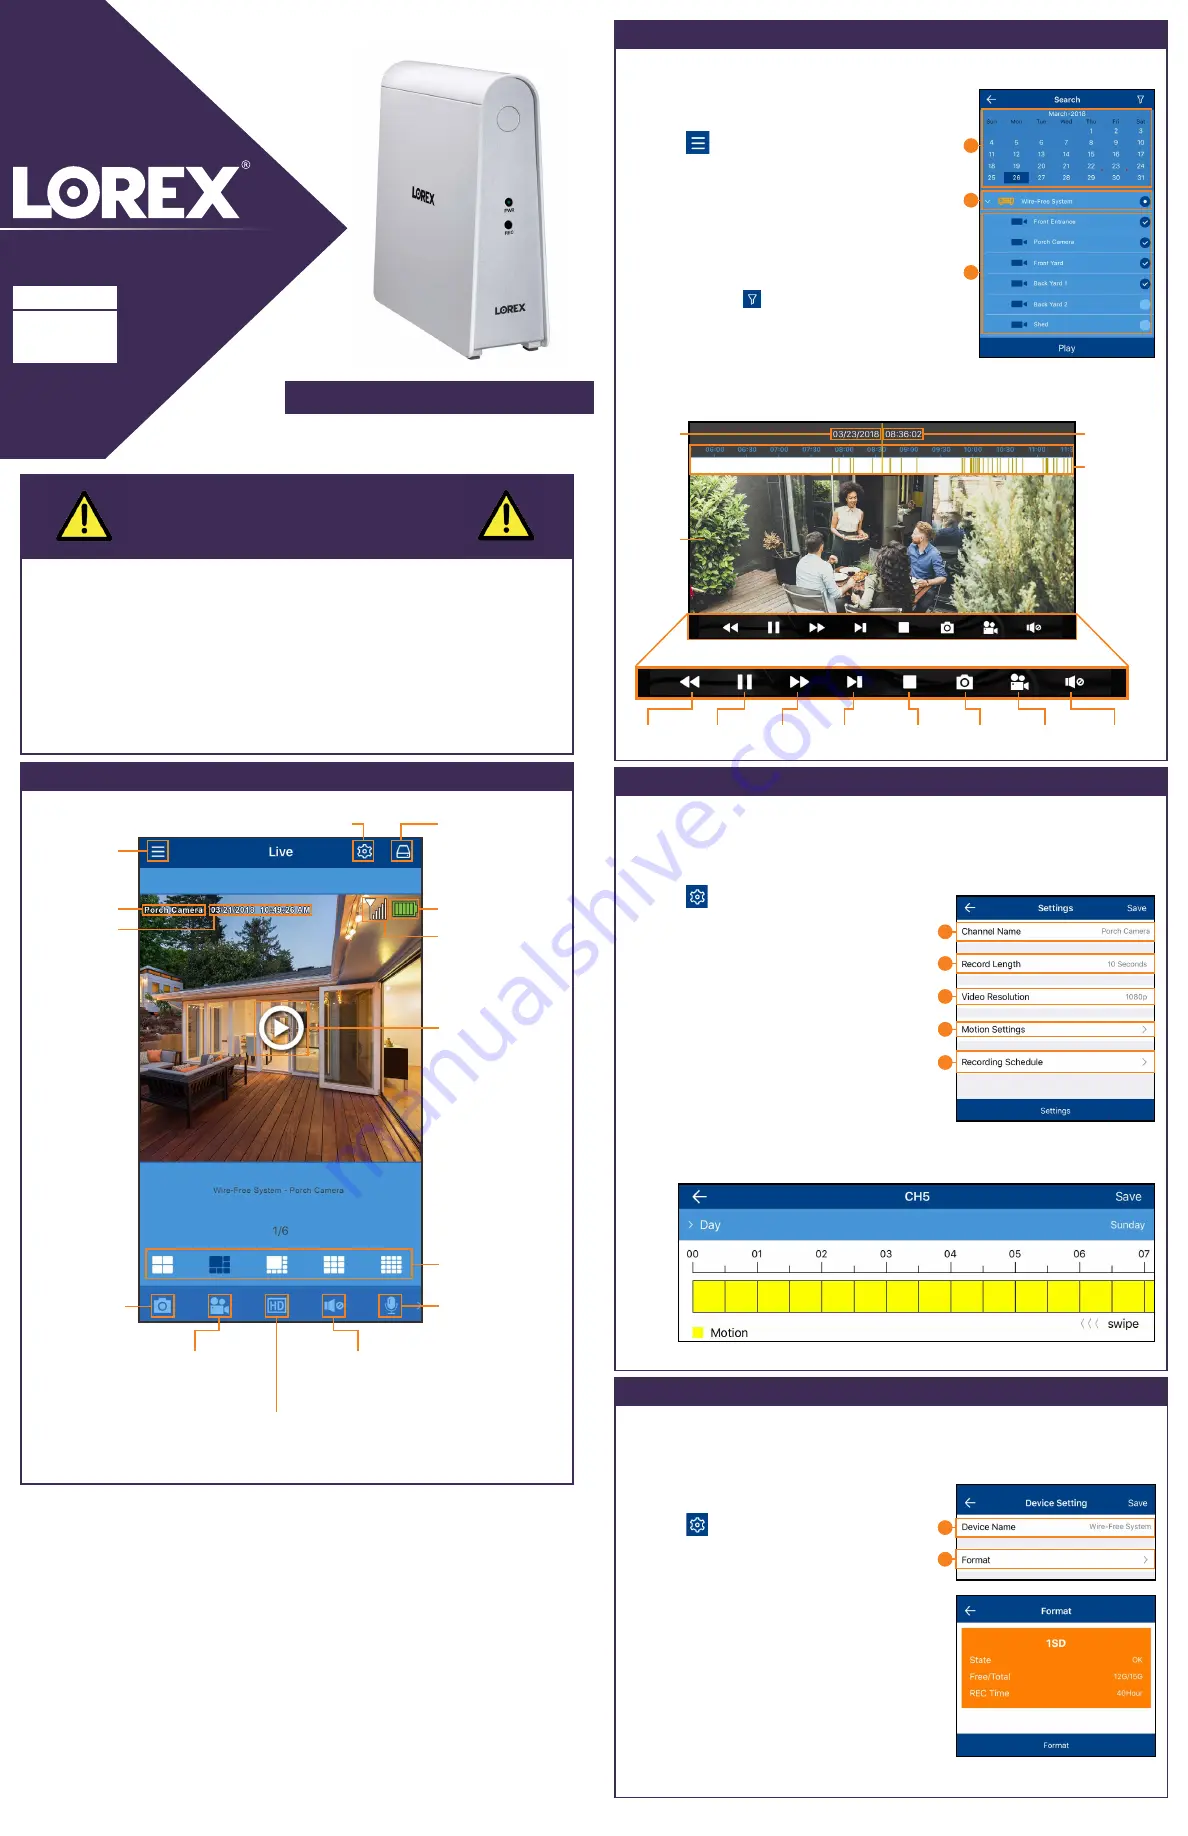
Main menu
Play back recorded video using the Lorex Cirrus app.
To play back recorded video:
1.
Launch the
Lorex Cirrus
app.
Playback Controls:
2. Tap
, then tap
Playback
.
3. Set search options for playback:
Video timeline.
Tap to start
playback from
the selected
time. Pinch or
spread fingers
to change the
time period.
Playback
date
Lorex Cirrus:
Camera Settings
Change camera settings using the Lorex Cirrus app.
To change camera settings:
1.
Launch the
Lorex Cirrus
app.
2. Tap a channel in Live View to select it.
3. Tap
to open settings for the selected
channel.
4. Configure the following as needed:
a.
Channel Name:
Enter a name of your choice
for the channel (e.g.,
Porch Camera
).
b.
Record Length:
Set the recording length
when motion is detected.
c.
Video Resolution:
Set
720p
or
1080p
recording.
d.
Motion Settings:
Configure motion
detection settings. See the “Optimizing
Motion Detection” section in the
Quick
Connection Guide
for details.
e.
Recording Schedule:
Configure the recording
5. Tap
SAVE
to save settings.
Lorex Cirrus:
Device Settings
Change recorder name and format storage using the Lorex Cirrus app.
To change device settings:
1.
Launch the
Lorex Cirrus
app.
2. Tap a channel on the device you want to
edit from Live View.
3. Tap
, then tap
Settings
.
4. Configure the following as needed:
a.
Device Name:
Enter a name of your
choice for the recorder (e.g.,
Wire-Free
System
).
b.
Format:
Tap to select a storage device
(hard drive or microSD card) to format.
Tap
Format
to confirm the selected
device and begin formatting.
IMPORTANT:
Formatting a storage device
will erase all recordings and snapshots.
This step cannot be undone.
NOTE:
Only the admin user can format
memory.
5. Tap
Save
to save settings.
Select channels for
live viewing from all
connected devices
Configure settings for
selected channel
Channel name
Date and time
stamp
Battery strength
indicator
Wireless signal
strength indicator
Tap to start live view
Split-screen options
Save a snapshot
of the current
live view
Tap to enable the
camera’s intercom;
tap again to stop
Tap to start manual
recording; tap again
to stop
Tap to switch to full HD video
quality; tap again for reduced
video quality that is optimized
for streaming
Tap to switch
between muted and
unmuted
4. Tap
Play
to begin playback.
a. Tap a recorder to reveal available
channels.
b. Tap channels to include in search.
c. Tap a date from the calendar to
seach for recordings from. Dates with
recordings available are marked with a
red dot.
NOTE:
Tap
to filter recordings by
type and resolution.
Playback
time
Video
playback
Slower
Play / Pause Faster
Next Frame
Stop
Snapshot
Manual
Recording
Mute / Unmute
You can use playback mode in portrait or landscape mode. Landscape mode
shown below:
schedule for the selected camera by day. Tap
Day
to select the day of the week.
Tap squares on the timeline to enable motion recording during specified times
(yellow for enabled, white for disabled). Tap
Save
when finished.
a
b
c
a
b
c
d
e
a
b
LHWF1000 Series


