

Logitech
®
Installation
NX80 Cordless Laser Mouse
for Notebooks
ON
1
2
USB
3
4
LASER RADIATION
DO NOT VIEW DIRECTLY WITH OPTICAL INSTRUMENTS
CLASS 1M LASER PRODUCT
1
2
1
3
4
5
6
English
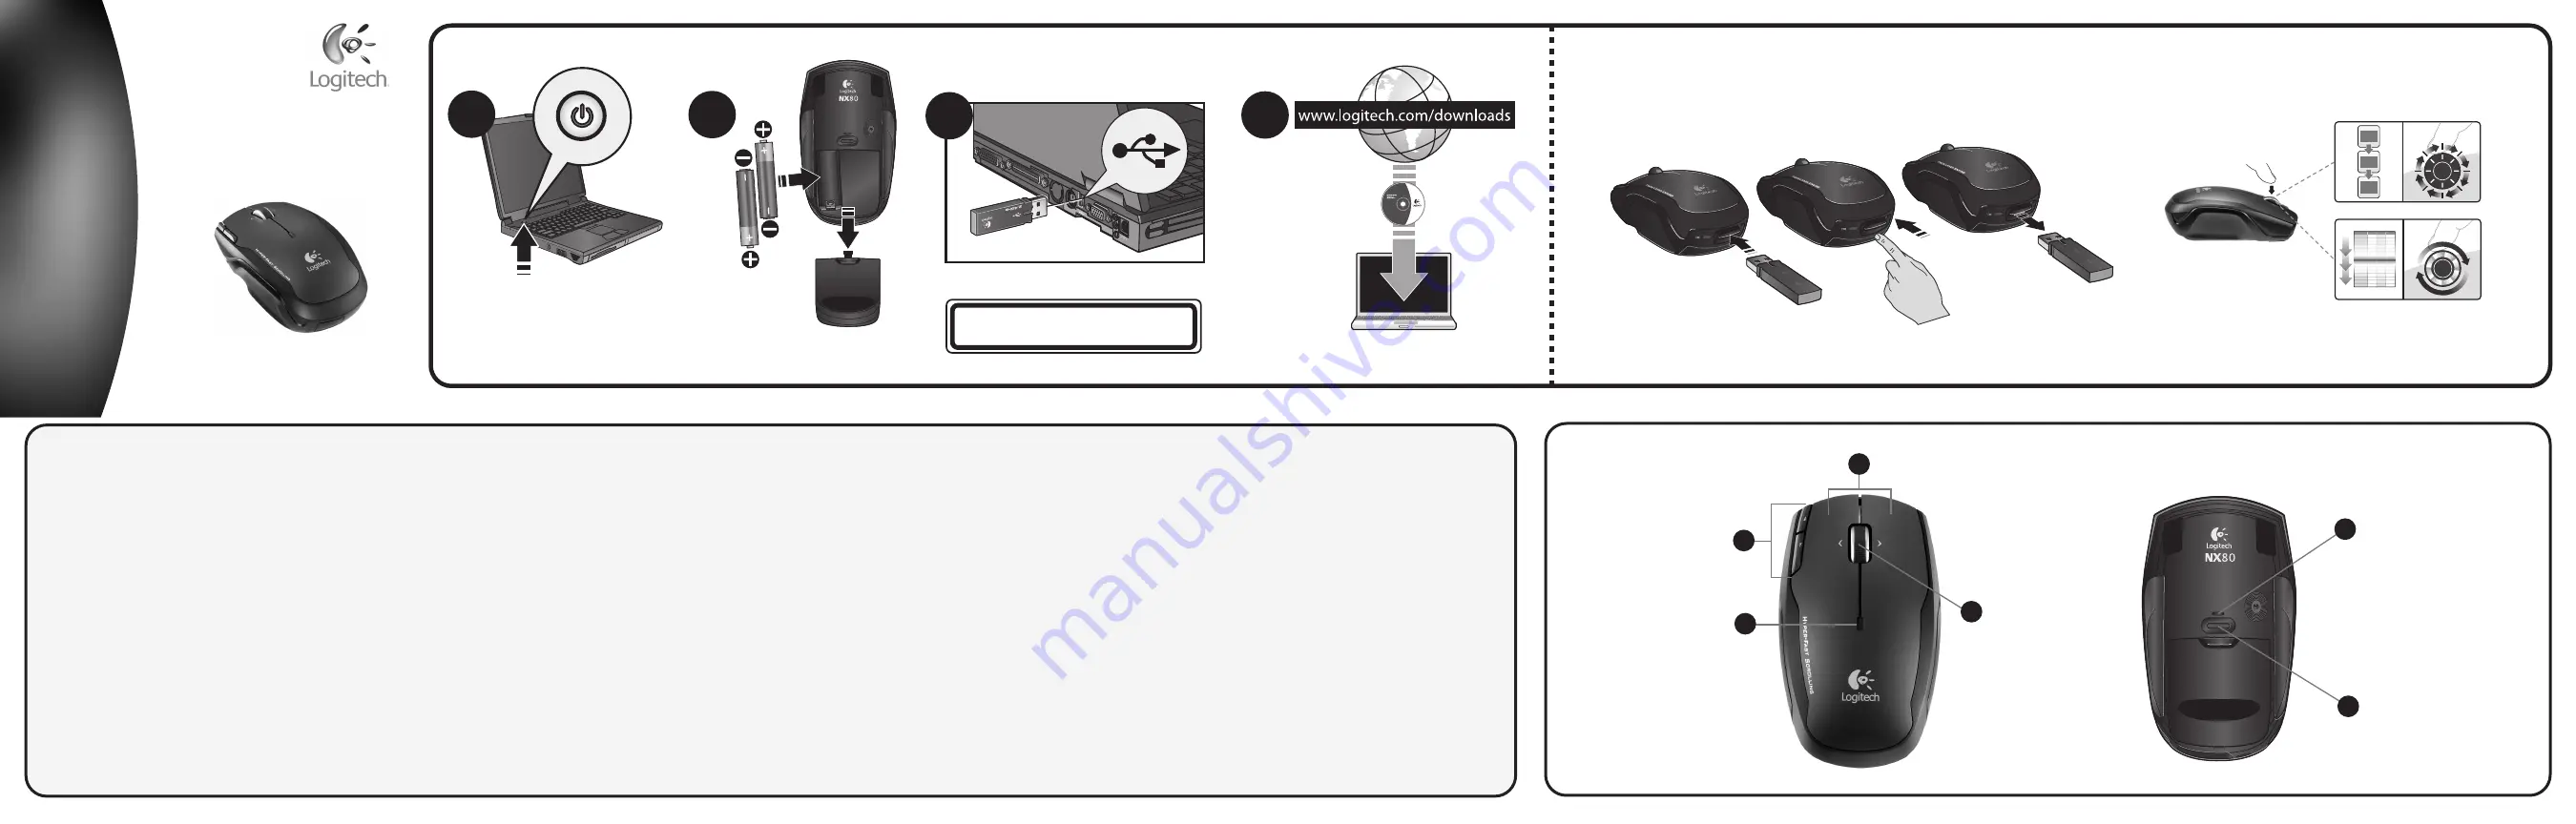
Install the software
For enhanced mouse features, please download the mouse software at
www.logitech.com/downloads
. After installing the mouse software, launch it by double-clicking
the keyboard-mouse logo in the Windows® System Tray.
Insert the USB mini-receiver into mouse for convenient storage when traveling. Mouse turns off.
Press eject button to remove USB mini-receiver. Mouse turns on.
CAUTION: CHOKING
HAZARD. HARMFUL OR FATAL IF SWALLOWED. Package contains small parts. Not for
children under 6 years.
1. Scroll wheel. a) Tilt wheel feature:
Tilt the wheel left or right to scroll side to side.
(Software installation required.)
b) Scroll toggle feature:
Press down and release the wheel to
change the scrolling speed from click-to-click scrolling to hyper-fast scrolling, or vice versa.
2.
Internet forward and back buttons.
3. Left and right mouse buttons
. Use the mouse
software to change functions.
4. Battery LED
glows green when mouse is turned on and
batteries are good. It flashes red when batteries are low.
5. Power LED
glows green when on.
6.
Power button.
To conserve battery power while the mouse is not in use, press the Power
button.
Troubleshooting Mouse Not Working
1
. Make sure the USB mini-receiver is plugged into a computer USB port and the computer is on;
try another USB port on the computer.
2
. Check battery installation. Replace the batteries if the
Battery LED flashes red.
3
. Try pressing and holding the Power button on the mouse bottom until
the Power LED blinks green; release the Power button.
4
. If cursor performance is slow or jerky,
try using the mouse on another surface; avoid dark surfaces.
5
. Finally, try the
Logitech
Reconnection Utility
(requires software installation). Go to the Start Menu and select
Programs/Logitech/Mouse and Keyboard/Reconnection Utility
. Follow the on-screen
instructions.
Español
Install the software
For enhanced mouse features, please download the mouse software at
www.logitech.com/downloads
. After installing the mouse software, launch it by double-clicking
the keyboard-mouse logo in the Windows® System Tray.
Insert the USB mini-receiver into mouse for convenient storage when traveling. Mouse turns off.
Press eject button to remove USB mini-receiver. Mouse turns on.
CAUTION: CHOKING
HAZARD. HARMFUL OR FATAL IF SWALLOWED. Package contains small parts. Not for
children under 6 years.
1. Scroll wheel. a) Tilt wheel feature:
Tilt the wheel left or right to scroll side to side.
(Software installation required.)
b) Scroll toggle feature:
Press down and release the wheel to
change the scrolling speed from click-to-click scrolling to hyper-fast scrolling, or vice versa.
2.
Internet forward and back buttons.
3. Left and right mouse buttons
. Use the mouse
software to change functions.
4. Battery LED
glows green when mouse is turned on and
batteries are good. It flashes red when batteries are low.
5. Power LED
glows green when on.
6.
Power button.
To conserve battery power while the mouse is not in use, press the Power
button.
Troubleshooting Mouse Not Working
1
. Make sure the USB mini-receiver is plugged into a computer USB port and the computer is on;
try another USB port on the computer.
2
. Check battery installation. Replace the batteries if the
Battery LED flashes red.
3
. Try pressing and holding the Power button on the mouse bottom until
the Power LED blinks green; release the Power button.
4
. If cursor performance is slow or jerky,
try using the mouse on another surface; avoid dark surfaces.
5
. Finally, try the
Logitech
Reconnection Utility
(requires software installation). Go to the Start Menu and select
Programs/Logitech/Mouse and Keyboard/Reconnection Utility
. Follow the on-screen
instructions.
Français
Install the software
For enhanced mouse features, please download the mouse software at
www.logitech.com/downloads
. After installing the mouse software, launch it by double-clicking
the keyboard-mouse logo in the Windows® System Tray.
Insert the USB mini-receiver into mouse for convenient storage when traveling. Mouse turns off.
Press eject button to remove USB mini-receiver. Mouse turns on.
CAUTION: CHOKING
HAZARD. HARMFUL OR FATAL IF SWALLOWED. Package contains small parts. Not for
children under 6 years.
1. Scroll wheel. a) Tilt wheel feature:
Tilt the wheel left or right to scroll side to side.
(Software installation required.)
b) Scroll toggle feature:
Press down and release the wheel to
change the scrolling speed from click-to-click scrolling to hyper-fast scrolling, or vice versa.
2.
Internet forward and back buttons.
3. Left and right mouse buttons
. Use the mouse
software to change functions.
4. Battery LED
glows green when mouse is turned on and
batteries are good. It flashes red when batteries are low.
5. Power LED
glows green when on.
6.
Power button.
To conserve battery power while the mouse is not in use, press the Power
button.
Troubleshooting Mouse Not Working
1
. Make sure the USB mini-receiver is plugged into a computer USB port and the computer is on;
try another USB port on the computer.
2
. Check battery installation. Replace the batteries if the
Battery LED flashes red.
3
. Try pressing and holding the Power button on the mouse bottom until
the Power LED blinks green; release the Power button.
4
. If cursor performance is slow or jerky,
try using the mouse on another surface; avoid dark surfaces.
5
. Finally, try the
Logitech
Reconnection Utility
(requires software installation). Go to the Start Menu and select
Programs/Logitech/Mouse and Keyboard/Reconnection Utility
. Follow the on-screen
instructions.
Português
Install the software
For enhanced mouse features, please download the mouse software at
www.logitech.com/downloads
. After installing the mouse software, launch it by double-clicking
the keyboard-mouse logo in the Windows® System Tray.
Insert the USB mini-receiver into mouse for convenient storage when traveling. Mouse turns off.
Press eject button to remove USB mini-receiver. Mouse turns on.
CAUTION: CHOKING
HAZARD. HARMFUL OR FATAL IF SWALLOWED. Package contains small parts. Not for
children under 6 years.
1. Scroll wheel. a) Tilt wheel feature:
Tilt the wheel left or right to scroll side to side.
(Software installation required.)
b) Scroll toggle feature:
Press down and release the wheel to
change the scrolling speed from click-to-click scrolling to hyper-fast scrolling, or vice versa.
2.
Internet forward and back buttons.
3. Left and right mouse buttons
. Use the mouse
software to change functions.
4. Battery LED
glows green when mouse is turned on and
batteries are good. It flashes red when batteries are low.
5. Power LED
glows green when on.
6.
Power button.
To conserve battery power while the mouse is not in use, press the Power
button.
Troubleshooting Mouse Not Working
1
. Make sure the USB mini-receiver is plugged into a computer USB port and the computer is on;
try another USB port on the computer.
2
. Check battery installation. Replace the batteries if the
Battery LED flashes red.
3
. Try pressing and holding the Power button on the mouse bottom until
the Power LED blinks green; release the Power button.
4
. If cursor performance is slow or jerky,
try using the mouse on another surface; avoid dark surfaces.
5
. Finally, try the
Logitech
Reconnection Utility
(requires software installation). Go to the Start Menu and select
Programs/Logitech/Mouse and Keyboard/Reconnection Utility
. Follow the on-screen
instructions.


