

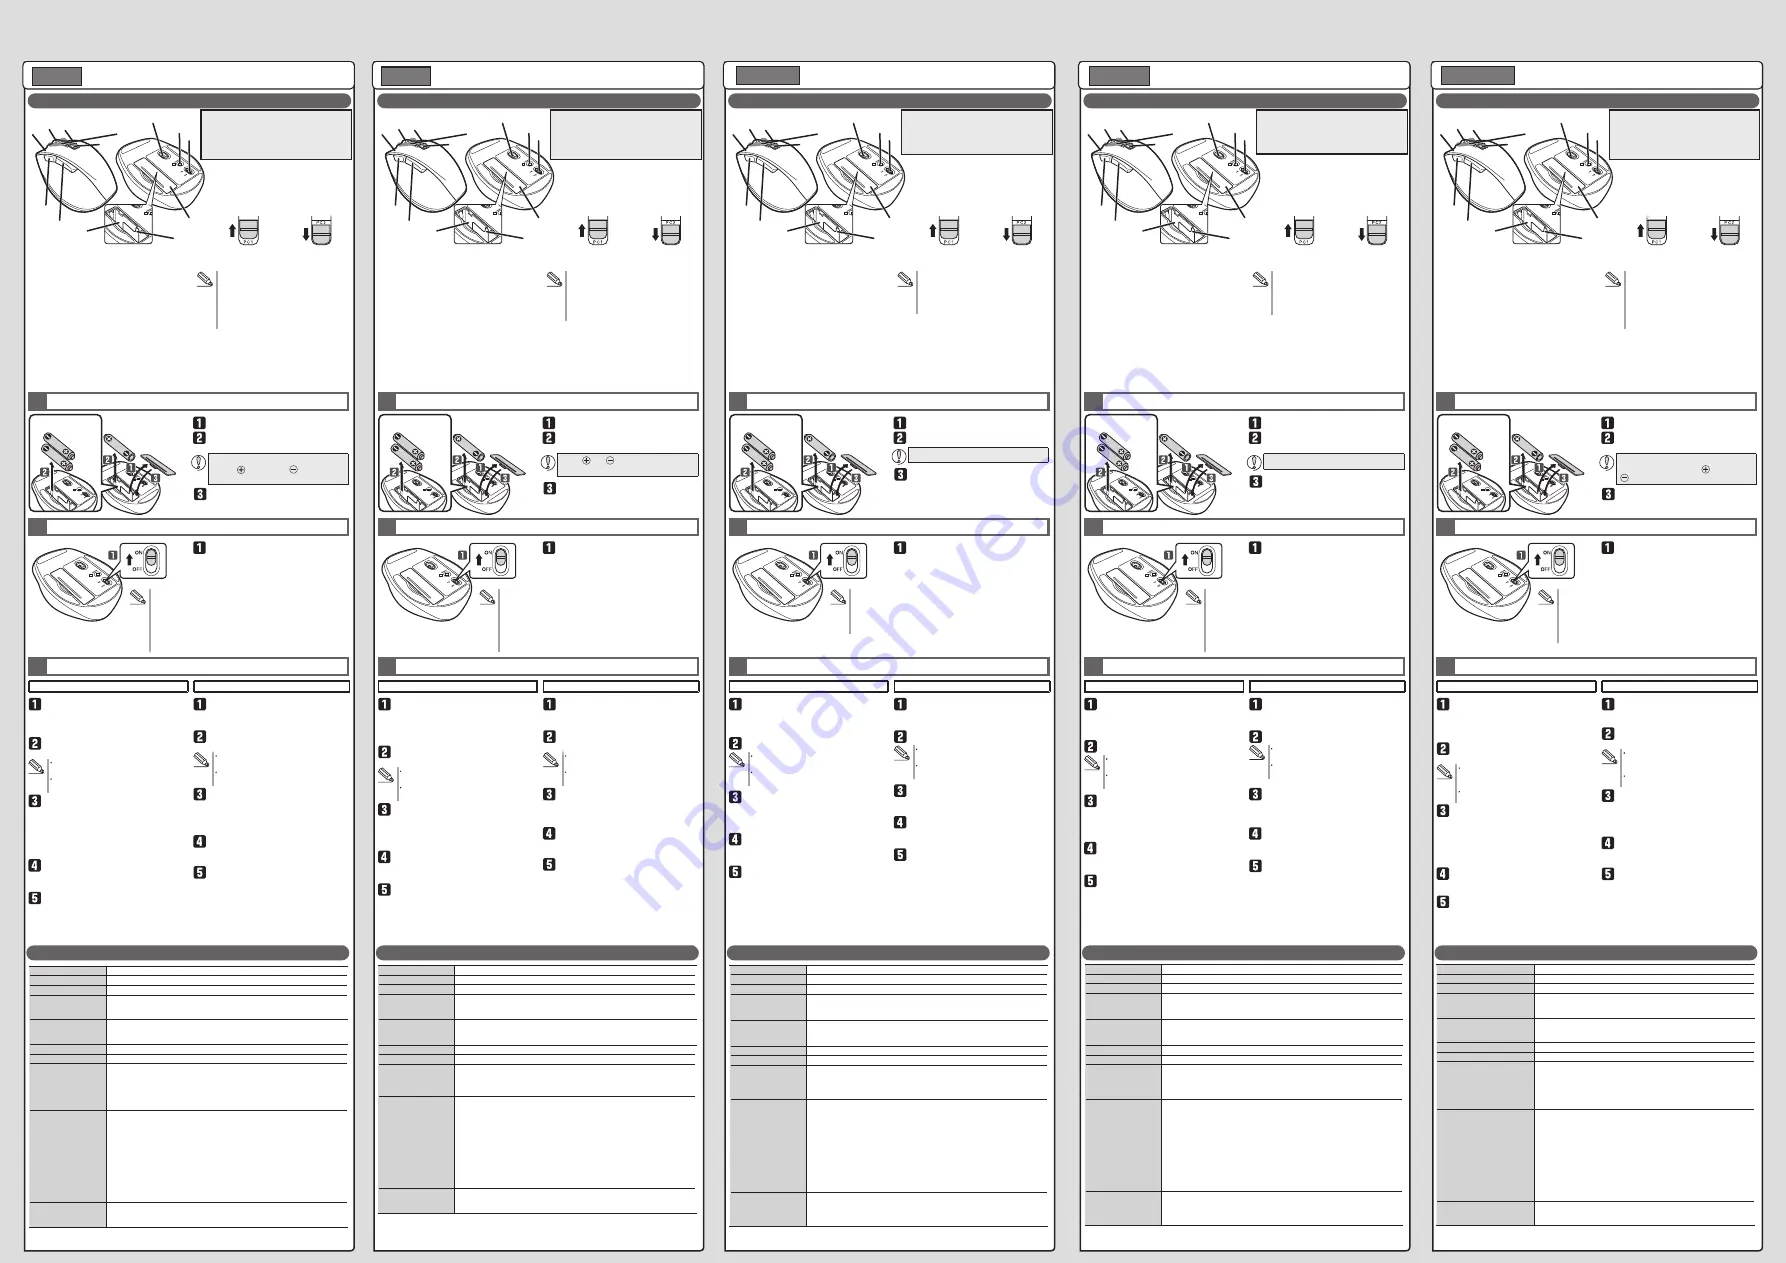
Name and function of each part
각 부분의 명칭 및 기능
各部分的名称及其作用
各部位名稱及功能
Nama dan Fungsi dari Setiap Bagian
Attach the battery cover.
Wireless Mouse
Manual
ENGLISH
Remove the battery cover.
The power indicator light will become
illuminated in red for a fixed period of time.
* Flashes red when the battery level gets low.
Specifications
1
Inserting the battery
2
Turning the power on
3
Pairing with a PC
Slide the power switch to the ON
position.
Click on “X” in the notification area
and right-click on the Bluetooth
®
icon
(“X”) to press “Add Bluetooth device”.
Select the connected device using the
device selection switch.
In the “Manage Bluetooth device”
screen, press the pairing button
located at the bottom of this product
for 2 or 3 seconds using a pointed
object and release.
Insert the battery as instructed on the
battery removal sheet.
Power-saving mode
When the mouse is left untouched for a fixed period of time
while the power is ON, it automatically shifts to power-saving
mode. The mouse is released from the power-saving mode
when it is touched.
* Mouse operation may be unstable for a few seconds after
returning from the power-saving mode.
Ensure that the battery is inserted with its
positive and negative ends oriented
correctly.
1
2
3
4
5
6
7
8
9
10
11
12
13
Change to PC1
Change to PC2
Download "ELECOM Mouse Assistant" from the
ELECOM website to use its button assignment and
high-speed scrolling functions.This also enables the
use of the 'Forward' and 'Back' buttons on
Macintosh.
www.elecom.co.jp/global/download-list/utility/mouse_assistant/
When only either “PC1” or “PC2” is paired,
and if you turn the device selection switch
to the device that is not paired, the current
connection is disconnected. In this case,
reconnect by turning the device selection
switch back to the device that was
connected.
For Windows
®
8.1, Windows
®
RT
The “Manage Bluetooth device” screen appears.
The machine enters into the Pairing mode and
the pairing lamp is lit in red.
Pairing of this product starts.
For how to select the device to connect,
see “Changing device to connect”.
The currently paired Bluetooth device is
registered to the device selected here.
Choose “ELECOM BlueLED Mouse”
and click “Pairing”.
“ELECOM BlueLED Mouse” is added in the
“Manage Bluetooth device” screen.
You can now use the mouse.
When pairing is completed, the
pairing lamp turns off.
From the Bluetooth
®
menu, click
“Open Bluetooth preferences”.
Select the connected device using the
device selection switch.
Press the pairing button for 2 or 3
seconds using a pointed object and
release.
For Macintosh
“Bluetooth” is shown.
The machine enters into the Pairing mode and
the pairing lamp is lit in red.
Registration of this product starts.
For how to select the device to connect,
see “Changing device to connect”.
The currently paired Bluetooth device is
registered to the device selected here.
Click “ELECOM BlueLED Mouse”
and click “Pairing”.
The message “Connected” appears on the
screen.
You can now use the mouse.
Pairing is completed when the pairing
lamp turns off and the “ELECOM
BlueLED Mouse” is shown as
“Connected”.
전지 커버를 원래대로 부착합니다.
무선 마우스
취급설명서
전지 커버를 분리합니다.
전원 표시등은 지정된 시간 동안 빨간색으로
불이 들어옵니다.
※건전지 잔량이 적을 때, 일정 시간 적색 점멸합니다.
기본 사양
1
전지 삽입
2
전원 켜기
3
컴퓨터와 페어링 하기
전원 스위치를 ON 위치로
슬라이드시킵니다.
알림 영역에서 “X”를 클릭하고
Bluetooth® 아이콘(“X”)을 마우스
오른쪽 버튼으로 클릭한 다음 “블루투스
장치 추가”를 누릅니다.
장치 선택 스위치를 이용하여 연결된
장치를 선택합니다.
“블루투스 장치 관리” 화면에서 제품
하단에 있는 페어링 버튼을 뾰족한 물체를
이용하여 2, 3초 눌렀다 뗍니다.
전지 배출 시트의 기재에 따라 전지를
삽입합니다.
마우스의 절전 모드에 대해
전지의 소모를 억제하기 위해, 전원 스위치가 ON 상태에서 조작
없이 일정 시간이 지나면, 마우스가 자동으로 절전 모드로
이행합니다.
마우스를 움직이면 절전 모드에서 벗어납니다.
※절전 모드에서 벗어난 후 2~3초간은 마우스 조작이 불안정할 수
있습니다.
전지의 극과 극 방향을 올바르게
삽입하십시오.
1
2
3
4
5
6
7
8
9
10
11
12
13
PC1로 변경
PC2로 변경
엘레컴 웹사이트에서 「Elecom Mouse Assistant」
를 다운로드하여 설치하면 버튼 할당이나 고속
스크롤 기능을 사용할 수 있습니다.
또한 Macintosh에서 「앞으로」 버튼/「뒤로」 버튼이
사용 가능하게 됩니다.
www.elecom.co.jp/global/download-list/utility/mouse_assistant/
“PC1” 또는 “PC2”에만 페어링되었을 때,
장치 선택 스위치를 페어링되지 않은
장치로 설정하면 현재 연결이 차단됩니다.
이러한 경우 장치 선택 스위치를 이전에
연결된 장치로 다시 되돌려 다시
연결합니다.
Windows
®
8.1, Windows
®
RT
“블루투스 장치 관리” 화면이 표시됩니다.
장치가 페어링 모드가 되고 페어링 램프에
빨간색으로 불이 들어옵니다.
제품 페어링을 시작합니다.
연결할 장치를 선택하는 방법은 “연결할
장치 변경”을 참조하십시오.
현재 페어링된 블루투스 장치는 여기에서
선택된 장치로 등록됩니다.
“ELECOM BlueLED Mouse”를
선택하고 “페어링”을 클릭합니다.
"ELECOM BlueLED 마우스"가 "블루투스 장치
관리" 화면에 추가 됩니다.
이제 마우스를 사용할 수 있습니다.
페어링이 완료되면 페어링 램프가
꺼집니다.
Bluetooth® 메뉴, 클릭 “블루투스
환경설정 열기”를 클릭합니다.
장치 선택 스위치를 이용하여 연결된
장치를 선택합니다.
뾰족한 물체를 이용하여 페어링 버튼을 2,
3초 동안 눌렀다 뗍니다.
Macintosh
"블루투스"가 표시됩니다.
장치가 페어링 모드가 되고 페어링 램프에
빨간색으로 불이 들어옵니다.
이 제품의 재등록이 시작됩니다.
연결할 장치를 선택하는 방법은 “연결할
장치 변경”을 참조하십시오.
현재 페어링된 블루투스 장치는 여기에서
선택된 장치로 등록됩니다.
“ELECOM BlueLED Mouse”를
클릭하고 “페어링”을 클릭합니다.
화면에 “연결됨” 메시지가 표시됩니다.
이제 마우스를 사용할 수 있습니다.
페어링 램프가 꺼지면 페어링이 완료되며
"ELECOM BlueLED Mouse”가
"연결됨"으로 표시됩니다.
装回电池盖。
无线鼠标
使用说明书
拆下电池盖。
此时,电源指示灯将变为红色,并保持一段
固定时间。
※電池殘餘量變少時,會閃爍一陣子紅燈。
基本規格
1
插入电池
2
接通电源
3
和電腦配對
使电源开关滑到ON的位置。
单击通知区域中的"X",然后右击
Bluetooth® 图标("X"),点击“添
加蓝牙设备"。
使用设备选择开关选择连接的设备。
在"管理蓝牙设备"屏幕上,使用一个
尖头物体按下该产品底部的配对按
钮,保持2秒或3秒钟,然后释放。
结合电池取出片的记载,插进电池。
關於滑鼠的省電模式
為了減少電池耗電,電源開關在 ON 的狀態下沒有操作,經
過一定時間之後,滑鼠會自動變成省電模式。
若是移動滑鼠,就會從省電模式復原。
※ 從省電模式復原後的 2 ~ 3 秒,滑鼠操作可能變得不穩定。
请正确插入电池正极和负极的方向。
1
2
3
4
5
6
7
8
9
10
11
12
13
更改为 PC1
更改为 PC2
从本公司官网下载并安装“Elecom Mouse
Assistant”后,即可使用自定义按键、高速滚动
功能。
在 Macintosh 上可使用“ 前进 ”键 /“ 返回 ”键。
www.elecom.co.jp/global/download-list/utility/mouse_assistant/
当只对 "PC1" 或 "PC2" 进行配对时,如
果将设备选择开关切换为未配对的设备,
则当前连接将会断开。在这种情况下,通
过将设备选择开关切换回此前连接的设
备,可以重新建立连接。
对于
Windows
®
8.1
、
Windows
®
RT
出现"管理蓝牙设备"屏幕。
机器进入配对模式,配对时,红灯亮起。
此产品开始配对。
有关选择要连接的设备所用的方法,请
参阅 " 更改要连接的设备 "。
当前配对的蓝牙设备已在此处选择的设
备上进行注册。
选择"ELECOM BlueLED Mouse",然
后单击"配对"。
在"管理蓝牙设备"屏幕中添加了"ELECOM
BlueLED Mouse"图标。
现在可以使用鼠标了。
配对完成后,配对灯熄灭。
在 Bluetooth® 菜单中,单击"打开蓝
牙首选项"。
使用设备选择开关选择连接的设备。
使用尖头物体按下配对按钮,保持2秒
或3秒钟,然后释放。
对于
Macintosh
显示 " 蓝牙 "。
机器进入配对模式,配对时,红灯亮起。
此产品开始注册。
有关选择要连接的设备所用的方法,请
参阅 " 更改要连接的设备 "。
当前配对的蓝牙设备已在此处选择的设
备上进行注册。
点击"ELECOM BlueLED Mouse",然
后再点击"配对"。
屏幕上显示信息"已连接"。
现在可以使用鼠标了。
配对灯关闭后,配对完成,"ELECOM
BlueLED Mouse"显示"已连接"。
重新蓋回電池蓋。
無線滑鼠
使用說明書
拆下電池蓋。
電源指示燈會亮紅燈一段時間。
※電池殘餘量變少時,會閃爍一陣子紅
燈。
基本規格
1
放入電池
2
打開電源
3
和電腦配對
將電源開關滑至 ON 的位置。
按一下通知區域中的 [X],接著在
Bluetooth® 圖示 ([X]) 上按一下滑鼠
右鍵,以按下 [新增藍牙裝置]。
使用裝置選擇開關選擇連接的裝置。
在「管理藍牙裝置」畫面中,使用尖頭
物品按住位於本產品底部的配對按鈕
2 或 3 秒鐘,然後鬆開。
按照電池取出膠片的記載,放入電
池。
關於滑鼠的省電模式
為了減少電池耗電,電源開關在 ON 的狀態下沒有操作,
經過一定時間之後,滑鼠會自動變成省電模式。
若是移動滑鼠,就會從省電模式復原。
※ 從省電模式復原後的2 ~ 3 秒,滑鼠操作可能變得不穩
定。
請正確對準電池正負方向。
1
2
3
4
5
6
7
8
9
10
11
12
13
變更至 PC1
變更至 PC2
在本公司網站下載並安裝「Elecom Mouse
Assistant」,即可使用按鍵配置及高速捲動等功能。
此外,在 Macintosh 的環境下,能夠使用「下一
頁」鍵 /「上一頁」鍵。
www.elecom.co.jp/global/download-list/utility/mouse_assistant/
若只有和「PC1」或「PC2」進行配對,且您
將裝置選擇開關切換至未配對的裝置,
目前的連線便會中斷。在此情況下,請
將裝置選擇開關切換回先前連線的裝
置,以重新連線。
針對
Windows
®
8.1
、
Windows
®
RT
「管理藍牙裝置」畫面便會出現。
滑鼠便會進入配對模式,而配對指示燈會亮
紅燈。
本產品會開始進行配對。
有關用於選擇要連接裝置的方法,請參
閱《變更要連接的裝置》。
目前配對的藍牙裝置是註冊在於此處選
擇的裝置。
選擇「ELECOM BlueLED Mouse」,然
後按一下 [配對]。
「ELECOM BlueLED Mouse」新增至「管理藍
牙裝置」畫面中。
您現在便可使用滑鼠。
配對完成後,配對指示燈便會熄滅。
自 Bluetooth® 選單按一下 [開啟藍牙
偏好設定]。
使用裝置選擇開關選擇連接的裝置。
使用尖頭物品按住配對按鈕 2 或 3 秒
鐘,然後鬆開。
針對
Macintosh
電腦
畫面會顯示「藍牙」。
滑鼠便會進入配對模式,而配對指示燈會亮
紅燈。
電腦便會開始註冊此產品。
有關用於選擇要連接裝置的方法,請參
閱《變更要連接的裝置》。
目前配對的藍牙裝置是註冊在於此處選
擇的裝置。
按一下 [ELECOM BlueLED Mouse],
然後按一下 [配對]。
畫面顯示「已連線」的訊息。
您現在便可使用滑鼠。
配對指示燈熄滅時即代表配對完成,
而「ELECOM BlueLED Mouse」會顯示
為「已連線」。
Pasang tutup baterai.
Mouse Nirkabel
Manual
Lepas tutup baterai.
Lampu indikator daya akan menyala merah
selama beberapa saat.
* Saat sisa pengisian baterai lemah, area ini akan
berkedip merah untuk jangka waktu tertentu.
Spesifikasi dasar
1
Menyisipkan baterai
2
Nyalakan daya
3
Memasangkan dengan PC
Geser pengalih daya ke posisi ON.
Klik tanda "X" dalam kolom
pemberitahuan dan klik kanan pada ikon
Bluetooth® ("X") untuk menekan
"Tambahkan perangkat Bluetooth".
Pilih perangkat yang tersambung dengan
menggunakan tombol pilihan perangkat.
Pada layar "Kelola perangkat Bluetooth",
tekan tombol penyandingan yang terletak
di bagian bawah produk ini selama 2 atau
3 detik menggunakan benda berujung
lancip dan kemudian lepaskan.
Sisipkan baterai seperti yang ditunjukkan
pada lembar pencopotan baterai.
Mode hemat daya
Apabila mouse tidak disentuh selama beberapa waktu saat daya
dalam posisi ON, mouse otomatis berpindah ke mode hemat daya.
Apabila disentuh, mouse tidak dalam mode hemat daya lagi.
* Pengoperasian mouse mungkin tidak stabil selama beberapa detik
setelah kembali dari mode hemat daya.
Pastikan bahwa baterai disisipkan
dengan arah ujung positif dan negatif
dengan benar.
1
2
3
4
5
6
7
8
9
10
11
12
13
Beralih ke PC1
Beralih ke PC2
Unduh "ELECOM Mouse Assistant" dari situs web
ELECOM untuk menggunakan fungsi penugasan tombol
dan gulir kecepatan tinggi.
Hal ini juga memungkinkan penggunaan tombol 'Maju'
dan 'Mundur' pada Macintosh.
www.elecom.co.jp/global/download-list/utility/mouse_assistant/
Ketika hanya "PC1" atau "PC2" disandingkan,
dan jika tombol pilihan perangkat berada pada
perangkat yang sedang tidak disandingkan,
koneksi akan terputus. Dalam hal ini, silakan
menghubungkan kembali perangkat dengan
mengalihkan tombol pilihan perangkat
kembali ke perangkat yang terhubung.
Untuk Windows® 8.1, Windows® RT
Muncul layar "Kelola Perangkat Bluetooth".
Produk akan berada pada moda Penyandingan
dan lampu penyandingan akan menyala merah.
Penyandingan produk dimulai.
Untuk memilih perangkat yang akan
dihubungkan, silakan melihat "Mengganti
perangkat yang akan dihubungkan".
Perangkat Bluetooth yang tersandingkan saat
ini terdaftar pada perangkat yang dipilih di sini.
Pilih "ELECOM BlueLED Mouse" dan klik
"Menyandingkan".
"ELECOM BlueLED Mouse" ditambahkan pada layar
"Kelola Perangkat Bluetooth".
Anda sekarang dapat menggunakan mouse.
Setelah penyandingan selesai, lampu
penyandingan padam.
Pada menu Bluetooth®, klik "Buka
preferensi Bluetooth".
Pilih perangkat yang tersambung dengan
menggunakan tombol pilihan perangkat.
Tekan tombol berpasangan selama 2
atau 3 detik menggunakan benda
berujung lancip dan kemudian lepaskan.
Untuk Macintosh
"Bluetooth" ditampilkan.
Produk akan berada pada moda Penyandingan
dan lampu penyandingan akan menyala merah.
Pendaftaran produk dimulai.
Untuk memilih perangkat yang akan
dihubungkan, silakan melihat "Mengganti
perangkat yang akan dihubungkan".
Perangkat Bluetooth yang tersandingkan saat
ini terdaftar pada perangkat yang dipilih di sini.
Pilih "ELECOM BlueLED Mouse" dan klik
"Menyandingkan".
Pesan "Terhubung" muncul pada layar.
Anda sekarang dapat menggunakan mouse.
Penyandingan selesai ketika lampu
penyandingan padam dan status
"ELECOM BlueLED Mouse" berubah
menjadi "Terhubung".
한국어
中文・简体
中文 ・繁體
Bahasa Indonesia
Product number: M-XGS10BB/M-XGM10BB/M-XGL10BB
M-XGS10BBS/M-XGM10BBS/M-XGL10BBS
M-XGS10BBX/M-XGM10BBX/M-XGL10BBX
Model/Equipment Type: M-XGx10BB
제품번호
: M-XGS10BB/M-XGM10BB/M-XGL10BB
M-XGS10BBS/M-XGM10BBS/M-XGL10BBS
M-XGS10BBX/M-XGM10BBX/M-XGL10BBX
产品编号
:M-XGS10BB/M-XGM10BB/M-XGL10BB
M-XGS10BBS/M-XGM10BBS/M-XGL10BBS
M-XGS10BBX/M-XGM10BBX/M-XGL10BBX
设备型号
: M-XGx10BB
產品編號
: M-XGS10BB/M-XGM10BB/M-XGL10BB
M-XGS10BBS/M-XGM10BBS/M-XGL10BBS
M-XGS10BBX/M-XGM10BBX/M-XGL10BBX
設備型號
: M-XGx10BB
Nomor produk:M-XGS10BB/M-XGM10BB/M-XGL10BB
M-XGS10BBS/M-XGM10BBS/M-XGL10BBS
M-XGS10BBX/M-XGM10BBX/M-XGL10BBX
Model: M-XGx10BB
모델명
: M-XGx10BB
Resolution
2000 dpi
Radio frequency
2.4 GHz band
Radio wave method
FHSS
Operation distance
Non-magnetic surface (e.g. wooden desk): approx. 10 m
Magnetic surface (e.g. steel desk): approx. 3 m
* These values were obtained in ELECOM's test environment and are not guaranteed.
Mouse dimensions
(W × D × H)
M-XGS10BB (M-XGS10BBS) series : approx. 66 × 92 × 40 mm
M-XGM10BB (M-XGM10BBS) series : approx. 74 × 110 × 41 mm
M-XGL10BB (M-XGL10BBS) series : approx. 82 × 120 × 42 mm
Operating temperature/humidity
5°C to 40°C/90%RH or less (without condensation)
Storage temperature/humidity
-10°C to 60°C/90%RH or less (without condensation)
Supported battery
M-XGS10BB (M-XGS10BBS) series (requires two batteries)
AAA alkaline batteries, AAA manganese batteries, AAA nickel-metal
hydride rechargeable batteries
M-XGM10BB (M-XGM10BBS) / M-XGL10BB (M-XGL10BBS) series
AA alkaline battery, AA manganese battery, AA nickel-metal hydride
rechargeable battery
Operating time
Estimated operating time when using an alkaline battery
Continuous operating time:
M-XGS10BB (M-XGS10BBS) series : approx. 200 hours
M-XGM10BB (M-XGM10BBS) / M-XGL10BB (M-XGL10BBS) series : approx. 222 hours
Continuous standby time:
M-XGS10BB (M-XGS10BBS) series : approx. 416 days
M-XGM10BB (M-XGM10BBS) / M-XGL10BB (M-XGL10BBS) series : approx. 462 days
Estimated usage time:
M-XGS10BB (M-XGS10BBS) series : approx. 362 days
M-XGM10BB (M-XGM10BBS) / M-XGL10BB (M-XGL10BBS) series : approx. 402 days
The above is assuming the computer is used for eight hours a day with 5%
of that time spent operating the mouse.
Supported OS
Windows
®
10, Windows
®
8.1, Windows
®
RT8.1, Windows
®
7, Windows
Vista
®
, Macintosh OS X 10.10, Macintosh OS X 10.11
(Updating the OS or installing a service pack may be necessary.)
카운트 수
2000 카운트
전파 주파수
2.4GHz 대
전파 방식
FHSS 방식
전파 도달 거리
비자성체 ( 나무판 등 ): 약 10m
자성체 ( 철판 등 ): 약 3m
※폐사 환경에서의 테스트 값이며 보증 값은 아닙니다 .
마우스 본체 외형 치수
( 폭 x 깊이 x 높이 )
M-XGS10BB (M-XGS10BBS) 시리즈 : 약 66 × 92 × 40 mm
M-XGM10BB (M-XGM10BBS) 시리즈 : 약 74 × 110m × 41 mm
M-XGL10BB (M-XGL10BBS) 시리즈 : 약 82 × 120 × 42 mm
동작 온도 / 습도
5℃~ 40℃ / ~ 90% RH( 단 , 결로가 없을 때 )
보존 온도 / 습도
-10℃~ 60℃ / ~ 90% RH( 단 , 결로가 없을 때 )
대응 전지
M-XGS10BB (M-XGS10BBS) 시리즈 ( 두 개의 배터리가 필요합니다 )
AAA 알칼리 건전지 , AAA 망간 건전지 , AAS 니켈수소 2 차전지
M-XGM10BB (M-XGM10BBS) / M-XGL10BB (M-XGL10BBS) 시리즈
AA 알칼리 건전지 , AA 망간 건전지 , AA 니켈수소 2 차전지
동작 시간
알칼리 건전지 사용 시 기준
연속 동작 시간 :
M-XGS10BB (M-XGS10BBS) 시리즈 : 약 200 시간
M-XGM10BB (M-XGM10BBS) / M-XGL10BB (M-XGL10BBS) 시리즈 : 약 222 시간
연속 대기 시간 :
M-XGS10BB (M-XGS10BBS) 시리즈 : 약 416 일
M-XGM10BB (M-XGM10BBS) / M-XGL10BB (M-XGL10BBS) 시리즈 : 약 462 일
예상 사용 가능 시간 :
M-XGS10BB (M-XGS10BBS) 시리즈 : 약 362 일
M-XGM10BB (M-XGM10BBS) / M-XGL10BB (M-XGL10BBS) 시리즈 : 약 402 일
1 일 8 시간 컴퓨터 조작 중 5% 를 마우스 조작에 할당한 경우
대응 OS
Windows® 10, Windows® 8.1, Windows® RT8.1, Windows® 7, Windows
Vista®, Windows® XP, Macintosh OS X 10.10, Macintosh OS X 10.11
( 각 OS 의 최신 버전으로의 업데이트나 서비스팩의 설치가 필요할 수 있습니다 .)
分辨率
2000 DPI
电波频率
2.4GHz 频段
电波方式
FHSS 式
电波传播距离
非磁性体(木桌等):约 10 m
磁性体(铁桌等):约 3 m
※ 这是在本公司环境下的测试值,并非保证值。
鼠标本体 外观尺寸
(宽 × 深 × 高)
M-XGS10BB (M-XGS10BBS) 系列 : 约 66 × 92 × 40 mm
M-XGM10BB (M-XGM10BBS) 系列 : 约 74 × 110 × 41 mm
M-XGL10BB (M-XGL10BBS) 系列 : 约 82 × 120 × 42 mm
工作温度 / 湿度
5℃~ 40℃ ,相对湿度最高 90%(但无结露)
存放温度 / 湿度
-10℃~ 60℃,相对湿度最高 90%(但无结露)
适用电池
M-XGS10BB (M-XGS10BBS) 系列 ( 需要两节电池 )
7 号碱性干电池、7 号锰干电池、7 号镍氢二次电池
M-XGM10BB (M-XGM10BBS) / M-XGL10BB (M-XGL10BBS) 系列
5 号碱性干电池、5 号锰干电池、5 号镍氢二次电池
工作时间
使用碱性干电池时的大致时间
连续工作时间 :
M-XGS10BB (M-XGS10BBS) 系列 : 约 200 小时
M-XGM10BB (M-XGM10BBS) / M-XGL10BB (M-XGL10BBS) 系列 : 约 222 小时
连续待机时间 :
M-XGS10BB (M-XGS10BBS) 系列 : 约 416 天
M-XGM10BB (M-XGM10BBS) / M-XGL10BB (M-XGL10BBS) 系列 : 约 462 天
估计可用时间 :
M-XGS10BB (M-XGS10BBS) series : 约 362 天
M-XGM10BB (M-XGM10BBS) / M-XGL10BB (M-XGL10BBS) 系列 : 约 402 天
假设 1 天使用计算机 8 小时,其中 5% 的时间在操作鼠标
支持的操作系统
Windows® 10、Windows® 8.1、Windows® RT8.1、Windows® 7、
Windows Vista® 、Windows® XP、Macintosh OS X 10.10、Macintosh
OS X 10.11
(有时需要升级到各操作系统的最新版本,或者安装服务包。)
解析度
2000 dpi
電波頻率
2.4GHz 頻段
電波方式
FHSS 方式
電波距離
非磁性物體(木桌等):約 10m
磁性物體(鐵桌等):約 3m
※ 這是本公司環境下的測試值,並非保證。
滑鼠本體 外型尺寸
(寬 × 深 × 高)
M-XGS10BB (M-XGS10BBS) 系列 : 約 66 × 92 × 40 mm
M-XGM10BB (M-XGM10BBS) 系列 : 約 74 × 110 × 41 mm
M-XGL10BB (M-XGL10BBS) 系列 : 約 82 × 120 × 42 mm
動作溫度 / 濕度
5℃~ 40℃ / ~ 90%RH(必須無水氣凝結)
存放溫度 / 濕度
-10℃~ 60℃ / ~ 90%RH(必須無水氣凝結)
適用電池
M-XGS10BB (M-XGS10BBS) 系列 ( 需要兩節電池 )
四號鹼性乾電池、四號碳氫乾電池、四號鎳氫充電電池
M-XGM10BB (M-XGM10BBS) / M-XGL10BB (M-XGL10BBS) 系列
三號鹼性乾電池、三號碳氫乾電池、三號鎳氫充電電池
操作時間
使用鹼性乾電池時的時間
連續操作時間 :
M-XGS10BB (M-XGS10BBS) 系列 : 約 200 小時
M-XGM10BB (M-XGM10BBS) / M-XGL10BB (M-XGL10BBS) 系列 : 約 222 小時
連續待機時間 :
M-XGS10BB (M-XGS10BBS) 系列 : 約 416 天
M-XGM10BB (M-XGM10BBS) / M-XGL10BB (M-XGL10BBS) 系列 : 約 462 天
預期可使用時間 :
M-XGS10BB (M-XGS10BBS) 系列 : 約 362 天
M-XGM10BB (M-XGM10BBS) / M-XGL10BB (M-XGL10BBS) 系列 : 約 402 天
假設 1 天使用 8 小時電腦,其中 5% 時間使用滑鼠
支援 OS
Windows® 10 、Windows® 8.1 、Windows® RT8.1 、Windows® 7 、
Windows Vista® 、Windows® XP 、Macintosh OS X 10.10 、Macintosh
OS X 10.11
(可能必須更新至各 OS 的最新版本,或者安裝服務包。)
Resolusi
2000 dpi
Frekuensi radio
Pita 2,4 GHz
Metode gelombang radio
Modulasi FHSS
Jangkauan gelombang radio
Permukaan yang tidak mengandung magnet (meja kayu, dll.): sekitar 10 m
Permukaan magnetik (meja baja, dll.): sekitar 3 m
* Nilai ini didasarkan pada pengujian Elecom dan bukan untuk menjamin performa.
Dimensi mouse
(L × P × T)
Seri M-XGS10BB (M-XGS10BBS): sekitar 66 × 92 × 40 mm
Seri M-XGM10BB (M-XGM10BBS) : sekitar 74 × 110 × 41 mm
Seri M-XGL10BB (M-XGL10BBS) : sekitar 82 × 120 × 42 mm
Suhu operasi/kelembapan
Suhu 5°C hingga 40°C/ 90% RH atau kurang (tanpa kondensasi)
Suhu/kelembapan penyimpana
Suhu -10°C 60°C/ 90% RH atau kurang (tanpa kondensasi)
Baterai
M-XGS10BB (M-XGS10BBS) series (requires two batteries)
Baterai kering alkaline AAA, baterai kering mangan AAA, atau baterai
nikel logam hidrida isi ulang AAA
M-XGM10BB (M-XGM10BBS) / M-XGL10BB (M-XGL10BBS) series
Baterai kering alkaline AA, baterai kering mangan AA, atau baterai nikel
logam hidrida isi ulang AA
Waktu pengoperasian
Perkiraan waktu pengoperasian saat menggunakan baterai alkalin
Waktu pengoperasian berkelanjutan:
Seri M-XGS10BB (M-XGS10BBS) : sekitar 200 jam
Seri M-XGM10BB (M-XGM10BBS) / M-XGL10BB (M-XGL10BBS : sekitar 222 jam
Waktu siaga berkelanjutan:
Seri M-XGS10BB (M-XGS10BBS) : sekitar 416 hari
Seri M-XGM10BB (M-XGM10BBS) / M-XGL10BB (M-XGL10BBS) : sekitar 462 hari
Perkiraan masa pakai baterai:
Seri M-XGS10BB (M-XGS10BBS) : sekitar 362 hari
Seri M-XGM10BB (M-XGM10BBS) / M-XGL10BB (M-XGL10BBS) : sekitar 402 hari
Bila komputer digunakan selama 8 jam sehari, dengan 5% waktu tersebut
dihabiskan untuk mengoperasikan mouse menggunakan baterai alkaline.
OS yang didukung
Windows® 10, Windows® 8.1, Windows® RT8.1, Windows® 7, Windows Vista®,
Macintosh OS X 10.10, Macintosh OS X 10.11
(Mungkin perlu memperbarui OS atau memasang paket layanan.)
M-XGM10DB/BBS Series
M-XGL10DB/BBS Series
M-XGS10BB/BBS Series
M-XGM10DB/BBS
시리즈
M-XGL10DB/BBS
시리즈
M-XGS10BB/BBS
시리즈
M-XGM10DB/BBS
系列
M-XGL10DB/BBS
系列
M-XGS10BB/BBS
系列
M-XGM10DB/BBS
系列
M-XGL10DB/BBS
系列
M-XGS10BB/BBS
系列
Seri M-XGM10DB/BBS
Seri M-XGL10DB/BBS
Seri M-XGS10BB/BBS
4 "Back" button
3 Wheel
You can perform the "Back" operation in a
web browser.
5 "Forward" button
You can perform the "Forward" operation in
a web browser.
6 Pairing light/Power indicator light
1 Left button
2 Right button
The light underneath the wheel flashes in red
when the mouse is in a pairing standby state.
When the power is turned ON, the light
underneath the wheel becomes illuminated in
red for a fixed period of time. If flashes red
when the battery level gets low.
7 Device selection switch
8 Optical sensor
9 Pairing button
10 Power switch
11 Battery cover
12 Battery storage compartment
13 Battery removal sheet
This product can be used with two Bluetooth
devices by switching between them.
Slide the device selection switch for
changing device from “PC1” to “PC2”.
When the device is connected, the pairing
lamp is lit for about three seconds.
4
「뒤로」버튼
3
휠
Web 브라우저에서 「뒤로」 조작이
가능합니다.
5
「앞으로」버튼
Web 브라우저에서 「앞으로」 조작이
가능합니다.
6
페어링 표시등/전원 표시등
1
좌 버튼
2
우 버튼
마우스가 페어링 대기 상태일 경우 휠 아래의
표시등이 빨간색으로 깜박입니다.
전원을 켰을(ON) 때, 휠 주위가 일정 시간
적색으로 점등합니다. 사용 중에 전지 잔량이
적어지면, 적색으로 점멸합니다.
7
장치 선택 스위치
8
광학식 센서
9
페어링 버튼
10
전원 스위치
11
전지 커버
12
전지 수납부
13
전지 배출 시트
이 제품은 2 개의 블루투스 장치를 전환하며
사용할 수 있습니다.
장치 선택 스위치를 밀어 장치를 “PC1”
에서 “PC2”로 변경합니다.
장치가 연결되었을 때 페어링 램프에 약 3초
동안 불이 들어옵니다.
4
“ 返回 ”键
3
滚轮
可在网页浏览器上进行“ 返回 ”操作。
5
“ 前进 ”键
可在网页浏览器上进行“ 前进 ”操作。
6
配对灯/电源指示灯
1
左键
2
右键
当鼠标处于配对待机状态时,滚轮下面的光线
会以红色闪烁。
開啟(ON)電源時,滾輪周圍會亮紅燈一定時
間。使用時,若電池殘餘電量變少,就會閃爍紅
燈。
7
设备选择开关
8
光学传感器
9
配对键
10
电源键
11
电池盖
12
电池存放部
13
电池取出片
此产品可通过在两个蓝牙设备之间切换
来使用。
滑动设备选择开关,将设备从 ”PC1" 更
改为 "PC2"。
当设备连接时,配对灯亮起约三秒。
4
「上一頁」鍵
3
滾輪
可在網頁瀏覽器操作「上一頁」。
5
「下一頁」鍵
可在網頁瀏覽器操作「下一頁」。
6
配對指示燈/電源指示燈
1
左鍵
2
右鍵
當滑鼠處於配對待機狀態時,滾輪下面的光線
便會閃紅燈。
開啟(ON)電源時,滾輪周圍會亮紅燈一定時
間。使用時,若電池殘餘電量變少,就會閃爍
紅燈。
7
裝置選擇開關
8
光學式感應器
9
配對鍵
10
電源開關
11
電池蓋
12
電池收納部位
13
電池取出膠片
本產品可搭配兩台藍牙裝置使用;您可
透過切換進行選擇。
滑動裝置選擇開關,將裝置自「PC1」變
更為「PC2」。
裝置連線後,配對指示燈會亮起約三秒
鐘。
4
Tombol "kembali"
3
Roda
Anda dapat melakukan pengoperasian
"Kembali" dalam browser web.
5
Tombol "maju"
Anda dapat melakukan pengoperasian "Maju"
dalam browser web.
6
Lampu penyandingan/Lampu indikator daya
1
Tombol kiri
2
Tombol kanan
Lampu di bawah roda akan berkedip merah saat
mouse dalam keadaan siaga untuk penyandingan.
Apabila daya dalam posisi ON, lampu di bawah
roda akan menyala merah selama beberapa saat.
Lampu akan berwarna merah apabila daya baterai
mulai melemah.
7
Tombol seleksi moda daya
8
Sensor optik
9
Tombol memasangkan
10
Pengalih daya
11
Tutup baterai
12
Kompartemen penyimpanan baterai
13
Lembar pencopotan baterai
Produk ini dapat digunakan dengan dua perangkat
Bluetooth dengan saling berganti antara mereka.
Geser tombol pilihan perangkat untuk
beralih dari perangkat "PC1" ke "PC2".
Jika perangkat berhasil terhubung, lampu
penyandingan akan menyala selama tiga detik.


