Logik L2STB11, Instruction Manual
The Logik L2STB11 Instruction Manual is a comprehensive guide for operating your Logik L2STB11 product efficiently. This manual, available for free download at manualshive.com, contains in-depth instructions and troubleshooting tips to ensure optimal performance. Get the most out of your Logik L2STB11 with this user-friendly manual.
Share
Download


Reviews:
No comments
Related manuals for L2STB11

DMS1004HDHM
Brand: Crescent Pages: 13
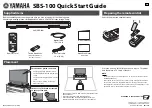
SBS-100
Brand: Yamaha Pages: 2

Xpresionn 2000
Brand: ENERGY SISTEM Pages: 26

2721W
Brand: ADB Pages: 12

PLUS BOX
Brand: UniFi Pages: 16

HDSTB100
Brand: Palsonic Pages: 24

RollingStream MC1088H
Brand: UTStarcom Pages: 26

2025-CP
Brand: Shakespeare Electronic Pages: 2


