background image

Strip Linear 

Econolume Series (8ft)

Installation Instructions

LITELUME™ seeks to deliver the most advanced and efficient LED technology. Due to 
technology progression, specifications may change. We reserve the right to update product 
specifications without notice. Contact LITELUME™ for the most up-to-date data.

www.litelume.com
[email protected]
833.LED.LUME

Page 1/4

Rev Date: 08/23/2018

©Lite Lume Corporation 2018

 Warning

1. To avoid electric shock, disconnect power at source prior to installation.
2. The installation should be performed by qualified electricians or lighting technicians.
3. Before conducting any installation, maintenance, or removal, disable all power to the luminaries and wait until the fixture cool 

down.

4. Do not touch the fixture while it is in service.
5. If there is any problem with the fixture, DO turn off power and DO NOT attempt repair unless you are a qualified technician or 

the customer service member.

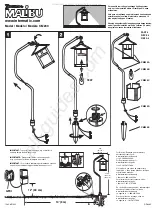
Surface Mount Installation

1. Unscrew the 4pcs screws on the back box of the luminaire or the luminaire base.

Luminaire Base

Screw(4Pcs)

2. Disconnect the wire plug to start installation.

Luminaire Base

Plug

Lensand Metal Lens
Frame Assembly

Summary of Contents for Econolume Series

Page 1: ... installation 2 The installation should be performed by qualified electricians or lighting technicians 3 Before conducting any installation maintenance or removal disable all power to the luminaries and wait until the fixture cool down 4 Do not touch the fixture while it is in service 5 If there is any problem with the fixture DO turn off power and DO NOT attempt repair unless you are a qualified ...

Page 2: ...ecifications without notice Contact LITELUME for the most up to date data www litelume com info litelume com 833 LED LUME Page 2 4 Rev Date 08 23 2018 Lite Lume Corporation 2018 3 Install and lock the mounting plate on the luminaire base following the arrow L NGND DIM DIM 4 Connect the AC wires and dimming wires Wire box in the celling 5 After wire connection complete Fix the screws on the ceiling...

Page 3: ...ecifications without notice Contact LITELUME for the most up to date data www litelume com info litelume com 833 LED LUME Page 3 4 Rev Date 08 23 2018 Lite Lume Corporation 2018 6 Align the holes of the fixture with the screws one the ceiling and slide it to the side to lock the fixture Wire box in the cellingc elling Chain Mount Installation 1 Clip the aircraft cable into the planned holes 2 Adju...

Page 4: ... and dimming wires L N GND DIM DIM 4 Wrap the wires with metal conduit Metal Hose Wiring Diagram For 0 10V Dimming Version please refer to wiring diagram below LIGHT FIXTURE Cleaning and Maintenance CAUTION Be sure the fixture temperature is cool enough to touch Do not clean or maintain while fixture is energized 1 Clean glass lens with non abrasive glass cleaning solution 2 Do not open the fixtur...

Reviews: