

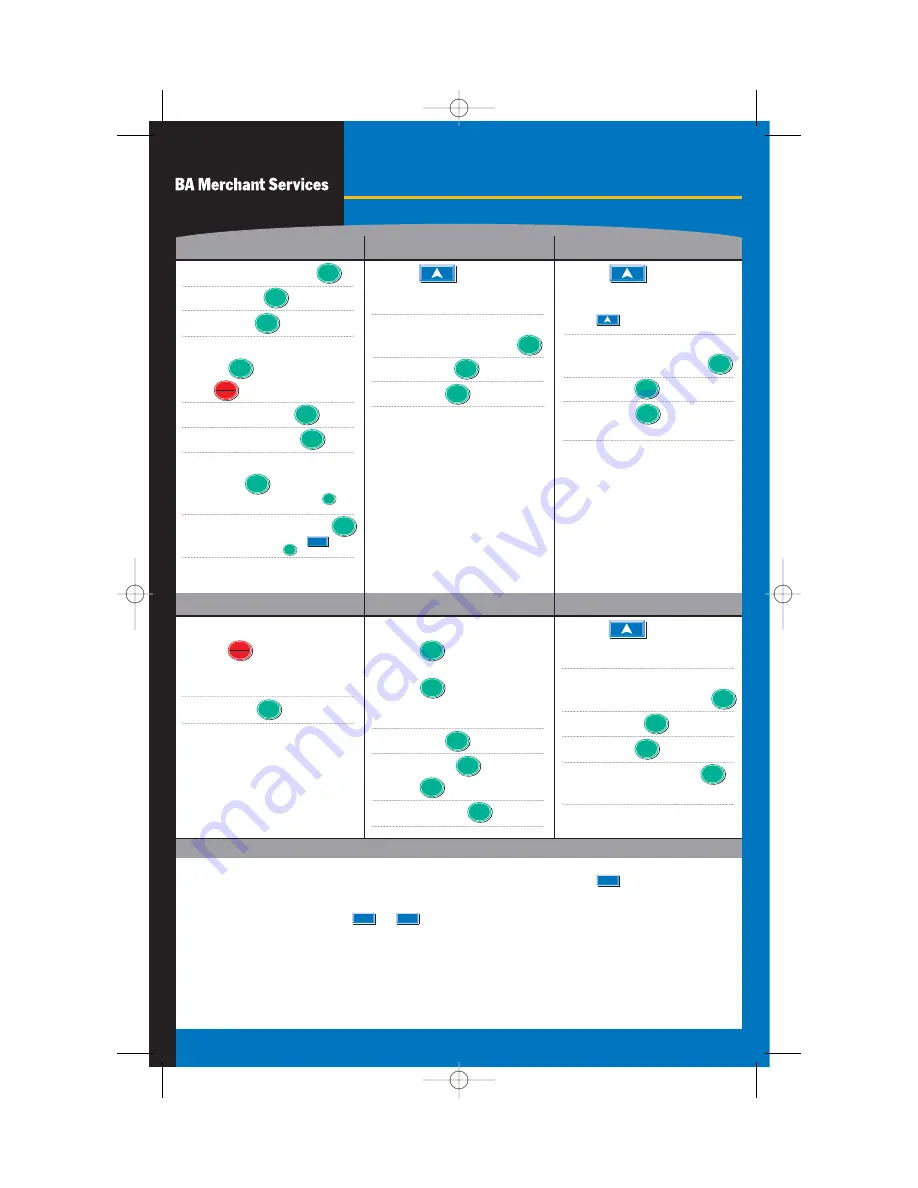
Credit Card Sale
Debit Sale
Forced Sale
›
Swipe Card
›
Press for Credit Card
if Prompted, or Skip to Next
Step
›
›
Swipe Card
›
Press for Debit Card
Or
›
Press
Until Debit...Sale Appears on
the Screen Then Swipe Card
›
›
Cash Back +
›
Press if No Cashback
›
PIN
›
Press
Until Credit...Forced
Appears on the Screen
›
Swipe Card
Or
Enter Acct
›
Exp. Date +
›
›
Enter Auth
NOTE:
* CVV2 (also CVC2 and CID) codes are often requested for manually entered transactions. These codes normally appear on the
back of the card as the last three digits on the right of the signature panel, directly below the mag stripe.
Use numbers only for street address.
-
Terminal will prompt for Clerk ID and invoice number if those options are activated.
›
Press
Until Credit...Return
Appears on the Screen
›
Swipe Card
Or
Enter Acct
›
Exp. Date +
›
›
Enter Acct
›
Exp. Date +
›
Card Present?
›
Press for Yes
›
Or
for No
›
Enter Zip Code +
›
Street Address
+
›
Enter CVV2, CVC2, or CID
Code* +
›
Enter Order Number* +
Manual Credit Card Sale
Credit Card Refund
Voids
R
ETAIL
Enter
Paymt
Menu
Cancel
Enter
Paymt
Enter
Paymt
Enter
Paymt
Enter
Paymt
Enter
Paymt
Enter
Paymt
If code is not known or not present, press
and choose the appropriate numeric response.
*These items above prompt if the card is not present. Discover
cards will prompt when the card is present as well. The AVS
and CVV2 or CID response will print on the receipt.
Enter
Paymt
Enter
Paymt
Enter
Paymt
›
Press
Until Credit...Void/Sale
Appears on the Screen
›
Swipe Card
Or
Enter Acct
›
Exp. Date +
›
Enter
Paymt
Enter
Paymt
Enter
Paymt
The terminal will look for a transaction that matches the data
entered to VOID, or it will read. “Trans not found” if no match.
Enter
Paymt
Enter
Paymt
Enter
Paymt
Enter
Paymt
Enter
Paymt
Enter
Paymt
Use the six digit authorization number previously obtained
for this transaction. The receipt will read “Ticket Only”.
Enter
Paymt
Enter
Paymt
Enter
Paymt
Enter
Paymt
Enter
Paymt
Menu
Cancel
Enter
Paymt
Press
again to VOID a Return, or again
to VOID a Forced Sale.
The Nurit 8000 is a wireless terminal with an internal radio antenna and battery pack. The terminal will turn itself off if idle for more
than one minute to conserve the battery power. To turn the terminal back on, press and hold down
for two seconds. To charge
the battery, plug the terminal into a standard power outlet using the power pack provided. It is recommended that the terminal be
charged for 12 hours upon receipt, and about two hours for recharges.
To manually turn the terminal off, press and at the same time.
There is a battery status graphic in the lower left corner of the screen. A radio connection and signal strength indicator is in the
lower right corner. When first powered on, this will say “RAD FAIL.” After a radio connection is made (5-40 seconds) a number
should display here to indicate the strength of the connection. A signal of at least 14 is recommended.
On/Off
F
On/Off
Enter
Paymt
Enter invoice number or just press the key
and then press the key.
1
Enter
Paymt
Quick Reference Guide
Nurit 8000
05BAM066_N8000.Ret.B.1.Doc 4/18/05 3:18 PM Page 1


