

www.lightware.eu
Firmware version: 1.2.0b5
For technical support contact [email protected]
Document revision: 2.0
MODEX Extender Family
Quick Start Guide
Introduction
Thank you for choosing MODEX, Lightware’s Modular Extender family. The MODEX family is
a hybrid, modular and multi-layer group of extenders supporting AV and broadcast industry’s
formats. Capable of extending digital and analog audio and video, USB KVM, Ethernet and
control signals like RS-232, RS-422 or Infrared.
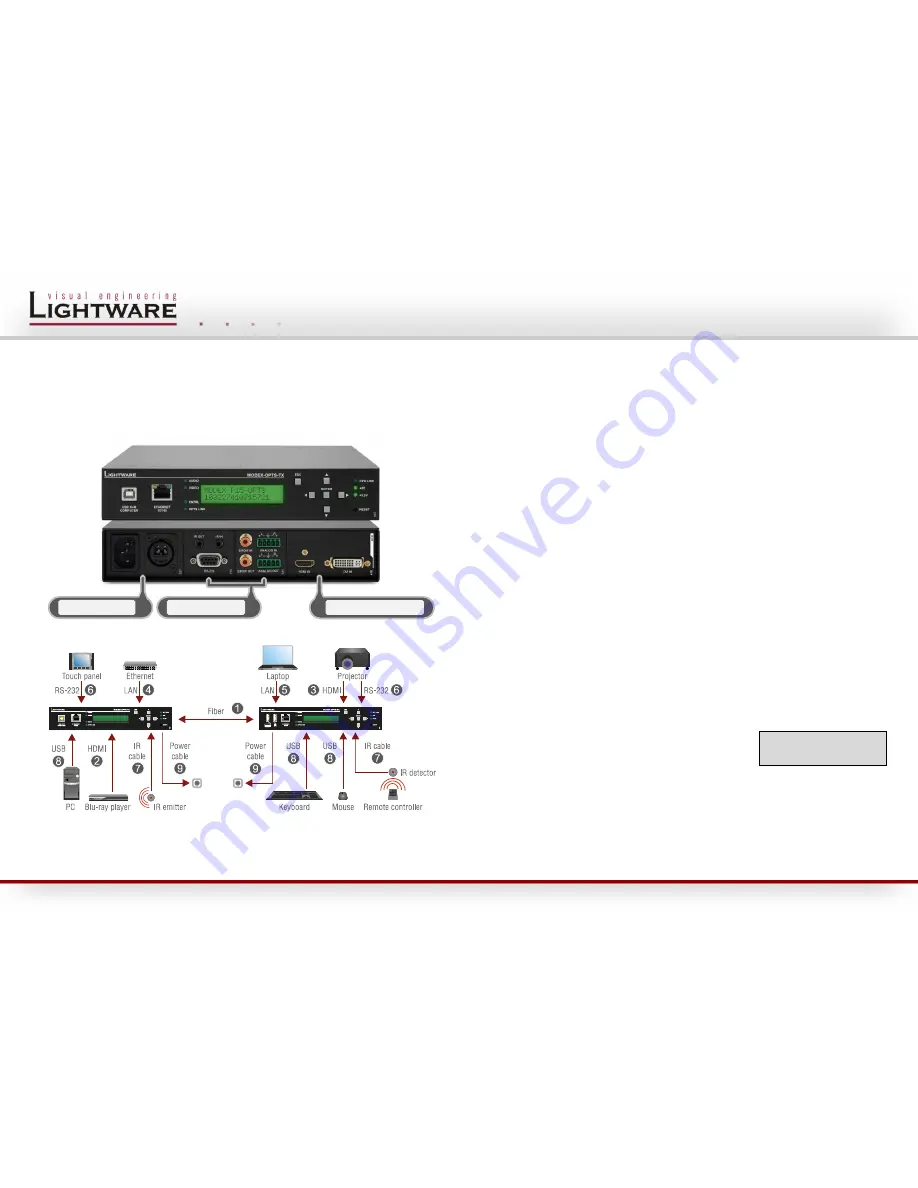
Front and rear view (transmitter)
Installation
Connecting steps
1.
Connect the transmitter and the receiver by a multi- or single mode fiber cable. Connect
channel A on transmitter to channel B on receiver.
2.
Connect a DVI or HDMI source to the transmitter's DVI or HDMI INPUT connector.
3.
Connect a DVI or HDMI sink (e.g. projector) to the receiver's DVI or HDMI output.
4.
To control the extenders connect the transmitter or the receiver to Ethernet.
5.
Optionally connect Ethernet devices to the available RJ45 connector(s) of the extender(s). All
connected devices will work as if they are connected to the same network.
6.
Optionally for RS-232 extension:
▪
Connect a controller unit (e.g. Touch panel) to the RS-232 port of the transmitter with a
null modem serial cable.
▪
Connect a controlled device (e.g. Projector) to the RS-232 port of the receiver with a
regular serial cable.
7.
Optionally for Infra-Red extension:
▪
Connect the supplied IR emitter to the IR OUT port of the transmitter or receiver.
▪
Connect the supplied IR detector to the IR IN port of the transmitter or receiver.
8.
Optionally for USB HID extension:
▪
Connect a USB HID device to the receiver.
▪
Connect the transmitter to the computer by the USB-B cable.
9.
Power on the devices.
Video input selection
If the Audio & Video module contains more video connectors, the desired input can be selected
via the front panel menu. Navigate to the Modules/Video/Settings/Input port submenu and
press the enter button. The available video ports are listed, select the desired one and press
the enter button.
Info: The input can be also selected by using the built-in web or sending an LW3 command.
Set static IP address
The IP address of the extender can be also set from the front
panel. Firstly navigate to the Settings/Network settings/DHCP
submenu and press the enter button. If the setting is Enabled
change it to Disabled and press the enter button. Press the Escape button twice and apply the
settings by the enter button.
Secondly navigate to the Settings/Network settings submenu, and select the IP address,
Subnet mask, Static gateway options. Set the parameters by the front panel buttons according
to your Network requirements. Press the Escape button twice and apply the settings by the
enter button.
1
Media connector
2
Interface modules
3
Video & Audio module
¹Network SettinÞ
¾IP Address º


