background image

P/NO. :  MFL69325402(1506-REV00)

Printed in Korea

Please read these safety precautions carefully before using the product.

■ Make sure to connect the power cable a grounded outlet.

  - You may be electrocuted or injured.
■ Use the rated voltage only.

  - The product can be damaged, or you may be electrocuted.
■ During a thunder or lightning storm, unplug the power cable or signal cable.

  - You may be electrocuted or a fire can break out.
■  Do not touch the power plug with wet hands. Additionally, if the cord pin is wet or covered 

with dust, dry the power plug completely or wipe dust off.

  - You may be electrocuted due to excess moisture.
■  Do not insert a conductor (like a metal chopstick) into one end of the power cable while 

the other end is connected to the input terminal on the wall. Additionally, do not touch the 

power cable right after plugging into the wall input terminal.

  - You may be electrocuted.
■ The appliance coupler is used as the disconnect device.
■  Risk of explosion if battery is replaced by an incorrect type. Dispose of used batteries 

according to the instructions.

Safety Precautions

Mini-PC for Signage

PC100/PC200/PC700

Easy Setup Guide

Please read this guide carefully before using this product and keep it for future reference.

Please record the model number and serial number of the product on this guide. You will 

need to provide this information (if applicable) when you require service.

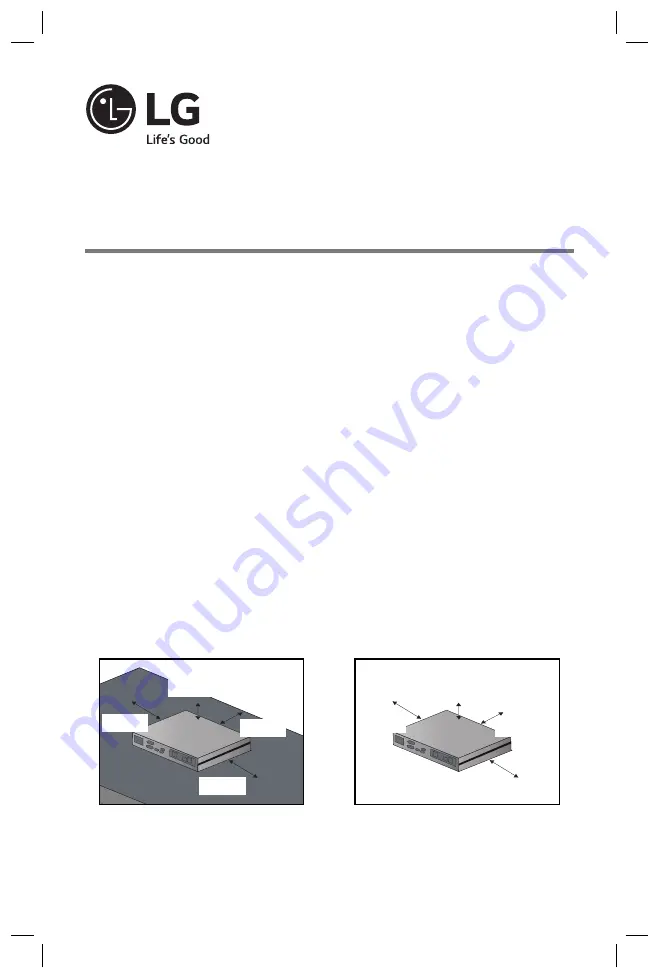
Installation Environment of Mini-PC for Signage

Leave at least 10 cm of space at each side of the product from an obstacle when installing 

the product to ensure sufficient ventilation.

< Install Mini-PC for Signage Attached 

to Monitor >

< Install Mini-PC for Signage>

10 cm

10 cm

10 cm

10 cm

10 cm

10 cm

10 cm

10 cm

*MFL69325402*

Summary of Contents for PC100

Page 1: ...n the wall Additionally do not touch the power cable right after plugging into the wall input terminal You may be electrocuted The appliance coupler is used as the disconnect device Risk of explosion if battery is replaced by an incorrect type Dispose of used batteries according to the instructions Safety Precautions Mini PC for Signage PC100 PC200 PC700 Easy Setup Guide Please read this guide car...

Page 2: ...ower Cable RS 232C Cable Rail x 2 M3 L12 x 4 for attachment of Box Guide on the monitor Handle x 2 M3 L8 x 8 for attachment of handle Owner s Manual Cards SuperSign software and manual Downloading from the LG Electronics website Visit the LG Electronics website http www lgecommercial com supersign and download the latest software for your model Depending on the model this feature may not be suppor...

Page 3: ...product with your monitor in order to ensure the correct results Warning Be careful of sharp edges on the rail and the handle Fixing the product with non standard screws may cause damage or the product to fall down LG Electronics is not liable for any accidents relating to the use of non standard screws Do not over tighten the screws as this may cause damage to the product and void your warranty T...

Page 4: ...low use screws to secure the Box Guide in the four tap holes at the back of the monitor 5 Attach the Box Guide to the rail slots and press it upward 6 Use screws to secure the product and the Box Guide as shown below ...

Page 5: ...ot available when only the D SUB cable is connected to the monitor A LINE OUT cable must be connected for audio output to function D sub cables are also known as RGB cables Note MIC IN P W DP MIC IN P W DP MIC IN P W DP MIC IN P W DP 2 Connect the D sub port of PC100 and RGB IN port of the monitor with a D sub cable MIC IN P W DP MIC IN P W DP MIC IN P W DP MIC IN P W DP ...

Page 6: ...P MIC IN P W DP MIC IN P W DP 5 Connect a LAN cable to the PC100 4 Connect the PC100 to the monitor with a LINE OUT cable MIC IN P W DP MIC IN P W DP MIC IN P W DP MIC IN P W DP MIC IN P W DP MIC IN P W DP MIC IN P W DP MIC IN P W DP MIC IN P W DP MIC IN P W DP MIC IN P W DP MIC IN P W DP ...

Page 7: ...Microsoft Windows Embedded Standard the operating system of the PC100 To connect and disconnect the HDMI audio device see the Connecting Disconnecting HDMI Audio Device in Windows section of this document HDMI connections allow digital video and audio signals to be transferred with one cable HDMI cable connections do not require an additional audio in cable Attention MIC IN P W DP MIC IN P W DP MI...

Page 8: ...nnect a LAN cable to PC100 3 Connect PC100 OUT to the monitor IN with an RS 232C cable MIC IN P W DP MIC IN P W DP MIC IN P W DP MIC IN P W DP MIC IN DP MIC IN P W DP MIC IN P W DP MIC IN P W DP MIC IN P W DP ...

Page 9: ... port When connecting the DP DisplayPort cable use the standard cable Using a non standard cable may cause a malfunction Attention 1 Connect the appropriate power cables to a monitor and PC100 respectively 2 Connect PC100 to the monitor via a DP cable MIC IN P W DP MIC IN P W DP MIC IN P W DP MIC IN P W DP MIC IN P W DP MIC IN P W DP D ...

Page 10: ...0 to the monitor with a LINE OUT cable MIC IN P W DP MIC IN P W DP MIC IN P W DP MIC IN P W DP MIC IN P W DP MIC IN P W DP MIC IN P W DP MIC IN P W DP MIC IN P W DP MIC IN P W DP 5 Connect a LAN cable to PC100 MIC IN P W DP MIC IN P W DP MIC IN P W DP MIC IN P W DP P W MIC IN P W DP ...

Page 11: ...without prior notice for quality improvement 0 288 kg PC200 Owner s Manual Cards screw x 2 SuperSign software and manual Downloading from the LG Electronics website Visit the LG Electronics website http www lgecommercial com supersign and download the latest software for your model Depending on the model this feature may not be supported Note ...

Page 12: ...e fully inserted into the insertion direction Hit by hand carefully to make fully connected Note 1 Remove the screw metal cover 2 Attach the product to the rail slots and press it upward 3 Use screws to secure the product and the product as shown below ...

Page 13: ... illustrations may differ from your product and are subject to change In some countries a Y type cable may be provided instead of the power cord Always use genuine components to ensure safety and product life Any damages or injuries by misuse or using an improper accessory are not covered by the warranty Attention Optional Items M 3 0 mm x Pitch 0 5 mm x Length 6 0 mm X 4ea PC700 Power Cable Owner...

Page 14: ...ith the screen facing downward Push the PC700 into the compart ment to mount it 2 Secure the PC700 to the set using the four screws provided PC700 Monitor Integration WS50 LT55A Models Be careful of sharp edges on the rail and the handle Attaching the product with non standard screws may cause damage or the product to fall down LG Electronics is not liable for any accidents relating to the use of ...

Page 15: ...F Model Attention Be careful of sharp edges on the rail and the handle Attaching the product with non stand ard screws may cause damage or the product to fall down LG Electronics is not liable for any accidents relating to the use of non standard screws Do not over tighten the screws as this may cause damage to the product and void your warranty Attention 1 Place a soft cloth on the table and put ...

Page 16: ...70MS Model Attention Be careful of sharp edges on the rail and the handle Attaching the product with non standard screws may cause damage or the product to fall down LG Electronics is not liable for any accidents relating to the use of non standard screws Do not over tighten the screws as this may cause damage to the product and void your warranty Attention 1 Place a soft cloth on the table and pu...

Page 17: ...s complete assign the SET ID of the monitor to be connected to PC700 To configure the SET ID please refer to the owner s manual for your monitor Attention 2 Connect PC700 to a monitor with an RGB cable 1 Connect the appropriate power cables to a monitor and PC700 respectively Connecting a Monitor with an RGB Cable PC700 In Out Cable Connection ...

Page 18: ...18 4 Connect PC700 OUT to the monitor IN with an RS 232C cable 3 Connect the PC700 to the monitor with a LINE OUT Audio Out cable AUDIO IN AUDIO IN ...

Page 19: ...19 PC700 5 Connect a LAN cable to PC700 ...

Page 20: ... a Monitor with DP Display Port Cable 2 Connect PC700 to the monitor via a DP cable 1 Connect the appropriate power cables to a monitor and PC700 respectively 3 Connect PC700 to the monitor IN with an RS 232C cable ...

Page 21: ...ultiple cables simultaneously and turn the product on video output is prioritized accordingly For DP output the screen is displayed only when the power is turned on after connecting the cables or when the cables are connected after the OS is booted Attention ...

Page 22: ......

Page 23: ......

Page 24: ......

Reviews: