

Indoor Plug-In Timer
Cat. No. LT111 - Standard - 500W Tungsten, 10A Resistive / 5A Inductive, 1/3 HP - 120V, 60Hz
Cat. No. LT112, LT113 - Advanced - 1000W Tungsten, 15A Resistive/Inductive, 5A Fluorescent, 1/2 HP - 120V, 60Hz
Cat. No. LT114 - Table Top - 300W Tungsten, 8.3A Resistive/Inductive, 1/3 HP - 120V, 60Hz
WARNINGS AND CAUTIONS:
• To be installed and/or used in accordance with appropriate electrical codes and regulations.
• Unplug unit when servicing connected devices.
• These timers are for
indoor use only
.
• Not for use with devices that can overheat if inaccurately timed. Death, injury or property damage could result from such improper use.
• Plug timer into
receptacle only
.
INSTRUCTIONS
English
PK-93694-10-00-2A
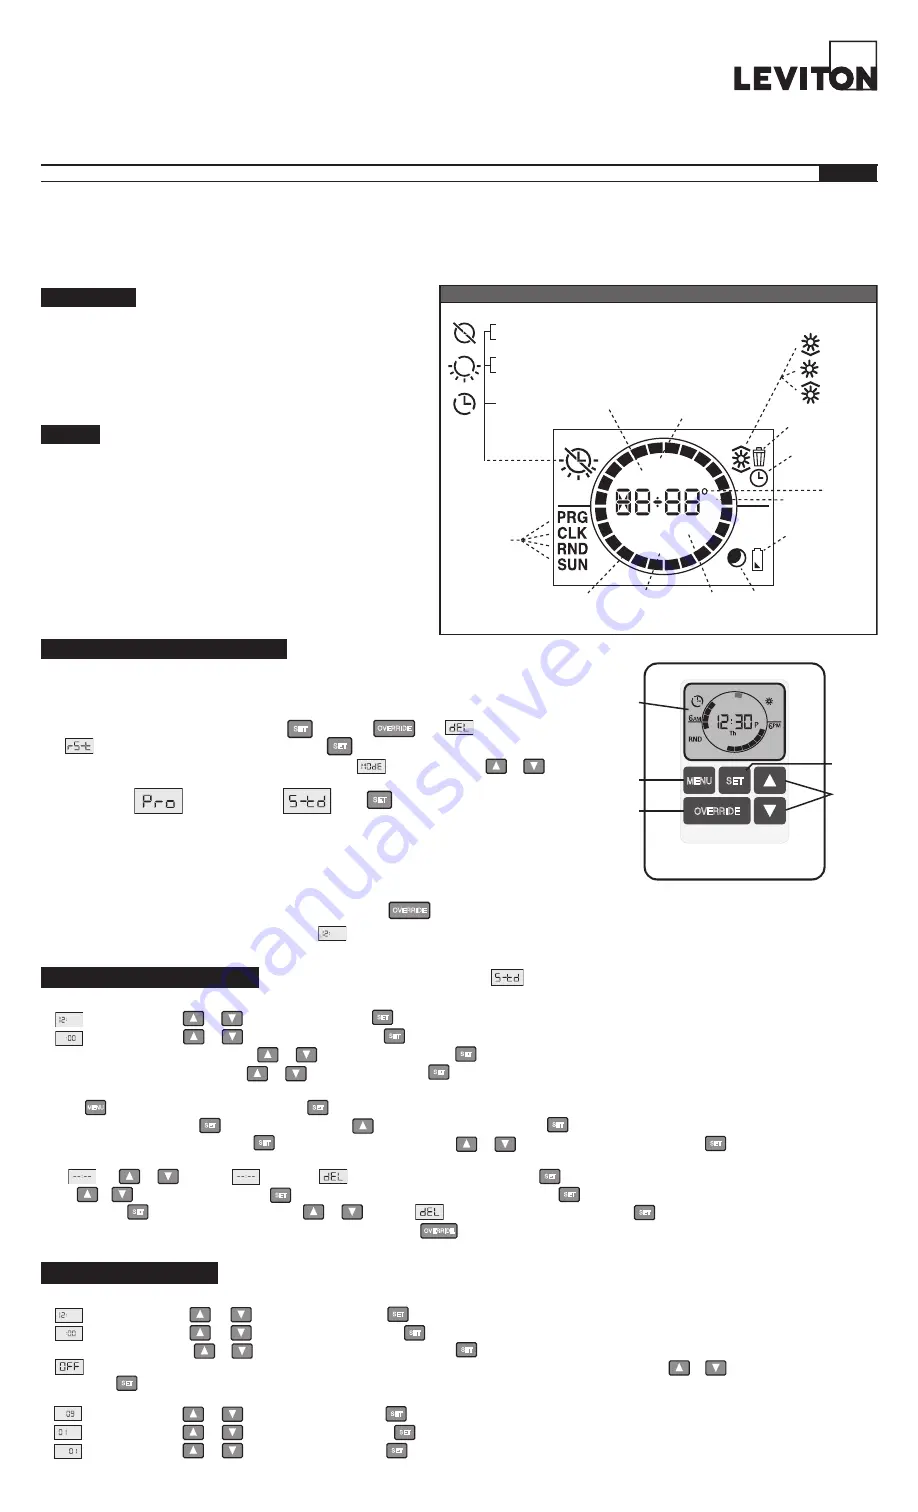
• The illustration ICON DEFINITIONS shows all of the icons found on Cat. Nos.
LT112 and LT113. Cat. Nos. LT111 & LT114 (and LT112 and LT113
when used in
STD mode) only show the icons for the standard functionality.
• Only Cat. No. LT112 & LT113 have the
Random Mode
,
Daylight Savings Time
Option
and
Automatic Sunup/Sundown
control.
•
Timer Schedule at a Glance will allow you to quickly see your timers ON/OFF
settings for the day. The displayed segments represent the time(s) your load will
be on. The segment representing the current time will be flashing.
Introduction
• will be flashing. Use or to choose the year and press to confirm your choice.
• will be flashing. Use or to choose the month and press to confirm your choice
• will be flashing. Use or to choose the date and press to confirm your choice.
The day of week will automatically adjust.
SET
SET
SET
Setting up the Time, Daylight Savings Time Option and the Date:
•
will be flashing. Press
or
to select the hour and press
to confirm your choice.
•
will be flashing. Press
or
to select the minutes and press
to confirm your choice.
•
A
or
P
will be flashing. Press or to select
A
for
AM
or
P
for
PM
and press to confirm your choice.
•
will be flashing. Set the daylight savings time mode to
OFF
or
AUTO
(for auto adjustment of daylight savings time) by using or to choose daylight savings time
option. Press to confirm your choice.
NOTE: Daylight Savings Time shall start at 2am on the 2nd Sunday of March (add 1 hour) and end at 2am on the 1st Sunday of November
(subtract 1 hour).
SET
SET
SET
SET
A
A
Programming Pro Mode
- Cat. Nos. LT112, LT113
Permanent override ON (schedule at a glance not available)
6
PM
Event
A
MTWThFSaSu
Offset
P
6
AM
Delete
ICON DEFINITIONS
Setting Timed
Events
Day time
Sun down
Sun up
Night time
Timer Mode
DST
Daylight
Savings Time
Event number
AM or PM
Longitude/
Latitude
degrees
Battery power
(No AC power)
Programming
Menus
Days of
the week
Offset of
astronomic clock
Timer schedule
at a glance
Permanent override OFF (schedule at a glance not available)
Temporary override OFF (when flashing)
Temporary override ON (when flashing)
Before Programming your Device
NOTE: The timer programming can be performed holding the timer in your hand, while operating on
battery power.
Remove the battery door and remove the plastic shield from the battery. Slide the battery
housing back into the device.
Pro Mode provides up to 50 ON/OFF events for any day or combination of days, M-Su, M-F
,
or
Sa-Su at desired fixed times or self adjusting Sunup
and
Sundown times. In this mode self
adjusting
Daylight Savings Time and random modes are also available.
Std Mode provides up to 3 ON/OFF events for M-Su
,
M-F
, or
Sa-Su at desired fixed times only.
Self adjusting
Sunup
and
Sundown
and
Daylight Savings Time are NOT available in Standard Mode.
To exit programming at any time press the OVERRIDE button -
OVERRIDE
Perform a
SYSTEM RESET by pressing and holding followed by until stops flashing
and begins to flash (approximately 5 seconds). Press to confirm
SYSTEM RESET.
NOTE: For Cat. Nos. LT112 & LT113, once the self test is complete will be flashing. Use or
to choose which mode is best for your application:
Pro mode
or
Standard mode
Press and
continue on to the
Programming Mode section for your device.
OVERRIDE
SET
SET
SET
A
For Cat. Nos. LT111 & LT114, once the self test is complete will be flashing. Continue on to the
Programming Standard Mode section for your device. NOTE: While
programming there are two ways to scroll through the choices; you can either continuously press an arrow button or press and hold an arrow button to progress rapidly.
MENU
OVERRIDE
SET
Arrow
Buttons
Display
Menu
Button
Set
Button
Override
Button
Battery
• The battery compartment is located in the back of the Timer. To replace the
battery, remove the battery from the back of the device by pressing the top of the
battery clip down and sliding out the battery housing. When replacing the battery,
ensure that the polarity of the battery is correct (the
+
side of the battery should
be facing the
+
side of the battery holder). When the battery housing door is flush
with the back housing, slide the lock up until you hear an audible click. This door
lock prevents the battery from dislodging in the event the device is dropped.
• Use CR2016 Lithium Ion battery for replacement. DO NOT replace with any other
battery type.
• To save battery life when storing the timer for an extended period of time, rotate
the battery so the
+
side of the battery is opposite the
+
side of the battery
holder. Programmed events will be retained.
• The battery icon will be lit when the timer is operating on battery power. It will
blink when the battery needs replacement.
To set the clock:
• will be flashing. Use or to choose the hours. Press to confirm your choice.
• will be flashing. Use or to choose the minutes. Press to confirm your choice.
•
A
for
AM
or
P
for
PM
will be flashing. Use or to choose the
A
or
P
. Press to confirm your choice.
• The day of the week will be flashing. Use or to choose the day. Press to confirm your choice.
SET
SET
SET
SET
A
To set ON/OFF Events:
• Press until
PRG is in the lower left corner. Press to enter the programming mode.
•
Event 1 will be flashing. Press to choose this event or use to move to the next event and press to confirm your event number choice.
• All days of the week will be flashing. Press to choose all days of the week or use or to scroll through
M-F
and
Sa-Su. Press to confirm your days of the
week choice and continue to program the event
ON TIME
.
• At use or to choose for time, or to delete an existing program and press to confirm your choice.
• Use or to choose the hour and press to confirm your choice. Do the same for minutes and press to confirm your choice. Continue to program the event
OFF TIME
.
• At
6:00P press to choose the OFF TIME or use or to choose to delete an existing program and press to confirm your choice.
• Continue to set desired events in the same manner. When you are done press to escape out of programming. If no buttons are pressed after approximately 30 seconds
the device will automatically exit out of programming mode.
SET
SET
SET
SET
SET
SET
SET
SET
SET
SET
MENU
OVERRIDE
A
Programming Standard Mode
- Cat. Nos. LT111, LT114 (and LT112, LT113 in mode)


