Congratulations on choosing the Lane Corvan Entrance Lock Set. Please take a few minutes
to read through these installation instructions prior to attempting installation. These few minutes
invested in familiarising yourself with this lock set, could save you money and time later if you
install incorrectly.
When you remove your Lane Corvan Entrance Lock Set from the pack, you will notice that the levers are preset set in one
direction. This preset set direction or “handing”, may not be suitable for your installation requirements. If this handing is not
correctly suited to your installation requirements, please view the next section on “Handing your Trim Set”.
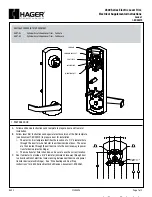
HANDING YOUR TRIM SET
Put simply, handing is the side of the door you wish
to install the trim set, so that it correctly aligns with
the locking function. To correctly determine the handing,
refer to the handing diagram to the right.
Example: If you are standing outside the home and the door opens away from you ie: Opens into the home and the hinges are
on the right side of the door, then you hand your external side trim set to the left side handling indicator ‘L’. Using this example,
you can determine from the above diagram the handing for inside and outside installations.
SETTING THE HANDING
The trim plates supplied are
designed to fit back to back on the
door. On the under side of each trim
plate is printed “
inside plate
” or
“
outside plate
”. The inside plate is
installed to the inside of the door, the
side that faces into the home, the
outside plate is installed externally.
In this instance the trim plate is left
handed, this is because the lever is
pointing to the side marked ‘L’.
To change handing, simply undo and
remove the screw that holds the lever
handing stopping block.
Remove the lever handing stopping
block, this will allow the lever to be
handed in the opposite direction.
You may need to pull down slightly
on the lever to assist removing the
stopping block.
To change the lever handing, rotate
the lever around to the opposite side,
remembering to pass over the top of
the trim plate as shown.
Once the handing is complete,
reverse the lever handing stopping
block, so that the ‘L’ shaped
locking plate locks down behind
the cam assembly, preventing the
lever from being rotated back to
it’s original position.
Replace and tighten the screw that
holds the lever handing stopping
block and the change of handing is
now complete. This process is
required on both the inside and
outside trim plates, if initial preset
set handing is not suitable.
PREPARING THE DOOR FOR INSTALLATION
Because Corvan comes in a number of different
locking applications, only use the template
supplied with the lock you purchase.
There are different templates with each of the
different Corvan Lock types. Using the wrong
template will make installation virtually impossible
and void any warranty.
MC 2840
DOOR STRIKE
DOOR STRIKE
HANDING DIAGRAM
HANDING DIAGRAM
Corvan
™
Entrance Lock Set
2840 ITW Corvan Entrance Lock Set Handing Instructions:Layout 1 6/5/09 1:56 PM Page 1