Battery
Cover
INSTANT TRANSMISSION
is the state-of-the-art new
wireless transmission technology, exclusively designed and
developed by LA CROSSE TECHNOLOGY.
INSTANT
TRANSMISSION
offers you an immediate update
(
every 4 seconds
!) of all your outdoor data measured from
the transmitters: follow your climatic variations in real-time!
This product
offers:
INTRODUCTION:
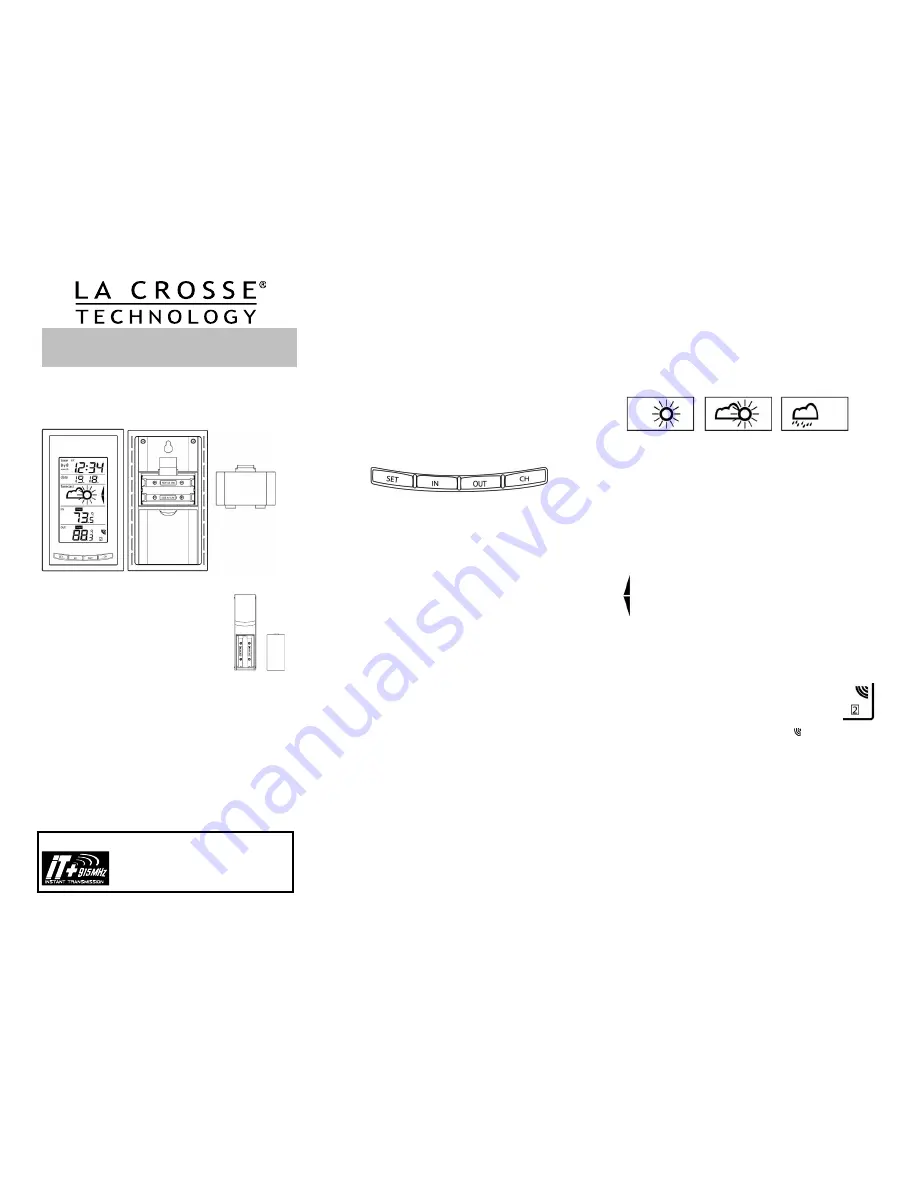
The Wireless Forecast Station features radio-controlled time, date, forecast
icons, indoor temperature and outdoor temperature on a stylish display.
WIRELESS FORECAST STATION:
SETUP INSTRUCTIONS STEP BY STEP:
Step 1:
Remove battery cover from the outdoor transmitter.
Slide the battery cover down and lift off the back of
the transmitter
Insert 2 NEW AA batteries (not included) into the
TX29U-IT transmitter. Observe the correct polarity.
Keep the Forecast Station and transmitter within 10
feet during setup (15 minutes).
Step 2:
Remove battery cover from Forecast Station: insert a solid object in the
space provided at the upper-central position of the battery cover, then push
down and pull out to remove the battery cover.
Insert 2 NEW AA batteries (not included) into the back of the Forecast
Station. Observe the correct polarity (see marking inside the battery
compartment).Do NOT mix old and new batteries.
The Forecast Station will display, time (12:00) and indoor temperature.
Within 3 minutes the Outdoor temperature should be displayed.
Trouble shooting:
After 3 minutes, if the Outdoor temperature does not show up in the
designated area on the Forecast Station, remove batteries from both units
and start the setup process again.
For optimal reception performance, of the 915MHz signal, the outdoor
transmitter should be placed within 330 feet (100 meters) from the Forecast
Station.
WWVB RADIO CONTROLLED TIME
The NIST radio station, WWVB, is located in Ft. Collins, Colorado and
transmits the exact time signal continuously throughout the United States at
60 kHz. The signal can be received up to 2,000 miles away through the
internal antenna in the Forecast Station. However, due to the nature of the
Earth’s Ionosphere, reception is very limited during daylight hours. The
Forecast Station will search for a signal every night when reception is best.
The tower icon will show solid when the Forecast Station has received the
WWVB signal.
No tower icon displayed. The Forecast Station was unable to receive a
signal at this time.
Reposition the Forecast Station for better signal reception or try again at
bedtime.
Note:
In case the Forecast Station is not able to detect the WWVB signal
(disturbances, transmitting distance, etc.); the time can be manually set by
following the
Program Menu
.
FUNCTION BUTTONS:
PROGRAM MENU:
The forecaste station has four function buttons on the front. The SET button
will move through the program menu. The IN or OUT button will change a
value. Press and release the SET button after each step to be moved to the
next step. Exit the programming mode at any time by pressing the CH
button.
CONTRAST:
Hold the SET button for five seconds. LCD and a number
from 0-7 will flash. To increase or decrease the contrast of the LCD
display, press and release the IN button. Press and release the SET
button to confirm and move to the next item.
TIME ZONE
: The Time Zone will flash, showing a number following by
the letter h. Use the IN to change the Time Zone.
Note:
North American
Time Zones are negative numbers: -4h Atlantic, -5h Eastern,-6h Central, -
7h Mountain, -8h Pacific, -9h Alaskan and -10h Hawaiian. Press and
release the SET button to confirm and move to the next item.
DAYLIGHT SAVING TIME:
DST will show with either
0
(Off) or
1
(On)
flashing. Most states use DST, so this should be set to 1. However if
your location does not use DST, use the IN button to turn it 0. Press and
release the SET button to confirm and move to the next item.
RADIO-CONTROLLED TIME:
RCC will show with ON or OFF flashing.
Use the IN button to set the RCC signal. Press and release the SET
button to confirm and move to the next item.
12/24-HOUR TIME MODE:
Either 12h or 24h will flash on the display.
Use the IN button to change from 12-hour to 24-hour time. Press and
release the SET button to confirm and move to the next item.
HOUR AND MINUTES:
The Hour and Minutes will flash. Use the
IN
button to advance the
Hour.
Use the
OUT
button to advance the
Minutes
. Press and release the SET button to confirm and move to the
next item.
YEAR:
The Year will flash. Use the IN button to set the year. Press and
release the SET button to confirm and move to the next item.
MONTH AND DATE:
The Month and Day will flash. Use the
IN
button to
advance the
Month
. Use the
OUT
button to advance the
Date
. Press and
release the SET button to confirm and move to the next item.
SNOOZE TIME:
Although numbers will flash, this feature is not used as
there is no alarm on this unit. Press and release the SET button to
confirm and move to the next item.
FAHRENHEIT OR CELSIUS: °F
or
°C
will flash. Use the IN button to
select your preference. Press and release the SET button to confirm and
move to the next item.
FORECAST SENSITIVITY:
Two air pressure tendency
arrows
will
appear and a number will flash under the forecast icon. Press and
release the IN button to select the desired forecast sensitivity setting. The
lowest number is used near the coastline, the highest number is for the
desert, and middle number is for everywhere else. Press and release the
SET button to confirm and exit.
WEATHER FORECAST ICONS:
The weather forecasting feature is estimated to be 75% accurate. The
weather forecast is based solely upon the change of air pressure over time.
In areas where the weather is not affected by the change of air pressure, this
feature will be less accurate.
There are 3 possible weather forecast icons that will be displayed :
Sunny
—indicates that the weather is expected to improve (not that the
weather will be sunny).
Sun with Clouds
—indicates that the weather is expected to be fair (not that
the weather will be sunny with clouds).
Clouds with Rain
—indicates that the weather is expected to get worse (not
that the weather will be rainy).
The weather icons change when the unit detects a change in air pressure.
The icons change in order, from “sunny” to “partly sunny” to “cloudy” or the
reverse. If the symbols do not change then the weather has not changed, or
the change has been slow and gradual.
Weather Tendency Arrows:
These arrows reflect current changes in the air pressure.
Up arrow:
indicates air pressure is increasing, weather expected to
improve or remain good.
Down arrow:
indicates air pressure is decreasing, weather is
expected to become worse or remain poor.
No arrow:
No arrow means the pressure is stable.
VIEW CHANNELS:
The Forecast Station can receive up to 3 outdoor transmitters. Extra TX29U-
IT transmitters may be found online or at your retailer. Additional transmitters
allow you to monitor remote temperature of up to 3 locations within a 330 Ft
wireless range of the Forecast Station.
Press and release the CH button to view a different channel. A
shift from one “boxed” number to the next should be observed
in the OUTDOOR LCD.
Note:
When only one transmitter is connected, you cannot see
other channels and the channel indicator will not show.
OUTDOOR TRANSMITTER RECEPTION ICON:
When the signal is successfully received from the outdoor transmitter, the
icon will be solid.
The icon will flash when searching for the outdoor transmitter signal.
If reception is not successful, the icon will not be shown in LCD.
MIN/MAX DATA:
View Indoor MIN/MAX Data:
Press and release the IN button to view the
Minimum, Maximum and Current Indoor Temperatures and humidity records.
The Time and Date will flash to show when the Minimum or Maximum
Temperature occurred.
Note
: The indoor Humidity is not time and date stamped.
Reset Indoor MIN/MAX Data:
Press and release the IN button to select the individual indoor Max or Min
record you wish to reset.
Hold the SET button for five seconds. The record is now reset to the
current
day's reading.
Wireless Forecast Station
Model WS-9077U-IT | Quick Setup Guide


