background image

Quick Set Up Manual – WS-2310 Weather Station 


Using cable connection or 433MHz for wireless transmission of weather data, this unique weather station can be powered 
using batteries or AC power (or both at the same time) for all your weather needs in the home or office. 
 

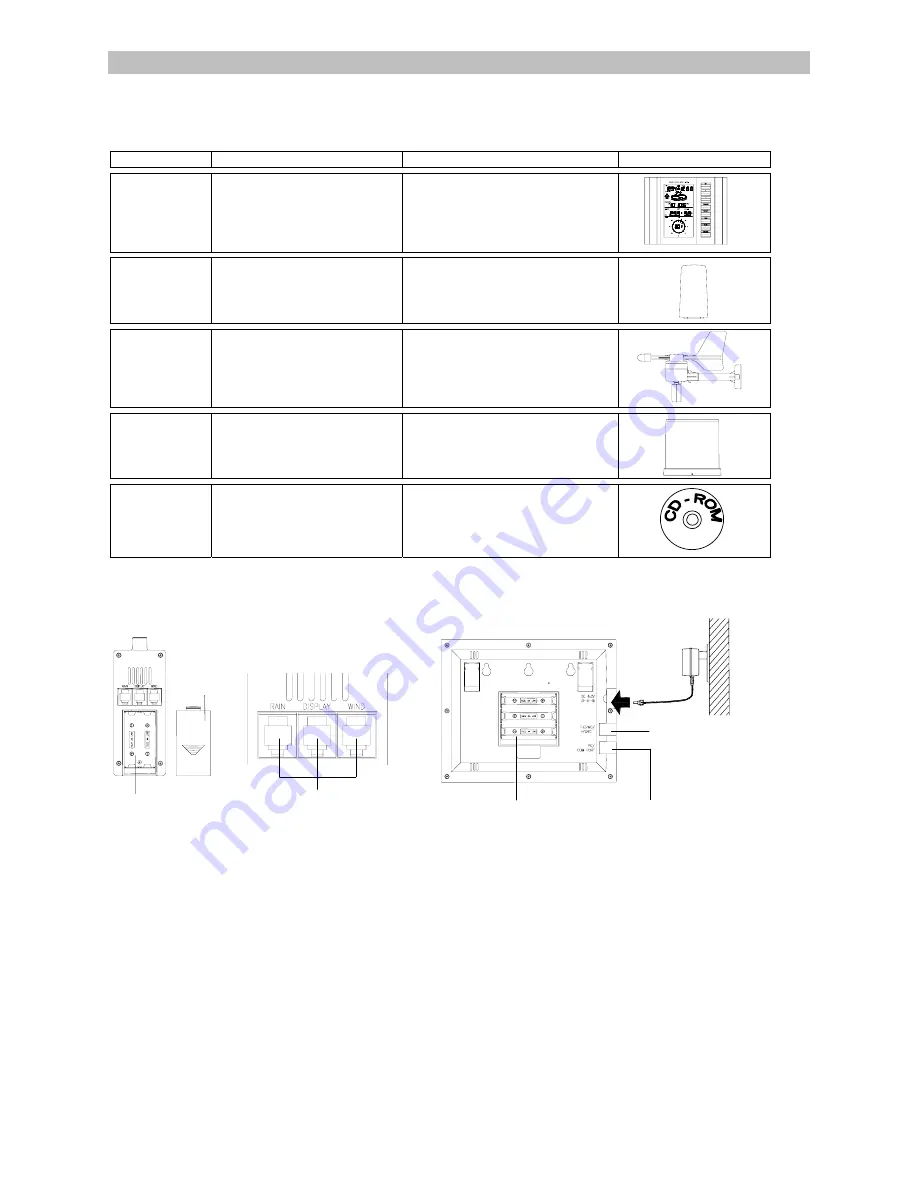
Carefully open and check that the following contents are complete:  


Item: Consisting 

of: 

Fittings: 

Illustration: 


Base Station 

1) Main unit 


1)  AD/DC 120V power Adaptor - 

optional use (included) 


Thermo-Hygro 
Sensor 

1) Main unit 
2) Rain protection cover 


1)  32ft cable - optional connection to 

the base station (included) 

2)  Wall mounting screws 
3)  Plastic anchors for screws 


Wind Sensor 

1)  Main unit with wind vane 
2)  32ft cable (already attached the 

main unit) 

3)  Mast holder  

1)  2 x U-bolts for mast holder 
2) 4 x Washers 
3) 4 x Nuts 
4)  1 x screw (to secure main unit to the 

mast holder) 


Rain Sensor 

1) Base and funnel 
2)  32ft cable (already attached 

the main unit) 


‘Heavy 
Weather” PC 
software 

CD-ROM 
(English and German version only) 

1)  6.5 ft computer cable for PC 

function only - optional use 
(included) 


Setting Up: 


Important:

 Operating power is supplied to both the wind and rain sensors by the thermo-hygro sensor 


Setting up using batteries: 

1) 

Sensors:

 Pull and remove the protective rain cover to reveal three socket ports and the battery cover.  Insert the cables 

of the wind and rain sensors in the correctly marked sockets.  Slide open the battery compartment and checking the 
correct polarity insert 2 x AA 1.5V batteries and replace the cover and rain cover 

2) 

Base Station:

 Now open the battery cover at the back of the unit and checking the correct polarity insert 3 x AA 1.5V 

batteries and replace the battery cover 


Setting up using the AC/DC power adaptor: 

1) 

Sensors:

 Set up the sensors as described above in 

Setting up using batteries

2) 

Base Station:

 Using the AC power adaptor (included in this set) plug it into mains supply and connect it to the 6.0V DC 

adaptor socket located at the side of the base station. 


Performing a function test: 

After powering up the units, the base station has to synchronize to the sensors before the weather data can be received.  
The synchronization mode lasts for 15 minutes.  Pressing the MIN/MAX key at any time will send the base station into the 
WWVB radio controlled time reception mode.  Under normal conditions the radio controlled time is usually received within 3-
5 minutes before returning to the normal operation.  During the synchronization mode, perform the following function test to 
check operation: 


Thermo-Hygro Sensor 


Battery Cover 

Battery Compartment 

Sensor sockets 

Base Station 

Battery compartment 

PC COM Port 

Socket for sensor 


DC 6.0V 
socket 

Summary of Contents for WS-2310

Page 1: ...ve rain cover to reveal three socket ports and the battery cover Insert the cables of the wind and rain sensors in the correctly marked sockets Slide open the battery compartment and checking the correct polarity insert 2 x AA 1 5V batteries and replace the cover and rain cover 2 Base Station Now open the battery cover at the back of the unit and checking the correct polarity insert 3 x AA 1 5V ba...

Page 2: ...on to the sensor The base station will automatically detect the connection and read the weather data If the data cannot be received then press and hold the PLUS key for 2 seconds to synchronize the base station with the sensor Important Ensure all signals including the radio controlled time can be received and or all cable distances meet with your requirements at the point of fixing particularly b...

Page 3: ...eatures of the base station Features of the wind sensor Features of the rain sensor 3 Safety Notes 4 Packaged contents 5 Setting up 6 Operation using cable connection or wireless 433MHz 7 LCD overview 8 Function test 9 Mounting 10 Resetting factory settings 11 Function description 12 Operation keys 13 Basic programming modes 14 MIN MAX programming modes 15 Alarm programming modes 16 Auto memory fo...

Page 4: ...to PC This weather station is designed to work easily with your PC simply connect and disconnect the PC cable at any time System Requirements for PC use The minimum system requirement for use of this Heavy Weather software is Operating system Windows 98 or above Processor Pentium 166 MHz or above RAM 32MB of RAM or above Hard disk 20MB free space CD ROM drive For full details on operation and inst...

Page 5: ...held liable For reasons of safety and operation alterations to this device are strictly prohibited To operate the weather station use only supplied adaptor and batter ies of the recommended type Do not leave discharged batteries in the device as these may corrode and release chemicals that may damage the unit Inserting batteries in an incorrect polarity will cause damage to this product This produ...

Page 6: ... three sockets for the wind sensor rain sensor and the base sta tion 2 Connect the attached cables of wind and rain sensors to the corresponding sockets of the thermo hygro sensor by clicking them into place 3 Open the battery cover of the thermo hygro sensor located below the three sockets and insert 2 x AA IEC LR6 1 5V batteries and close the cover 4 Open the base station s battery cover located...

Page 7: ...s will have a shorter life span for cable connection compared to using 433MHz To operate using cable connection simply use the enclosed 32ft cable and connect the thermo hygro sensor to the base station Once the connection is detected the base station will automatically con tinue reading the data from the sensor The user may at any time switch from cable connection to using 433MHz or vice versa by...

Page 8: ...gle through the relevant LCD sections 1 Indoor temperature and humidity 2 Outdoor temperature and humidity 3 Outdoor wind chill 4 Dew point 5 Rainfall 24 hour 6 Rainfall 1hour 7 Rainfall Total 8 Relative and absolute pressure 9 Wind speed wind direction and wind direction in degrees If any readings cannot be received from the sensors lines will be displayed in the respective weather sections of th...

Page 9: ...rk in the wall behind the base station For best WWVB reception place the base station near a window facing Colorado WWVB reception will be obtained easiest in the nighttime hours when the WWVB signal is strongest Mounting the Wind Sensor onto a mast Firstly check that the wind fan and the wind vane can rotate freely before fixing the unit For correct and accurate readings it is impor tant to mount...

Page 10: ...ries the base station has to synchro nize to the sensor again otherwise no weather data will be received To do this simply press and hold the PLUS key for 2 seconds and a short beep will sound to synchronize the base station to the sensor When the units are synchronized the data will be received again and the base station will return to normal operation mode Do not remove batteries or unplug the A...

Page 11: ...eather icons Notes to hPa sensitivity setting for weather forecasting The hPa Hekto Pascal pressure sensitivity can be set to suit the user s requirement for weather forecasting from 6 inHg 9 inHg to 12 inHg see Basic Programming below For areas that experience frequent changes in air pressure which does not necessarily reflect a change in the weather requires a higher inHg setting compared to an ...

Page 12: ... can at a certain temperature only carry a certain amount of water water vapor which also increases and decreases with temperature If the air temperature decreases below the dewpoint saturation point the excessive water vapor will condense and fall out in form of dew fog or rain At a temperature of e g 59 F and a relative humidity of 50 the dewpoint will be about 41 F at 80 humidity about 53 6 F A...

Page 13: ...al WIND key To toggle between the following settings Wind speed Wind direction Wind direction display in degrees ALARM key In normal mode to enter the alarm pro gramming mode In alarm programming mode to select the following setting modes Time alarm setting Indoor temperature alarm high low Outdoor temperature alarm high low Indoor humidity alarm high low Outdoor humidity alarm high low Outdoor wi...

Page 14: ...crease decrease digits in greater steps Manual time setting The base station will continue to scan for the radio controlled time signal from 12am 6 am 1am 6pm summer time each day despite it being manually set During reception attempts the WWVB tower icon will flash If reception has been unsuccessful then the WWVB tower icon will not appear but reception will still be attempted the following hour ...

Page 15: ...er and temperature conditions set by the user The weather station allows for the follow ing 13 alarms modes to be set 1 Time alarm 2 Indoor temperature high alarm and low alarm 3 Outdoor temperature high alarm and low alarm 4 Indoor humidity high alarm and low alarm 5 Outdoor humidity high alarm and low alarm 6 Wind chill high alarm and low alarm 7 Dew point alarm high alarm and low alarm 8 Rainfa...

Page 16: ...ore to toggle to the indoor humidity low alarm set mode 5 Press and hold the SET key to enter the indoor humidity low set ting values digits will start flashing and set the desired indoor humidity low by using the PLUS or MINUS keys 6 Press ALARM key to confirm and press the MIN MAX key to re turn the normal display mode or press the ALARM once more to toggle to another alarm setting mode Outdoor ...

Page 17: ... once more to another alarm setting mode Pressure high alarm and low alarm setting 1 Press the ALARM key to enter the normal time alarm 2 Continue to press the ALARM key until you reach the pressure high alarm set mode 3 Press and hold the SET key to enter the pressure setting values digits will start flashing and set the desired pressure high by us ing the PLUS or MINUS keys 4 Press ALARM key to ...

Page 18: ...that particular alarm has been set to the ON To deacti vate the BUZZER OFF press the MINUS key once more General Alarm Icon The general alarm icon on the bottom right corner of the LCD will appear when any weather alarm is activated to show the user that a set weather condition has been reached The activated alarm can be determined by checking the set alarm values against the MIN MAX values reache...

Page 19: ...display mode Unit settings temperature pressure rainfall wind Air pressure offset for calculation of relative air pressure Weather picture threshold Storm warning threshold LCD contrast Alarm time Weather Alarm thresholds State of alarms enabled disabled Rainfall total value and reset time date 17 Accessories adding cable extensions For your convenience additional telephone cables to increase the ...

Page 20: ...oo long Reduce distance between transmitters and receiver to receive signal High shielding materi als between the units thick walls steel con crete isolating alumi num foil and etc Find a different location for sensors and or receiver See also Item Trans mission Range below Interference from other sources e g wireless radio headset speaker etc operating on the same frequency Find a different locat...

Page 21: ...he rain sensor attached nor the bottom part itself under running water This may bear the danger of water entering the unit s inner parts and cause damages Do not immerse the base station in water Should there be damage to this product please do not attempt to make any repairs Please take this unit to a qualified techni cian Opening or improper handling of the units will invalidate any guarantee 22...

Page 22: ...sume the remaining original warranty or ninety 90 days whichever is longer La Crosse Technology Ltd will pay all expenses for labor and materials for all repairs covered by this warranty If necessary repairs are not covered by this warranty or if a product is examined which is not in need or repair you will be charged for the repairs or examination The owner must pay any shipping charges incurred ...

Page 23: ...ease visit www lacrossetechnology com All rights reserved This handbook must not be reproduced in any form even in excerpts or duplicated or processed using electronic mechanical or chemical procedures without written permission of the publisher This handbook may contain mistakes and printing errors The information in this hand book is regularly checked and corrections made in the next issue We ac...

Page 24: ...y Weather program 6 2 Main Heavy Weather window 7 0 Basic Settings 7 1 Heavy Weather Setting Global tab 7 2 Heavy Weather Setting Units tab 7 3 Heavy Weather Setting Pressure tab 7 4 Heavy Weather Setting Weather history tab Changing history file Creating history file Deleting history file 7 5 Changing history file from the history window 7 5 1 Changing the history file 7 5 2 Saving history data a...

Page 25: ... values 9 1 Absolute or relative air pressure 9 2 Indoor humidity 9 3 Outdoor humidity 9 4 Indoor temperature 9 5 Outdoor temperature 9 6 Dew point 9 7 Wind chill 9 8 Wind speed 9 9 Rain count total rain 9 10 Rain count 24 hours 9 11 Rain count 1 hour 9 12 Rain 24 hours 9 13 Rain 1 hour 10 0 Exiting the Heavy Weather program 11 0 Technical data 12 0 Operating range 13 0 Understanding displayed inf...

Page 26: ...with the radio controlled time all the data is displayed on the large LCD with LED back light The base station can be battery operated using 3 x AA IEC LR6 1 5V batteries or with the AC DC adapter provided 3 2 Thermo hygro sensor The thermo hygro sensor measures the temperature and the humidity of it s surrounding outdoor environment and at the same time collects the data from the rain and wind se...

Page 27: ... boxes Note In the event the auto install did not start double click the set exe file found in the root directory of the CD ROM to start the installation of the Heavy Weather software 5 0 Features and displayed weather information 5 1 Weather icons The three weather icons can appear in the following combinations provide a weather forecast upon reading of any significant changes in air pressure Sun...

Page 28: ...and times and are automatically updated when a new minimum or maximum values are reached 5 5 Indoor and Outdoor Temperature Humidity The weather data recorded by the thermo hygro sensor for outdoor data transmission and base station for indoor data is displayed accordingly to the temperature humidity section on the screen numerically and graphically for temperature data only The recorded minimum a...

Page 29: ...ta consists of pressure indoor temperature indoor humidity outdoor temperature outdoor humidity dew point wind chill wind speed wind direction total rain time and date The user can also select to record a new history file at anytime by changing the history file or revert to any saved history file that had been previously saved The initial history file name is history dat If a previously saved hist...

Page 30: ... station and the received data will soon be received and displayed by the Heavy Weather program 6 2 Main Heavy Weather window Below are two windows of the Heavy Weather program before and after reception of the weather data from the base station 7 0 Basic Settings Click the Setup button located at the bottom to the Heavy Weather window to enter the Settings window to select the basic settings for ...

Page 31: ...sers of countries that recognizes the comma or point as the decimal separator When the decimal point or comma is selected the data digits on the main Heavy Weather window and history file s will be updated accordingly this option is not available on the base station COM Port no COM Port 1 4 Pop up screen tips on off Clock 12 24 hour display mode Decimal separator point comma 7 2 Heavy Weather Sett...

Page 32: ...les since there must be more than one file saved in order to select a file change Creating new history files 1 Click Change History File button to open the Select History File window 2 Type in a new file name and click OK 3 The file will be saved in the Heavy Weather directory that was created during installation of the Heavy Weather software and will automatically point here when the history file...

Page 33: ...story window 1 Click the change history file button to open the select history file window 2 Click the file name to highlight selection or type in the file name and click OK to confirm and return to the history file window 7 5 2 Save as text file 1 Click the save as text button to open the select text file window 2 Enter the file name you wish to save example weather txt and click OK to confirm an...

Page 34: ...urn back to the history file window 7 5 4 Setting of interval for reading the next set of weather data from 1 minute up to 60 hours 1 Click the change settings button to open the change history settings window 2 Select the desired hour and minutes setting in the next data set in and click the change button to confirm and return back to the history file window Note To return to the main Heavy Weath...

Page 35: ...ity alarm Rainfall 24 hour Rainfall 1 hour Dew point alarm Pressure alarm Wind chill alarm Wind velocity alarm Wind direction alarm Set each alarm as follows 8 1 Storm Warning alarm setting 1 Place your cursor over the tendency alarm box and right click the mouse open the storm warning alarm window 2 Click the alarm active box to set the storm alarm 3 Click the set button to confirm 4 The storm al...

Page 36: ...ppear after a short delay due the constant data communication between all the sensors base station and the PC 8 3 Absolute or Relative Pressure Low Alarm Setting 1 Place your cursor over the absolute or relative pressure low alarm box and right click the mouse to open the relative or absolute pressure low alarm window 2 Drag the cursor over the sliding scale to set the desired inHg pressure low or...

Page 37: ...ear after a short delay due the constant data communication between all the sensors base station and the PC 8 5 Indoor Humidity Low Alarm Setting 1 Place your cursor over the indoor humidity low alarm box and right click the mouse to open the indoor humidity low alarm window 2 Drag the cursor over the sliding scale to set the desired indoor humidity low or enter the humidity in the box provided 3 ...

Page 38: ...pear after a short delay due the constant data communication between all the sensors base station and the PC 8 7 Outdoor Humidity Low Alarm Setting 1 Place your cursor over the outdoor humidity low alarm box and right click the mouse to open the outdoor humidity low alarm window 2 Drag the cursor over the sliding scale to set the desired indoor humidity low or enter the humidity in the box provide...

Page 39: ...after a short delay due the constant data communication between all the sensors base station and the PC 8 9 Indoor Temperature Low Alarm Setting 1 Place your cursor over the Indoor temperature low alarm box and right click the mouse to open the indoor temperature high alarm window 2 Drag the cursor over the sliding scale to set the desired indoor temperature low or enter the temperature in the box...

Page 40: ... after a short delay due the constant data communication between all the sensors base station and the PC 8 11 Outdoor Temperature Low Alarm Setting 1 Place your cursor over the outdoor temperature low alarm box and right click the mouse to open the outdoor temperature low alarm window 2 Drag the cursor over the sliding scale to set the desired outdoor temperature low or enter the temperature in th...

Page 41: ...after a short delay due the constant data communication between all the sensors base station and the PC 8 13 Dew Point Low Alarm Setting 1 Place your cursor over the dew point low alarm box and right click the mouse to open the dew point low alarm window 2 Drag the cursor over the sliding scale to set the desired dew point temperature or enter the temperature in the box provided 3 Click the alarm ...

Page 42: ...after a short delay due the constant data communication between all the sensors base station and the PC 8 15 Wind Chill Low Alarm Setting 1 Place your cursor over the wind chill low alarm box and right click the mouse to open the wind chill low alarm window 2 Drag the cursor over the sliding scale to set the desired wind chill temperature or enter the temperature in the box provided 3 Click the al...

Page 43: ...after a short delay due the constant data communication between all the sensors base station and the PC 8 17 Wind Speed Low Alarm Setting 1 Place your cursor over the wind speed low alarm box and right click the mouse to open the wind speed low alarm window 2 Drag the cursor over the sliding scale to set the desired wind speed or enter the wind speed in the box provided 3 Click the alarm active bo...

Page 44: ... base station s LCD but will appear after a short delay due the constant data communication between all the sensors base station and the PC 8 19 Rainfall 24 Hour Alarm Setting 1 Place your cursor over the rain 24 hour alarm box and right click the mouse to open the rain 24 hour alarm window 2 Drag the cursor over the sliding scale to set the desired rainfall level or enter the rainfall in the box ...

Page 45: ...larm icon will light up when any weather condition has been met for the weather alarm settings This notifies the user that a set weather alarm condition has been reached To cancel and prpapre the general alarm icon for the next weather event simply right click the mouse to enter clear general alarm window and press the clear button 8 22 Weather Alarm Notes To compensate for fluctuation of the weat...

Page 46: ...Absolute or relative air pressure Indoor and outdoor humidity Indoor and outdoor temperature Dew point Wind chill Wind speed Rainfall in past 24 hours Rainfall in the last 1 hour 9 1 Resetting the min max absolute or relative air pressure 1 Right click the min max button to open the pressure min max details window 2 Click clear min max details button to return to the Heavy Weather window Note The ...

Page 47: ...ing the records on the Heavy Weather program also resets the same recorded data on the base station 9 3 Resetting the min max outdoor humidity 1 Right click the min max button to open the outdoor3 humidity min max details window 2 Click clear min max details button to return to the Heavy Weather window Note The reset values will flash and may not register on the heavy weather display immediate bec...

Page 48: ...ing the records on the Heavy Weather program also resets the same recorded data on the base station 9 5 Resetting the min max outdoor temperature 1 Right click the min max button to open the outdoor temperature min max details window 2 Click clear min max details button to return to the Heavy Weather window Note The reset values will flash and may not register on the heavy weather display immediat...

Page 49: ...ing the records on the Heavy Weather program also resets the same recorded data on the base station 9 7 Resetting the min max wind chill 1 Right click the min max button to open the wind chill min max details window 2 Click clear min max details button to return to the Heavy Weather window Note The reset values will flash and may not register on the heavy weather display immediate because the prog...

Page 50: ...ng the records on the Heavy Weather program also resets the same recorded data on the base station 9 9 Resetting the rain counter for the rain total 1 Right click the total rain count button to open the clear total window 2 Click clear rain counter button to return to the Heavy Weather window Note The reset values will flash and may not register on the heavy weather display immediate because the p...

Page 51: ...etting the records on the Heavy Weather program also resets the same recorded data on the base station 9 11 Resetting the rain counter for the rain 1 hour 1 Right click the rain count 1 hour button to open the clear rain 1hour window 2 Click clear rain counter button to return to the Heavy Weather window Note The reset values will flash and may not register on the heavy weather display immediate b...

Page 52: ... the records on the Heavy Weather program also resets the same recorded data on the base station 9 13 Resetting the maximum record for rain in the past 1 hour 3 Right click the max button to open the rain 1h max details window 4 Click clear max details button to return to the Heavy Weather window Note The reset values will flash and may not register on the heavy weather display immediate because t...

Page 53: ... greater than 95 it will display 19 or 96 Resolution 1 Rain Volume Display 0 to 39 37 inch 1h and 24h rainfall 0 to 98 38 inch Total rainfall Resolution 0 01 inch Wind Speed 0 to 111 8mph Resolution 0 1mph Wind Direction Graphic resolution 22 5 Degrees Numerical Resolution Letter format 433MHz transmission Measuring interval thermo hygro sensor 32 seconds if wind factor 22 36 mph or 128seconds if ...

Page 54: ... objects that give radiation characteristic and thus the range Neighboring using units operating on the same frequencies may affect the receiver Poorly screened PCs may affect the receiver and reduce the reception ranges 13 0 Understanding Displayed Weather Data When the transfer of the updated weather information occurs or the user has entered new settings for example setting high and low alarms ...

Page 55: ...al between sensor and receiver thick walls Find a new location for the transmitter or receiver or use cable connection between the base station and the sensors Batteries of sensors or receiver empty Faulty batteries Change batteries to use those of the recommended type Sensors superimposed by source of interference Radios headphones or loudspeakers and items operating on the same 433MHz frequency ...

Page 56: ...les and create charts on other applications 1 Using the Heavy Weather program open the History window and save the weather data from the desired history file as a text file by clicking on the Save as text button enter a text file name and click OK Appendix 1 ...

Page 57: ...ry using a spreadsheet program like Excel 3 The text import wizard window will open Choose delimited as the separator for each data column and click the next button 4 The Heavy Weather program uses tab to separate data so you should choose tab as delimiter in the Excel program and click the next button ...

Page 58: ...as text or numbers for each column of data The default setting General and this is usable and click the Finish button 6 The data is then imported into the Excel ready for the user to plot a graph In this example we will use the indoor temperature ...

Page 59: ... 5 25 1 30 8 Since the weather data in this example is generated with a 1 minute interval we can use a formula to generate the time column we type M3 1 24 60 in the cell M4 This means adding 1 minute with respect to cell M3 in cell M4 for the next set of data Since Excel uses 1 day as a unit for time we add 1 24 x 60 1 minute with respect to the cell above ...

Page 60: ...be able to read the weather data directly Excel will define the data with comma as text format and thus will not be suitable for graph plotting as co ordinates There are two solutions to solve this problem First and most the simplest way is to go into Heavy Weather software and change the decimal separator to point in setup menu and then save the text file again Second follow below procedures to c...

Page 61: ...o into to a new cell for example N3 type VALUE SUBSTITUTE B3 Then an Excel readable indoor temperature reading is created B Then we copy this formula to all cells in column N A set of valid indoor temperature readings are ready for graph plotting ...

Page 62: ...tting From Excel select Insert from the pull down menu then select Chart You will see the below screen Then select XY as the chart type and click next 11 The Chart Source Data window is now open then select Series tab and click Next ...

Page 63: ...rom cell M3 to M62 plot a graph between 1 30 to 2 29 The history1 M 3 M 62 is now written in the box 13 Next select the weather data as Y Axis we choose the indoor temperature as Y Axis so we have the following screen A When decimal separator is comma Choose column N B When decimal separator is point Choose column B 14 As shown below both the X and Y axis data range are selected The variation of t...

Page 64: ...n customize the Titles Axes Gridlines Legend Data Labels 16 Click next then select whether you want a separate sheet or a chart inside the data sheet 17 Click finish to see the chart In this chart the variation of indoor temperature within 1 hour 1 30 to 2 39 is plotted ...

Reviews: