background image

Operating manual

If your RepRap Industrial 3D printer is of hardware revision 1.0.0 and has not been updated, you are
probably still running RepRapOnRails version 1.0.5.
Clicking here will redirect you to the respective manual.

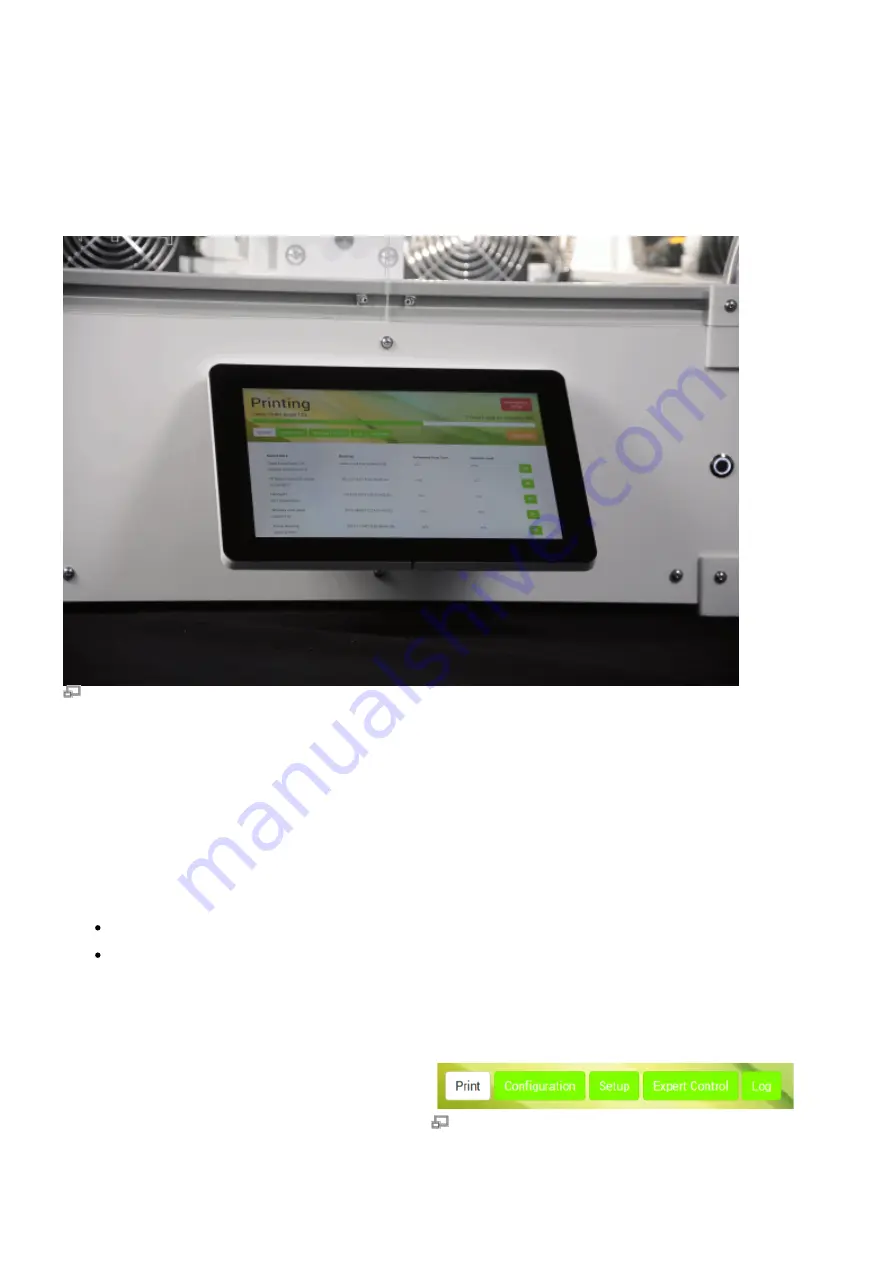
The high-resolution 10“-TFT touchscreen mounted at the front panel enables direct operation of the
RepRap Industrial.

This manual describes the 

initial commissioning

 of the 3D printer after 

installation

, the 

operation

 via

the RepRapOnRails operating software and the all manual operating tasks that must be performed
during normal day-today use.

RepRapOnRails Software version lists

v1.1.0 (current)
v1.0.5 (05/2013 - 02/2015)

Operation

With the release of RepRapOnRails version
v1.1.0, all basic functions are now represented
on the start-up 

Print

 screen.

The newly designed 

Configuration

 menu

enables the operator to preselect temperature

The newly ordered operating menus of
RepRapOnRails v1.1.0.

Summary of Contents for RepRap Industrial

Page 1: ...escribes the initial commissioning of the 3D printer after installation the operation via the RepRapOnRails operating software and the all manual operating tasks that must be performed during normal day today use RepRapOnRails Software version lists v1 1 0 current v1 0 5 05 2013 02 2015 Operation With the release of RepRapOnRails version v1 1 0 all basic functions are now represented on the start ...

Page 2: ...on for the preparation of print jobs can be found in Tips and tricks and the manual of the slicing software Starting the 3D printer There are two possible states from which to start the 3D printer switched off and in standby Either way starting the 3D printer is a one button only procedure After the boot sequence the operating screen starts with the Print screen in IDLE mode Switching on If the 3D ...

Page 3: ...on 1 Status message Idle apparatus is waiting for next user input Printing apparatus is busy printing 2 Menu selection Select the operating menu and mode Print represents the main production mode Configuration allows choosing material based temperature profiles for each extruder and bed chamber Setup provides wizards for different preset operating procedures Expert Control provides access to motors a...

Page 4: ...ter properly 7 Build Chamber ON OFF button Tap to activate deactivate drives and heaters after start up 8 Preheat Chamber Bed ON OFF button Tap to activate deactivate preheating of the build chamber print bed according to the settings made under Configuration 9 delete button Tap to delete the respective print job from the queue 10 print button Tap to start the respective print job 11 Browse buttons...

Page 5: ...aded to the queue 5 Countdown Displays the estimated remaining time calculated from the G code 6 Progress bar Indicates the progress of the print job graphically 7 Pause Resume Print button Allows interrupting a print job for interference and subsequent resumption 8 Abort Print button Tap to abort a print job Print status screen top half only Pause function The pause function was built in for the ...

Page 6: ...ing the print tap the Abort Print button The system will then print the last G code information from cash and move the print table and the extruder head to their home positions afterwards Either way the 3D printer returns to idle mode and displays a status message and a request how you wish to continue Simply tap the respective button on the screen to proceed After standstill of all drives you can...

Page 7: ...wered off and the green status indicators of the limit switches darken To reactivate the 3D printer see Starting the 3D printer INFO For day to day use the power supply should stay connected to mains power main switch in position I ON Emergency stop NOTICE The emergency stop function does not provide a cool down sequence Do not use the emergency stop button to abort current print jobs as this may l...

Page 8: ... the build chamber and replace or clean it before further use Restart the 3D printer if necessary Open the Print screen Switch on the build chamber The 3D printer will run the homing routine You can now resume normal operation Configuration screen The Configuration menu is a new feature that enables you to preselect material specific temperature profiles for each extruder and in combination the print ...

Page 9: ... bed preheating The list of filament temperature profiles of the configuration menu More profiles can be added via the web interface The selected profiles are displayed in the footer of every screen in the order Current and Target set temperature While aiming for a target temperature both values are highlighted red When displayed gray the temperature value is either not set or currently not triggered T...

Page 10: ...eld Enter the Extrusion Temperature 2 in C in the according input field Click Add or press Enter to save the 2 settings The new filament profile is added to the list newest at the bottom To change the settings click edit and enter the new properties To delete a profile click remove and confirm the safety query Filament profile setup via the web interface To create a preheating profile open the web interf...

Page 11: ... initial commissioning servicing and troubleshooting If you choose one of the wizards a step by step guide will provide all necessary information for completing the respective task This screen also provides system information and the web address needed to connect to the 3D printer via the network Wizard selection on the setup screen Beginning with ReRapOnRails v1 3 0 the nozzle change wizard has b...

Page 12: ...closed air from the nozzle tip additional information 2 Calibration wizards These wizards are needed during commissioning during change of material and other more rarely tasks Nozzle Change obsolete since v1 3 0 To change the nozzle tips e g for printing with another bore diameter for higher troughput follow the given instructions Make sure not do damage the extruder nozzle barrel Calibrate Extrus...

Page 13: ...strand on the spool the 3D printer stops automatically and signals lack of material at the touchscreen If you want to remove the filament for other reasons e g to use a differently colored material the following description applies also Required tools diagonal cutters Refilling If you want to continue printing with the same type of plastic the change of the filament spool is quite easy You have to man...

Page 14: ... filament as described 1 in Refilling Subsequent to unloading you have to 2 change the extruder nozzle barrel as described in the Service guide Afterwards install and adjust the new 3 filament spool run the Load Filament wizard and the Priming wizard INFO Make sure to choose the appropriate filament profile from the material database If you have not installed the adequate profile yet do so by following ...

Page 15: ...sed by skilled operators only It has been designed for test and troubleshooting purposes Persons unfamiliar with the 3D printer must not mess around with functions provided here The positions of the extruder head and the print table are not compared during manual operation Incautious operation may lead to massive damage of the extruder head and the print bed Be careful not to crash the print table...

Page 16: ...elected step width 5 Extruder temperature control Enables directly setting the temperature and extruding filament for one extruder at a time see the chapter Extrusion temperature in the Material section of the knowledgebase Expert Control screen Log screen All communication between touchscreen BeagleBone Black and microcontroller is stored and displayed on the log screen Print job statuses are stor...

Page 17: ...ons You can also check system s information and settings install firmware updates and download the LOG file for troubleshooting purposes To open the web interface enter the web interface URL into the address line of your internet browser You can find the web interface URL on the Setup screen of the GUI Initial commissioning Loading material 1 Spool adjustment Printer preparation 2 Calibration 3 First...

Page 18: ...ool carriers may be necessary The filament and chamber bed profiles have been preset during factory test and are ready for use For later changing the profiles refer to Configuration At the end of the Load Filament wizard follow the suggestion to run the Prime Extruders wizard by tapping the respective button Choose the left extruder and check that the filament profile Kühling Kühling white ABS is select...

Page 19: ... RepRap Industrial 3D printer All required files and settings are preinstalled on the 3D printer and need no further interference beside the instructions given in the following The extrusion multiplier allows for compensation of varying filament properties first of all the cutting depths of the drive gear into the filament but also deviations of the diameter also see Slic3r manual and Tips Tricks The ...

Page 20: ...es altered settings as described in the Tips Tricks section of this manual The extrusion multiplier is calculated automatically from the measurement and must be saved in the filament profile of the slicing software Creating your own first print job You will find all necessary installation and setup procedures required for the first print in the following paragraphs All software mentioned additionally i...

Page 21: ...slic3r org and follow the installation instructions provided in the Slic3r manual Open the Kühling Kühling GitHub 2 repository download the latest preconfigured Slic3r profiles package for the RepRap Industrial to a prepared directory on your PC and unpack the archive Make sure to download the correct package for your hardware and software In Slic3r select File Load Config Bundle 3 and choose the pre...

Page 22: ...printer before generating a G code file Open the Filament Settings tab end enter the extrusion multiplier measured during calibration Rename and save the filament profile Export the G code data 3 Refer to the Slic3r manual for help on fine tuning any parameters for the printing process Slic3r steps while crating a print job including setting the extrusion multiplier Uploading print jobs to the 3D prin...

Page 23: ...d Name and if required add additional information via the text field Note Click Add to upload the selected file to the printer The print job is now available for printing on your RepRap Industrial and can be selected directly for printing via the touchscreen controller on the 3D printer Web interface adding print jobs via the Queue Starting the print job Make sure that all previously described steps...

Page 24: ...ape the surface clean Scratches in the print bed s surface may lead to enforced adhesion of prints Severely scratched or broken print beds can no longer be used for production and must be replaced To remove printed objects from the print bed let the entire print cool down to room temperature larger prints should remain in the switched off build chamber until cooled down With materials suited to bei...

Reviews: