background image

INSTALLATION INSTRUCTIONS

24" (61 CM), 27" (68.6 CM), AND 30" (76.2 CM)

INDOOR/OUTDOOR ELECTRIC WARMING DRAWER 

INSTRUCTIONS D'INSTALLATION

TIROIR-RÉCHAUD ÉLECTRIQUE POUR USAGE

INTÉRIEUR/EXTÉRIEUR DE

24" (61 CM), 27" (68,6 CM), ET 30" (76,2 CM)

Table of Contents/Table des matières

WARMING DRAWER SAFETY ......................................................2

INSTALLATION REQUIREMENTS ................................................3

Tools and Parts ............................................................................3
Location Requirements ................................................................3
Electrical Requirements ...............................................................4

INSTALLATION INSTRUCTIONS ..................................................5

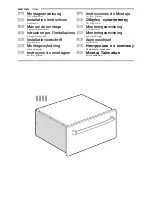
Install Warming Drawer ................................................................5
Complete Installation ...................................................................5

CUSTOM DRAWER FRONT INSTALLATION
INSTRUCTIONS FOR WARMING DRAWERS..............................6

Tools and Parts ............................................................................6
Install Custom Drawer Front Panel ..............................................6

SÉCURITÉ DU TIROIR-RÉCHAUD ...............................................7

EXIGENCES D'INSTALLATION .....................................................8

Outillage et pièces........................................................................8
Exigences d'emplacement...........................................................8
Spécifications électriques ............................................................9

INSTRUCTIONS D'INSTALLATION.............................................10

Installation du tiroir-réchaud ......................................................10
Achever l'installation ..................................................................10

INSTRUCTIONS D'INSTALLATION DE LA FAÇADE DU
TIROIR PERSONNALISÉ POUR TIROIR-RÉCHAUD ................11

Outillage et pièces......................................................................11
Installation du panneau de la façade du tiroir personnalisé ......11

IMPORTANT:


Save for local electrical inspector's use.

IMPORTANT :

À conserver pour consultation par l'inspecteur local des installations électriques.

W10600304A

Summary of Contents for 24" (61 cm) Warming Drawer

Page 1: ...WER FRONT INSTALLATION INSTRUCTIONS FOR WARMING DRAWERS 6 Tools and Parts 6 Install Custom Drawer Front Panel 6 SÉCURITÉ DU TIROIR RÉCHAUD 7 EXIGENCES D INSTALLATION 8 Outillage et pièces 8 Exigences d emplacement 8 Spécifications électriques 9 INSTRUCTIONS D INSTALLATION 10 Installation du tiroir réchaud 10 Achever l installation 10 INSTRUCTIONS D INSTALLATION DE LA FAÇADE DU TIROIR PERSONNALISÉ ...

Page 2: ...the instructions are not followed Your safety and the safety of others are very important We have provided many important safety messages in this manual and on your appliance Always read and obey all safety messages This is the safety alert symbol This symbol alerts you to potential hazards that can kill or hurt you and others All safety messages will follow the safety alert symbol and either the ...

Page 3: ...ectrical outlet is located in an adjacent cabinet a 1 3 5 cm minimum diameter hole should have been drilled in the back of the cutout or support surface to pass the power supply cord through to the outlet Warming drawer support surface must be solid level and flush with bottom of cabinet cutout Warming drawers with oiled bronze black glass and white glass panels are approved for indoor use only Fo...

Page 4: ...he above code standards can be obtained from National Fire Protection Association 1 Batterymarch Park Quincy MA 02169 7471 CSA International 8501 East Pleasant Valley Road Cleveland OH 44131 5575 A 120 volt 60 Hz AC only 15 amp fused electrical circuit is required A time delay fuse or circuit breaker is also recommended It is recommended that a separate circuit serving only this warming drawer be ...

Page 5: ...are now installed If there is an extra part go back through the steps to see which step was skipped 2 Check that you have all of your tools 3 Dispose of recycle all packaging materials 4 For warming drawer use and cleaning read the Use and Care Guide 5 Turn the Temperature control knob to HI The light should illuminate If warming drawer s does not operate check the following Household fuse is inta...

Page 6: ...according to the specific installation The depth of the panel will vary in order to have the custom warming drawer flush with the surrounding cabinets 3 It is recommended that if a wood or porous custom drawer front is installed a high quality spray polyurethane finish be applied to the inner wood surface 4 For the lens drill a 7 9 mm diameter hole through the appearance side of the custom drawer ...

Page 7: ... non respect des instructions Votre sécurité et celle des autres est très importante Nous donnons de nombreux messages de sécurité importants dans ce manuel et sur votre appareil ménager Assurez vous de toujours lire tous les messages de sécurité et de vous y conformer AVERTISSEMENT DANGER Voici le symbole d alerte de sécurité Ce symbole d alerte de sécurité vous signale les dangers potentiels de ...

Page 8: ...adjacent un trou de diamètre 1 3 5 cm minimum doit avoir été percé à l arrière de l ouverture ou de la surface de support pour faire passer le cordon d alimentation La surface de support du tiroir réchaud doit être robuste horizontale et en affleurement avec le bas de l ouverture découpée dans le placard Les tiroirs réchauds avec panneaux en bronze huilé en verre noir ou verre blanc sont approuvés...

Page 9: ... de la liaison à la terre Pour obtenir un exemplaire de la norme des codes ci dessus contacter National Fire Protection Association 1 Batterymarch Park Quincy MA 02169 7471 CSA International 8501 East Pleasant Valley Road Cleveland OH 44131 5575 L appareil doit être alimenté par un circuit de 120 V CA seulement 60 Hz 15 ampères protégé par fusible On recommande également d utiliser un fusible ou u...

Page 10: ...reste une pièce passer en revue les différentes étapes pour découvrir laquelle aurait été oubliée 2 Vérifier la présence de tous les outils 3 Jeter recycler tous les matériaux d emballage 4 Pour l utilisation et le nettoyage du tiroir réchaud lire le Guide d utilisation et d entretien 5 Tourner le bouton de commande de la température à HI élevée le témoin devrait s allumer Si le s tiroir s réchaud...

Page 11: ...tallation spécifiques du tiroir réchaud L épaisseur du panneau peut varier Il faut faire en sorte que la façade du tiroir personnalisé du tiroir réchaud soit en affleurement avec les placards adjacents 3 Il est recommandé d appliquer une finition en polyuréthane vernis yatch de première qualité sur la surface en bois intérieure si une façade de tiroir personnalisé poreuse ou en bois est installée ...

Page 12: ...W10600304A 2013 All rights reserved Tous droits réservés 5 13 Printed in U S A Imprimé aux É U ...

Reviews: