

92798 Cape Arago Hwy, Coos Bay, OR 97420 | 541-888-3517 | Toll Free 1-800-867-6863 | www.kksound.com
P R O D U C T M A N U A L
V IO L IN IS S IM O
Thank you for choosing the K&K Violinissimo!
INSTALLATION
1.
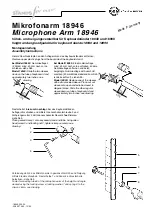
Loosen strings a little bit, so you can lift the bridge just high enough to install transducer discs.
2.
Wedge the two round transducers underneath each bridge foot. The metal sides should be positioned
towards the instrument's top (see fig. 1). The transducers do not need to be glued to the violin -- they are
held in place by the bridge's pressure.
3.
Lead the cables to the high string side and attach the jack with the supplied adhesive to the string holder.
4.
Affix the third oblong transducer into the one of the bridge wing slots (see fig. 2). If you want to achieve a
brighter sound, attach the pickup to the high string slot, if you prefer a sound with more low end, use the
low string slot.
5.
If the slot should is too narrow, you will have to remove some material off the bridge. If the slot is too wide,
fill the gap with a suitable piece of paper or cardboard.
6.
Re-tune the strings and re-adjust the bridge position if necessary
7.
Any change in the strings' action can be corrected easily by deepening the bridge notches.
8.
The connection cable is supposed to be placed over the left shoulder and down the player's back (for right
handed violinists).