

Drenante
Draining
Drenante
Draining
Drenante
Draining
Selene
- The device should be installed, connected
and tested by a qualified electrician,
and in accordance with local regulations.
- Turn off the power supply before
installation or maintenance of the device,
and make sure that the cables will not be
squeezed or damaqed by sharp edges.
- Clean the device with a soft cloth
and a standard pH neutral detergent.
Stainless steel surfaces should be
maintained regularly.
- Misuse or changes to the device cause
loss of warrancy.
- The manufacturer is free to change
the design, specifications and instruc-
tions for assembly.
SAFETY INSTRUCTIONS
EN
- L’apparecchio deve essere installato,
connesso e testato da un elettricista
qualificato e in accordo con le norme vigenti.
- Disconnettere l’alimentatore prima
dell’installazione o della manutenzione
dell’apparecchio e assicurarsi che i cavi
non vengano danneggiati.
- Pulire l’apparecchio con un panno
leggero e un detergente a pH neutro.
- Laddove si abusasse dell’apparecchio
o si apportassero modifiche, la garanzia
sarebbe da considerarsi nulla.
- Il fornitore è libero di apportare modifiche
al design, specificazioni ed istruzioni
di montaggio.
IT
ISTRUZIONI DI SICUREZZA
IP67
Made in P.R.C.
ISTRUZIONI PER L’INSTALLAZIONE/INSTALLATION INSTRUCTIONS
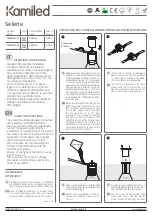
Realizzare il foro nel pavimento e posi-
zionate la controcassa. Passate il cavo
di alimentazione nell’apposito scanso
presente.Posizionare la controcassa
in modo che la parte superiore dell’ap-
parecchio sia al livello del pavimento.
Una posizione più alta del corpo illu-
minante può ostacolare la circolazio-
ne nella zona in cui è montato, mentre
una posizione inferiore può agevolare
la stagnazione e l’infiltrazione dell’ac-
qua su questo.
Fissare la cover all'apparecchio, suc-
cessivamente avvitare le viti per bloc-
care il prodotto nella controcassa.
Make, in the ground, the hole for the
light fitting and install into the hole
the recessed mounting box. Pass
the power supply cable throught
the special hole for it. The final
position of the recessed mounting
box will be as the frontal part of the
light fitting to be at the ground level.
A higher position can disturb the
circulation in the area, and a lower
one allows the water to stay on the
frontal part of the luminaire.
Lay the cover on the device, then
screw the cover and the device
to the recessed housing to fix them.
IT
IT
EN
EN
Dopo il posizionamento corretto della
controcassa, inserire calcestruzzo per
il completo fissaggio.
IT
After correct installation of the re-
cessed mounting box, lay concrete
to fix it.
EN
Modello
Model
Watt
Alimentazione
Input
Attacco
Socket
SELENE1028
Max
40W
230Vac
GU10
SELENE1029
Max
40W
230Vac
GU10
DOGI GROUP s.r.l.
www.kamiled.it
Il prodotto è fornito di portalam-
pada con attacco GU10. Realizzare
la connessione elettrica nell’appa-
recchio e inserire la lampadina.
The product is furnished with lamp
socket with GU10 connection. At-
tain the electrical connection in the
device and insert the light bulb.
IT
EN
ATTENZIONE!!!
ATTENTION!!!
Predisporre sotto la controcassa un substrato
drenante di almeno 30cm o uno scarico per evi-
tare il ristagno d’acqua dentro alla controcassa.
Place a drainage substrate of at least 30cm
or a water discharge under the outer casing
to avoid water stagnation inside the casing.
IT
EN
Cutting size
0105mm


