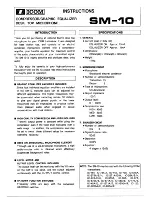
background image

MX-V508T/MX-V588T

   INSTRUCTIONS

For Customer Use:

Enter below the Model No. and Serial
No. which are located either on the rear,
bottom or side of the cabinet. Retain
this information for future reference.

Model No.

Serial No.

GVT0006-001A

[ U, UT, US, UB, UF ]

DISC

DISC

DISC

REPEAT

RANDOM

NTSC / PAL
/ PAL AUTO

LABYRINTH

LABYRINTH

LABYRINTH

LABYRINTH

1

2

3

4

5

6

7

8

9

REC PAUSE

10

10 

FM/AM  

A

B

DISC

FM MODE

PLAY MODE

7

£

DISC

DISC

–  VOLUME  +

SHIFT

SLEEP

ECHO  

RM-SEV508TU
REMOTE CONTROL

AUX

C D

DECK

CLOCK

TIMER

SET

–   SELECT   +

ON SCREEN

V.INTRO

HIGHLIGHT

SOUND

MODE

8

 STILL

SELECT

RETURN

PREV

NEXT

SELECT

COMPACT

DIGITAL AUDIO

COMPACT

DIGITAL AUDIO

GRAPHICS

PlayBack

Control

COMPACT

DIGITAL VIDEO

COMPACT COMPONENT SYSTEM

Consists of CA-V508T and SP-V608

Consists of CA-V588T and SP-V688

Cover&SafetyMX-V505T[U]

5/15/98, 3:55 PM

1

Summary of Contents for CA-V508T

Page 1: ... Y R I N T H L A B Y R I N T H L A B Y R I N T H L A B Y R I N T H 1 2 3 4 5 6 7 8 9 REC PAUSE 10 10 FM AM A B DISC FM MODE PLAY MODE 7 DISC DISC VOLUME SHIFT SLEEP ECHO RM SEV508TU REMOTE CONTROL AUX C D DECK CLOCK TIMER SET SELECT ON SCREEN V INTRO HIGHLIGHT SOUND MODE 8 STILL SELECT RETURN PREV NEXT SELECT COMPACT DIGITAL AUDIO COMPACT DIGITAL AUDIO GRAPHICS PlayBack Control COMPACT DIGITAL VID...

Page 2: ...nected to the terminal which is marked with the letter N or coloured black The wire which is coloured brown must be connected to the terminal which is marked with the letter L or coloured red IF IN DOUBT CONSULT A COMPETENT ELECTRICIAN G 1 CAUTION To reduce the risk of electrical shocks fire etc 1 Do not remove screws covers or cabinet 2 Do not expose this appliance to rain or moisture PRECAUCIÓN ...

Page 3: ...lle lasersäteilylle Älä katso säteeseen f CLASS 1 LASER PRODUCT 1 CLASS 1 LASER PRODUCT 2 DANGER Invisible laser radiation when open and interlock failed or defeated Avoid direct exposure to beam 3 CAUTION Do not open the top cover There are no user serviceable parts inside the Unit leave all servicing to qualified service personnel 1 PRODUCTO LÁSER CLASE 1 2 PELIGRO En el interior hay radiación l...

Page 4: ... se debería colocar nada en las áreas y las distancias que se detallan a continuación 3 Parte inferior Coloque el aparato sobre una superficie recta Debe haber buena circulación de aire para ello coloque el aparato sobre una base a una altura mínima de 10 cm Precaução Ventilação adequada Para evitar riscos de choques elétricos e incêndios e prevenir avarias instale o aparelho como segue 1 Parte fr...

Page 5: ...Karaoke with the Voice Masking system With an optional microphone you can replace the lead s singer voice on your favourite songs with your own Digital Echo applied to your voice through the microphone gives you a professional sound How This Manual Is Organized In this manual we have incorporated some special features Basic information that is the same for many different functions is grouped in on...

Page 6: ...Playing 18 Programming the Playing Order of the Tracks 19 Repeating a Selection or the Discs 20 Random Play 20 Tray Lock Function 21 Operation Of Playback Control Function Listening to a Tape 22 Playing Video CDs with Playback Control Function 22 What is the Playback Control PBC function 23 Graphic CDs 24 Playing Graphic CDs 24 Various Unique Functions 25 Various Function to Enchance Your Enjoymen...

Page 7: ...e Control requires 2 dry batteries which are supplied Remove the rear lid of the Remote Control by sliding it out in the direction of the arrow Insert the batteries by matching the polarity and on the batteries with the and markings in the battery compartment Caution Handle batteries properly To avoid battery leakage or explosion Remove batteries when the Remote Control will not be used for a long...

Page 8: ...est reception Snap the tabs on the loop into the slots of the base to attach the AM Loop 2 3 If reception is poor connect the outside antenna AM Antenna Wire not supplied Before attaching a 75 ohm coaxial lead the kind with a round wire going to an outside antenna disconnect the supplied FM Wire Antenna Note Even when an outdoor AM Antenna is used keep the indoor AM Loop Antenne connected Connecti...

Page 9: ...lack terminals marked RIGHT on the System 2 Connect the Red and Black wires of the left side speaker to the Red and Black terminals marked LEFT on the System IMPORTANT Use speakers with the correct impedance only Allowed speaker impedance is 6 16 ohm CAUTION If a TV is installed near the speakers the TV may display irregular colours In this case locate the speakers away from the TV Connecting Auxi...

Page 10: ...tlet Your System is ready for action and it is just waiting for your command COMPU PLAY COMPU PLAY is JVC s feature that allows you to control the most frequently used functions of the System with a single touch One Touch Operation starts playing a CD turns on the radio plays a tape etc with a single press of the play button for that function What it does is that it will turn on the power and then...

Page 11: ...n the items described in this section Unit Front Panel DISC DISC DISC REPEAT RANDOM NTSC PAL PAL AUTO SELECT 1 2 3 4 5 6 7 8 9 REC PAUSE 10 10 FM AM A B DISC FM MODE PLAY MODE 7 DISC DISC VOLUME SHIFT SLEEP ECHO RM SEV507TU REMOTE CONTROL AUX C D DECK CLOCK TIMER SET SELECT ON SCREEN V INTRO HIGHLIGHT SOUND MODE 8 STILL SELECT RETURN PREV NEXT ACTIVE BASS EX indicator STANDBY indicator PHONES SOUN...

Page 12: ...to On the Unit 1 Press the STANDBY button On the Remote Control 1 Press the button Unit Remote Control Steps Explanation Remarks or Turning the System Off 1 The STANDBY indicator lights up and the display is blank except for the clock display 2 Some power 12W is always consumed even though power is turned off Standby Mode 3 To switch off the Unit completely unplug theAC power cord from theAC outle...

Page 13: ...odes include modes using Surround Effects modes and S E A modes Sound Mode effects cannot be recorded Surround Effect Modes S E A Effect Modes D CLUB Dance Club HALL STADIUM CLASSIC POP Boosts low and high frequencies Set for wide and dynamic sound stereo systems Excellent for vocal music ROCK 1 Press repeatedly until the Sound Mode you want ap pears in the display The frame around S Mode indi cat...

Page 14: ...to the System See page 5 1 After pressing the AUX button AUX will appear on the display If the System is in Standby mode the Unit is automatically turned on to AUX 2 Select a sound mode if you wish See page 9 On the Unit Remote Control 1 Set the VOLUME control to 0 2 Press the AUX button 3 Start playing the external equipment 4 Adjust the VOLUME control to the desired level 5 To cancel change sett...

Page 15: ...the System is being used the display shows other items as well However we have only shown the items described in this section 1 2 3 4 5 6 7 8 9 REC PAUSE 10 10 FM AM A B DISC FM MODE PLAY MODE 7 DISC DISC VOLUME SHIFT SLEEP ECHO RM SEV507TU REMOTE CONTROL AUX C D DECK CLOCK TIMER SET SELECT ON SCREEN V INTRO HIGHLIGHT SOUND MODE 8 STILL SELECT RETURN PREV NEXT FM AM FM MODE FM AM When TUNER is sel...

Page 16: ...To select the 10 kHz interval On the Unit 1 Press the STANDBY button while pressing the TUNING UP button Unit Steps Explanation Remarks 1 The unit must be in STANDBY mode 2 AM 10 appears on the display To select change back to 9 kHz interval On the Unit 1 Press the STANDBY button while pressing the TUNING DOWN button Unit Steps Explanation Remarks 1 The unit must be in STANDBY mode 2 AM 9 appears ...

Page 17: ...ng Stations You can preset up to 30 FM stations and 15AM stations for the preset numbers Note In some cases test frequencies have been already memorized for the tuner since the factory examined the tuner preset function before shipment This is not a malfunction You can preset the stations you want into memory by following the presetting method On the Unit 1 Press the FM AM button 2 Press the TUNIN...

Page 18: ... noisy or hard to receive changing the following will improve the situation Remote Control Steps Explanation Remarks On the Remote Control 1 Press the FM MODE button 1 The ST indicator goes off and the MONO indicator appears The received broad cast will become monaural ...

Page 19: ...ck so when we are talking about locating a track we are also talking about how you find a certain song or performance Disc indicators Track number Playing time step number Disc Trays Unit Front Panel Remote Control Display When the System is being used the display shows other items as well However we have only shown the items described in this section Disc indicators A disc marker lights up for th...

Page 20: ...tinuous Play Random Play or Program Play for each mode see the related pages 3 If there is no disc loaded on any trays NO DISC will appear on the display Playback will not start To Insert Discs On the Unit Remote Control 1 Press the 0 button on the left of the Disc button you want to insert the disc into 2 Place a CD with its label side up onto the tray 3 Press the 0 to close the tray Caution Do n...

Page 21: ...utton 3 To Stop and Remove the disc Press the 0 0 0 0 0 button 4 To Pause Press the 8 8 8 8 8 STILL button 5 To Cancel Pause Press 3 3 3 3 3 SELECT button Unit Remote Control Steps Explanation Remarks 1 If a Video CD is inserted VIDEO CD will appear in the display Note If the CD can t be read correctly due to scratches misalignment etc 01 00 00 appears on the display 2 The first track of the selec...

Page 22: ...on to go ahead one track at a time 6 Press and holding down the buttons during playback will fastforward backwards the CD This will enable you to quickly find a particular passage in the selection you are listening to Locating a Track with the Remote Control Directly On the Remote Control 1 Press the DISC 1 3 button 2 Enter the number of the track Ex For track 20 press 10 then 10 Remote Control St...

Page 23: ...lay mode will be selected To Repeat Press the REPEAT button to repeat the programmed tracks over and over again See page 20 Remote Control Steps Explanation Remarks 1 The display changes with each press of the PLAY MODE button as shown below PROGRAM RANDOM No play mode indi cation back to beginning The PRGM play mode indicator lights up If a program is already in progress the last step of the prog...

Page 24: ...s resumed On the Remote Control 1 Press the PLAY MODE button while the CD Player is stopped to select RANDOM 2 Press the 3 3 3 3 3 SELECT button to start Random play 3 Press the 4 4 4 4 4 PREV to jump to the start of the track being played Press the NEXT button to skip to the next track with each press of the button You can also operate with the similar buttons on the Unit 4 To Cancel press RETURN...

Page 25: ...ay on the Unit Unit Steps Explanation Remarks 1 LOCKED appears on the display The trays are now locked 2 Pressing the 0 buttons will not open the trays The display shows the message LOCKED 3 0 button cannot be used to automatically turn on the power 4 You can still play the CD cassette or tune to a radio station Unlocking the Electronic Lock On the Unit 1 Put the System s power into STANDBY mode 2...

Page 26: ...tive menus for easy selection of tracks On the Unit Remote Control 1 Press the DISC 1 3 or SELECT CD 6 button 2 Press the 4 4 4 4 4 PREV or NEXT to move through the next menus 3 On the Remote Control Select an item in the menu by pressing the number keys See page 15 Your selection will start On the Unit Press the VCD NUMBER TUNING UP or TUNING DOWN on the MULTI CONTROL Then press the SELECT CD 6 b...

Page 27: ...3 1 2 2 1 2 3 1 3 Moving picture Moving picture Moving picture Still picture Still picture 2 To next screen Moving picture 1 Moving picture Moving picture Moving picture 3 2 1 To previous screen Press RETURN Press RETURN Press RETURN A selection menu is displayed when you start playing a Video CD with the Playback Control function The selection menu shows a list of number for selection Some disc m...

Page 28: ...cedures described on pages 17 20 can also apply to the playback of Video CDs without the PBC function When you start playing a Video CD without the PBC function VIDEO CD appears on the display To use a Video CD without the PBC function as a Karaoke source see page 38 Notes 1 The following operations may distort the image on the TV screen Searching for beginning points of the track Fast forwarding ...

Page 29: ... once Then each time you press the button the picture advances by one frame 2 During this function you will hear no sound Display of Operating Status Using this function you can watch the operating status on the TV screen On the Remote Control 1 Press the ON SCREEN button while pressing the SHIFT button 2 To display disc number track number and playing time always on the screen press the ON SCREEN...

Page 30: ...h the highlights of 2 Press the HIGHLIGHT button while pressing the SHIFT button after a pic ture appears on the TV screen 3 To Select a track while viewing the high lights press the number key for the high light scene 4 To Stop and Cancel the HIGHLIGHT Play press the RETURN 7 but ton Remote Control Steps Explanation Remarks 1 Playback begins For Video CD with PBC follow steps 1 to 3 on page 23 2 ...

Page 31: ...k will use for the playback During playback the direction indicator blinks slowly During fast left or fast right the indicator blinks quickly During Music Scan mode the direction indicator al ternates between blinking slowly and quickly repeat edly Unit Front Panel Cassette Deck control buttons 1 2 3 4 5 6 7 8 9 REC PAUSE 10 10 FM AM A B DISC FM MODE PLAY MODE 7 DISC DISC VOLUME SHIFT SLEEP ECHO R...

Page 32: ...6 To Play press the 2 2 2 2 2 TAPE 3 3 3 3 3 but ton The tape starts to play towards the direction selected 7 To Stop press the RETURN 7 7 7 7 7 STOP button 8 To Change deck while playing press the 2 2 2 2 2 TAPE 3 3 3 3 3 button after pressing the DECK A B button 9 To Rewind press the 4 4 4 4 4 P DOWN PREV while the tape is stopped 10 To Fast Forward press the P UP NEXT while the tape is stopped ...

Page 33: ...tion starts automatically Notes Music scan works by detecting a 4 second long blank at the beginning of each selection so it won t work well if your tape has No blank at the beginning of a selection Noise tape often used or poor dubbing which fills the blank with noise Long very soft passages or pauses in a selection The scan will detect these as 4 second long blanks If this happens scan again Rev...

Page 34: ...Type II tape is used only cover part of the hole as shown since the other part of the hole is used to detect the tape type When recording you can hear Sound Mode effects through the speakers or headphones However sound is recorded without Sound Mode effects Only Type I and Type II tapes can be used for recording Note At the start and end of tapes there is leader tape which cannot be recorded onto ...

Page 35: ...APE button 4 Prepare the source by inserting a tape into Deck A playing CDs tuning in a radio station or turning on the connected equipment 5 Press the REC PAUSE button 6 To start press the 2 2 2 2 2 or 3 3 3 3 3 button Recording starts in the direction pressed When using Reverse Mode to record both sides of a tape press the 3 3 3 3 3 but ton 7 To Pause at any one time of the record ing press the ...

Page 36: ...the proper setting is selected the beats will be elimi nated REPEAT CD Direct Recording The order of recording of the tracks goes according to the original order of the CD or to the order you have programmed The CD player starts playing automatically and recording begins When the CD player finishes playing recording will stop automatically Tape to Tape Recording Dubbing Dubbing is termed as the re...

Page 37: ...the time 4 Press the SET button 5 Release the SHIFT button Remote Control Steps Explanation Remarks 1 When CLOCK is pressed the CLOCK indicator on the display comes on and the clock time blinks 2 The button increases the time whereas the but ton decreases the time Pressing the button continuously will change the time in 10 minute intervals 3 When the time is Set the time display changes from a bli...

Page 38: ...he Off Time setting display 4 Step 5 This will help you to set to the time you want the Unit to be turned off 5 Step 6 The name of the source blinks 6 Step 7 The display changes as below with each press of the button TUNER TUNER REC CD TAPE TUNER Selects the last station you were listen ing to TUNER REC Records the last station you were listen ing to CD Plays the last CD you were listening to TAPE...

Page 39: ...Change the SLEEP Timer setting press the SLEEP button until the num ber of minutes you want appears 4 To Cancel the SLEEP Timer setting press the SLEEP button until the SLEEP indicator goes off Turning off the Unit also cancels the SLEEP timer Remote Control Steps Explanation Remarks 1 The SLEEP indicator will light up on the display A BASS EX S MODE SLEEP 2 Each time you press the SLEEP button th...

Page 40: ...icrophone s sound The MIC LEVEL control adjusts the volume for both the MIC 1 and MIC 2 at the same time Caution Always set the MIC LEVEL control to MIC when connecting or disconnecting the microphone Remote Control Display Karaoke indicator Echo indicator VOLUME KEY CONTROL I i ECHO SHIFT 1 2 3 4 5 6 7 8 9 REC PAUSE 10 10 FM AM A B DISC FM MODE PLAY MODE 7 DISC DISC VOLUME SHIFT SLEEP ECHO RM SEV...

Page 41: ...ears on the display 5 Turn the MIC LEVEL control and the VOLUME control to adjust the micro phone level and the speaker output level 6 Sing into the microphone 7 To apply ECHO to your voice see Ap ply Echo to your voice on page 39 8 To adjust the music key see Adjusting the Music Key Control on page 39 9 To record your singing along see Re cording Your Singing Along on page 40 10 When finish singi...

Page 42: ...BC function see page 22 To play tapes see pages 27 to 29 4 Press the MPX V REPLACE V MASKING button to choose the mode you want to sing along 5 Turn the MIC LEVEL control and the VOLUME control to adjust the micro phone level and the speaker output level 6 Sing into the microphone 7 To apply ECHO to your voice see Ap ply Echo to your voice on page 39 8 To adjust the music key see Adjusting the Mus...

Page 43: ... key press the KEY CON TROL i button repeatedly 4 To Cancel the key adjustment press the KEY CONTROL buttons I i until KEY 0 appears on the display On the Remote Control 1 While pressing the SHIFT key proceed with the following procedures 2 Press the KEY CONTROL buttons I i repeatedly 3 To lower the key press the KEY CON TROL I button repeatedly 4 To raise the key press the KEY CON TROL i button r...

Page 44: ... pages 37 and 38 5 Turn the MIC LEVEL control and the VOLUME control to adjust the micro phone level and the speaker output level 6 Sing into the microphone 7 To apply ECHO to your voice see Ap ply Echo to your voice on page 39 8 To adjust the music key see Adjusting the Music Key Control on page 39 9 Start recording Ensure that a tape has been inserted into Deck B to be re corded For further deta...

Page 45: ... turned on for a few hours until the moisture evaporates unplug theAC power cord and then plug it in again General Notes In general you will have the best performance by keeping your tapes CDs and the mechanism clean Store tapes and CDs in their cases and keep them in cabinets or on shelves Keep the Cassette Deck s tape doors and the CD trays closed when not in use Cassette Tapes If the tape is lo...

Page 46: ...ote Control and the sensor on the Unit is blocked The batteries have lost their charge The main AC power cord is not plugged in The CD is upside down The built in microprocessor has malfunc tioned due to external electrical interference During tape playing the power cord was unplugged VIDEO OUT select is unmatching The MPX sound Vocal Masking or Vocal Replace function is in use When you pause or a...

Page 47: ...MHz AM Tuner Tuning Range 531 1 602 kHz at 9 kHz channel space 530 1 710 kHz at 10 kHz channel space Dimensions 265 315 340 mm W H D 10 7 16 12 7 16 13 7 16 inches Mass 7 2 kg 15 9 lbs Speaker Specifications SP V608 SP V688 SP V608 Silver in colour SP V688 Gold in colour Type 3 way 3 speaker bass reflex type Magnetically shielded type Speaker Tweeter 2 cm 13 16 inches dome 1 Mid range 5 cm 2 inche...

Page 48: ...s with the position of the voltage selector switch provided on the outside of this equipment and if different reset the voltage selector switch to prevent from a damage or risk of fire electric shock IMPORTANTE para la línea de la red CA ANTES DE ENCHUFAR EL EQUIPO compruebe si la tensión de la línea de la red CA corresponde con la posicióndelselectordetensiónsituadoenlaparteexterior del equipo y ...

Reviews: